Navigation: Hope Springs Eternal uses basic point and click navigation. Arrows will show you what directions you may move. A magnifying glass will show when you can examine something closer. Gears show that there is an inventory item needed to solve the puzzle. A hand appears to pick up items, or to open things.
Inventory is accessed at the top of the screen. A speech bubble will appear when you can speak to a character. You should always exhaust all dialog possibilities. Take time to look around, this game has lots of beautiful detail.
You may save your game at any time. There are unlimited saves available. There are 6 puzzles in the game. If you are having serious problems working out the solutions, there is a by-pass button on the lower right of the screen that will solve the puzzle for you so that you can go on. The puzzles aren’t horribly difficult so give them a shot before using the by-pass.
Home
There is a letter on the table. Pick it up and read it. You’re writing a letter to Lovisa. You rent this flat from her. The letter lets you know that you are trying to run a detective agency that you took over from Conrad, but business is not good so far. Maybe you’ll have something more interesting to add to the letter later. Stand up and investigate the room. There is nothing special to do here, but the graphics are nice. Enter the bedroom you can see through the open doorway. Turn left and open cabinet with plant on it. There are scissors inside, go ahead and pick them up. Turn until you face the doorway, near the angel on the way. Go through into the entryway.
Look at the front door. Pull the string on the jumping jack. Oops! Pick the jumping jack off the floor. We will have to fix that. Turn left and enter kitchen to look for something to rehang the toy. The counter to the right has a phone and a dead answering machine. The batteries are dead and the recharger is broken. The table on the left has a newspaper with your ad in it. Pick up newspaper. Look past the table to the blue cabinet. Open cabinet and pick up hammer. Look at hammer in the inventory. Luckily a nail came with it so you don’t need to find one. There are other things to look at in the kitchen, but they aren’t necessary to complete the game.
Exit the kitchen, back into the entryway. You can check out the WC on the right if you like. Again its not necessary for finishing the game. Rehang the jumping jack on the front door by placing the hammer on the gears that show on the door. That put a nail in the door. Now place the jumping jack on the nail. Turn away from the door and the telephone in the kitchen will ring. Go answer the telephone. Katarina Vogel, Conrad’s sister, wants your help. She asks you to come over. Exit through the front door to a map. Click on Katarina’s name.
Katarina’s Apartment
You will arrive in her apartment. Go through all the dialog options. It seems a fellow teacher has gone missing the past three days and Katarina is worried about her. She asks you to find out if anything is wrong with Anna Bergion. You will exit to the map, click on Anna.
Anna’s Apartment
Go through passageway turn left and face orange building. Pick up the bottle by the small door. Open the door by the #6 light. Look for Anna’s flat by reading the names on the mail slots. Her flat is the second flat. Ring the bell, no one answers, you’ll need to find a key. Exit the building. Talk to the caretaker by the wheelbarrow. Exhaust all conversation possibilities. Try and take the keys from the wheelbarrow. He won’t let you, so find a way to distract him. Go back to passageway through the orange building. There is a magnify glass cursor in the middle of the passageway. Click on magnifying glass and see gears. Place the bottle in the newspaper. Hit the newspaper with the hammer. Place the broken glass on the ground. Go back and report the broken glass to the caretaker. Turn away and the caretaker will go to clean up the broken glass. Take the keys from the wheelbarrow. Go back Anna’s apartment and unlock the door with the keys.
In Anna’s apartment turn left and see chest. Get the photo of Anna from chest. Close chest and turn left, open brown door. This is the bathroom. Get pencil from on top the magazine on the floor. Pick up and look at the latex gloves. You can’t take them right now. Exit the room, oops, it locked behind you. Turn and open the brown door opposite the bathroom. Move the wall hanging to see the living room. Take the key from the door. Turn right and go down the hall to the kitchen area. Turn right and see white door. It is locked. Open it with the key from the brown door. Take the pencil sharpener and look at painting. Anna signed it and dated it Sept 04. Note the symbol F. Put the painting back and shut the closet door. Note the painting on the wall. It is signed Anna Dec 04 b. Explore the kitchen area. Take note of the painting by the entry to the living room. It is signed Anna May 03 Y ( with 2 lines through it). Enter living room. Turn right and look in waste can. Animal burials on Tuesday?? Axel?? Who’s Axel?? Close can and look at painting over can. Anna May 03 Y ( with 2 lines through it). Turn toward desk. Examine the typewriter and the recipe in the typewriter. It seems that this typewriter drops the letter n. Look at sheet of paper. There are impressions where someone wrote on it. Sharpen the pencil with the pencil sharpener and use it on the paper to make the writing legible. We need to look for an October painting. Back away from the desk and turn right. Go forward and check the telephone and answering machine. There are no messages. Turn left and examine bed. There’s nothing there. Turn around and look at the cabinet with the guitar leaning on it. There are gears showing on the drawers, but you can’t do anything yet. Turn right and examine painting over blue couch. It’s the October painting, take it with you. Note the signature Anna Oct 04 0. Exit apartment. Carol says she’ll leave the door unlocked for now. Don’t forget to return the caretaker’s keys to the wheelbarrow. Exit through passageway and back to the map.
Kiosk
Go to the Kiosk and talk to Stina. Again exhaust all dialog options. Now you have an idea where the pet cemetery is located. Exit to the map and click on the West Side.
The West Side
Follow the path past the yellow building. Follow the walkway over the water until it turns to the right. At that point turn left and note handbag sitting on rails. You can’t reach it right now. Turn back to the right and continue around the water. Follow the path until it splits at a small waterfall. Take the left fork of the path up to the first landing. Turn left and go into a seating area. Take the roll of tape from the bench. Turn around and go back to the stairs. Turn left and continue up the stairs to the street. Continue down the road between the yellow and orange buildings. You will need to turn left at the T in the road. There is no option. Continue past the human cemetery to the end of the parking lot. You will turn left at the big tree and go down a grassy path. There is groundskeeper working in the pet cemetery. Go through all the dialog options. Go back to the parking lot area and turn left. You will get an exit icon that will send you back to the map. There is now a Pet Cemetery location on your map.
Katarina’s Apartment
Go see Katarina and see if she knows anything about the October painting. She will tell you about it and the Axel that lived 200 years ago. There is now a Lofstad Castle location on your map. Go visit the castle.
Lofstad Castle
Go down the dirt road three clicks and turn left to see the castle stables. Note the AFHCD 1783 engraved on the building. Turn around and see the path split around the castle. Take the fork to the left and enter the castle courtyard. Note the letters AFHCDG 1753 on the front of the castle. Turn left and see guide sitting on the bench. Speak with her, if you can get past staring at the yellow jewel on her forehead. You need a ticket to enter the castle. To get a ticket you must pass a quiz about the castle. There is an ATM looking machine in the wall opposite the guide. This is where you need to take the quiz. But first you need to look around the grounds to learn more about the castle. When leaving the guide turn right three times to see a walkway between buildings and the quiz/ticket machine on the wall. Go forward twice and through the metal gate. This is the castle grounds; follow the path down to the grounds. Turn left and follow the path around the castle to the left. Go as far as you are allowed and then turn right, away from the castle. The path will zigzag back and forth. Follow the path until you see a red flyer on the ground. Pick up and read flyer. There have been concerts at the castle since 2001. Continue down the path. There is a Y in the path at the pond. Go to the left, take the little bridge and look at the monument. It reads the 20th of June, 1810. Turn around and go back over the bridge, stay on the path to the left. You will end up in an area with exits to the map straight ahead and to the left, so go right. There will be another fork in the path. Stay to the left. Follow the path until there is a small trail to the left. It is just before the path comes out in front of the castle. Follow the small trail down to the summer house. Note the Swedish flag on top of the summer house. Turn around and follow the trail, turn left where it joins the main path. Follow the path back to the stable area. Turn around and take the left path into the castle courtyard. Go to the main door of the castle and turn right. Go toward the ticket machine. Click on the silver panel to the lower right of the ticket machine. This is one of the puzzles that it is possible to bypass. The goal of this puzzle is to push the buttons in the correct order. The buttons will stay down and lit, if the order is correct. If you make a mistake the buttons will reset. Hint start with the second button. The solution is 25143. The ticket machine is now on, go and take the quiz. The answers are all available throughout the castle grounds. The answers are 1C 2A 3E 4D 5D
To finish the quiz there is a slider puzzle. This is another puzzle that can be bypassed if you wish, but give it a try first. Start with the top row and get them in their proper places, the bottom right will be empty when the puzzle is done correctly. Take your ticket. Turn around and give it to the guide. What is wrong with her??? Take the yellow jewel that she offers you. Turn right and enter castle. Follow the red carpet. Turn left at T. Read the two plaques on the walls; make sure you click on the one with the X. This will allow you to go into the cellar. Go back down the hall, past the entry wall. Read the information plaques on the walls. One of the plaques will tell you that Axel’s lucky number is 211. You can visit upstairs if you wish, but it isn’t necessary to finish the game. Go to the end of the hall. Turn right and see locked white door. Turn left and see old toilet, turn left again to enter salon. Go into next salon toward green chair. This will take you to the left and into the next room. Turn to the right and see a locked table. Enter Axel’s favorite number and press large square button. Take the key and turn to the right. Go forward one click toward the green wall, and then turn right. One click forward and you will be at the locked white door. Use the key from the table to unlock the kitchen door. Pick up the matches from the table. Exit kitchen and go down hallway, past the staircase to the left and back to the entryway on the left. The front door to the castle will be open. Don’t leave the castle. Turn to the left and face the small gray door. It leads to the cellar. Go down the stairs, oops its dark. Use the matches to light the lantern. Explore the cellar, note the X on the wall, poor kid. Back up from X and turn right twice. There is a map of the grounds on a chest. Read the map, and click on it until Carol says something about the secret meeting place. Go back upstairs and exit the castle. Go straight ahead, out the gates to the stable. Turn left at the stable, go forward three clicks and turn right. There is now an arrow leading into the trees. Keep going until you find a mound of rocks. Turn right and see a bag in the grass. Open the bag and find a letter to Axel from Anna. They are suppose to meet at a cottage in Finspong. Turn around and exit back to main road. Exit to map.
Anna’s Apartment
Let’s go back to Anna’s apartment to look for information about the cottage. Something fell when we entered the apartment. Read the mail that has been delivered. Something from the prison? Go into the living room. A plant fell off the window sill, revealing a small purse. This is the third puzzle that may be bypassed. The goal of this puzzle is to move all the buttons to the left to unlock the purse. The solution is: Numbering from1-3 across the top and 4-6 across the bottom, 54663. Get the key from the purse. Turn and use the key and the drawers under the rocking horse. The drawer on the right reveals a letter from Axel that was typed on Anna’s typewriter. The drawer on left reveals the fourth puzzle. Note that the symbols on the drawer are like the ones the Anna put on her paintings. Go by the dates of the paintings to find the order of the symbols. The order is Yf0b. Look at ring and read the contract to find the address for the cottage. Exit the apartment building. Go through the passageway and exit back to the map. There is a new location, The Cottage.
Katarina’s Apartment
But first go ask Katarina about Anna and the prison. She’ll give you some information on Anna’s job there, then go to the cottage.
Cottage & Kiosk & Anna’s Apartment
The backdoor is locked. You need to find a key. Visit the Kiosk for hints on the cottage and the West Side handbag. Go back to Anna’s apartment.
The caretaker is there. Humor him and you will go to Anna’s apartment. Check the telephone answering machine. The chimney sweep left a key under the mat at the cottage. Go to the cottage.
Cottage
Go behind the cottage and turn to face the green door. Move the mat and pick up the key. Replace the mat and unlock the door. Turn right and enter the living room. Read the note on the table and pick up the telephone. Anna plans on meeting Axel in Spain. Turn left and go forward. Hear strange noises upstairs. Turn left and go upstairs. Look out open window. There’s no one there, turn and look in other room. There are two hotspots on the bed. One shows the nightstand with a key like yours and a watch from the Animal Cemetery Committee. The second shows a newspaper. Exit the cottage and go back to the map.
Pet Cemetery
Go to the pet cemetery and ask the caretaker about the watch. Two new sites will be available on the map, the police station and the library. But first notice the hoe leaning against a tree. Borrow the hoe; you need to go fishing for a handbag. Go back to the West Side, face the handbag and reach it with the hoe. Take the library card from inside. Go back to the pet cemetery and return the hoe. Exit back to the map and go visit the library.
Library & Kiosk
Use the library card and click on the keyboard to read info about Axel’s conviction. Take library card and exit back to the map. Go to the kiosk and ask for a phone book. You will find the address for Axel’s lawyer on the third page. Exit to the map and go visit Urban Nystrom.
Urban Nystrom’s House
Knock on the door. A lady answers the door and says that she is already a member? A member of what? Knock on the door again. She’ll comment on the yellow jewel on your forehead and then let you into Urban’s den. Look around there is a lot of detail to appreciate. Near the computer note the battery charger, don’t take it yet. Turn right to face the door. Look at the boxes on top of the storage cabinet. Oops, you can’t reach them. Note the gears at the bottom of the storage cabinet. You need to place something there for you to stand on. Turn around and pick up ugly chair. Turn and place ugly chair where the gears were located. Stand on chair and reach green box. This is the fifth puzzle. The goal is for all the parts of the picture to become visible. Each section of the puzzle interacts with other section of the puzzle. It is similar to the purse puzzle at Anna’s apartment. If you have problems you can by-pass the puzzle. My solution is Middle, Upper Middle, Upper Left, Middle Left, Middle, Upper Left, Lower Right, Lower Left.
Once you open the box, there are notes about Axel’s case and how he may have been framed. Who would have place the Digoxin in this apartment? You will need to visit Nisse’s junkyard and find out if they made a key to his apartment. Exit the room and visit the Kiosk.
Kiosk and Nisse’s Junkyard
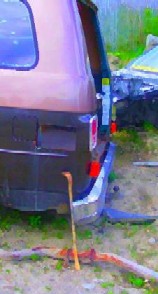
You need an address for the junkyard. After you speak with Stina the junkyard will appear on the map. Go visit the junkyard. When you enter Nisse’s junkyard go forward and enter the blue building on the right. Speak with Nisse. He has a rather inflated opinion of himself. But the important thing to discover is that he needs batteries for his MP3 player. Exit building and turn right, turn right again to see gray door on the outside of the blue building. The door is open but stuck. Turn right and go forward toward the blue car. Turn right and enter the wrecking yard, search the cars for something to open the door. After you find the crowbar go back to the gray door in the blue building. Try the crowbar on the door. Oops, you can’t do that yet, he might hear you. Go back to the entrance of the junkyard and exit back to the map.
Home and Urban’s House
Go home and enter the kitchen. Remove the batteries from the answering machine. They are uncharged. To charge them, leave home and exit to the map. Select Urban Nystrom’s home, there was a battery charger on the desk. Go to the back of the room. Turn right and pick up battery charger. Put batteries in charger. Turn left and plug charger into the pwer strip that is on the floor. It will take time for the batteries to charge. Leave the room. This will put you back to the map. Return to Urban’s home. His wife will answer the door with a letter from Urban’s boss, Lotta. Read to letter to find out that someone has been embezzling from the company. Lotta arranged to meet Urban on the day of her murder. After you read the letter you will automatically go to Urban’s den. Pick up the now charged batteries. Exit the room back to the map. Select the junkyard as your next stop.
Nisse’s Junkyard
At the junkyard two clicks forward and a turn to the right will put in front of the blue building. Enter the building and turn right. Give the batteries to Nisse. He won’t be able to hear you now. Exit the building, go forward 2 clicks, turn right, forward one click and turn right again. You should now see the red building. Go forward twice and turn right to return to the gray door. Nisse should be occupied now and unable to hear you break in. Use the crowbar on the door.
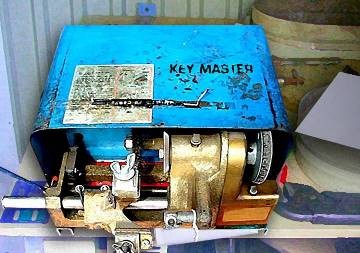
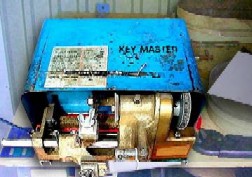
Opening the door reveals a hidden key cutting machine. Barely sticking out from under the machine is and unsent envelop. Open the envelop and read the note. There’s definitely a touch of blackmail going on. Pick up gold key. To the right of the key master is an sheet of blanks. Match the gold key to the blanks. It lines up with A.W. Is it Axel’s key? Exit back to the map. Go check out the address on the envelop, 142a Risselgatan.
Risselgatan 142a
The front door is locked. Turn left and go the side of the building. Turn right and go down the stairs to the basement. Turn and open the first door on the left. Turn left again and look in the dark corner. There is a screwdriver on top of the papers on the floor. Leave the room and look at the bulletin board directly across the hall. There is a note says that the main fuse is broken and needs to be fixed so that the front door opens. Turn left and go forward twice, on the right is the fuse box, however its locked and needs a key to be opened. Continue forward to the gold door on the right. Open the door to the bathroom and pick up the gold key on the floor. Go back to the fuse box and unlock it. There are bare wires that need to be fixed. Bare wires can’t be handled with bare hands. Where were those latex gloves?
Anna’s Apartment
Exit and use the map to go back to Anna’s apartment. When you get back to Anna’s apartment, enter the door and turn left. Click on the left brown door. The bathroom door locked behind you when you last left. To fix the door use the screwdriver on the lock. Enter the bathroom and get the latex gloves. Exit back to the map and go to Risselgatan 142a.
Risselgatan 142a
Go back to the basement and the fusebox. Open the fusebox and click on the wires. A few sparks later they are twisted together. Use the scissor to cut a piece of tape from the roll. The use the tape piece to finish the wire repair.
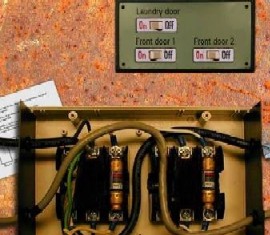
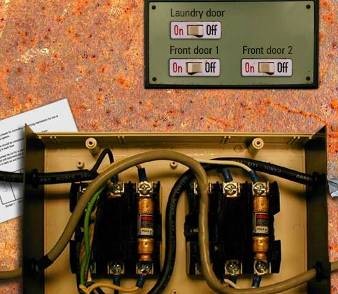
The fuse box is the 6th puzzle that has the by-pass option. You can by-pass if you like, but its not so hard. There is a piece of paper behind the wires leading to the fuse box. It has directions on how the fuses work. You will need a good fuse in slots #3 and #6. That is the front door and the main fuse. Fuse #3 is blown. You know that from the note on the bulletin board that said the main fuse is blown. So put the Fuse #1 in slot #3 and fuse #2 in slot #6. Now you need to set the switch for the front door to the off position. That turns off the locks. You press the switch so that the lower side is toward the off. Go to the right and back up the stairs. At the top of the stairs turn left. Go in front of the building and try the front door again. It should now be open.
Per Vegander has the first door on the left. Ring the bell and try to talk to him. He sure doesn’t remember much. Why did he set up Axel? Exit the building and turn right. Go forward a few clicks and you can exit to the map. Its time to talk to the police.
Police Station and Library
The police will arrest Per Vegander. Go to the library, use the library card on the computer and then click on the keyboard to read the lastest newsclippings on Per Vegander’s arrest. Its really not very nice for a lawyer to set up his client for a crime that the lawyer committed. Take the library card and exit to the map. That’s all you can do for now, so perhaps you should go home.
The Ending
As you enter your apartment Axel’s cell phone rings. Anna is planning on meeting Axel at the Viking terminal. Go and tell him that his name has been cleared. The Viking terminal is now available on the map. When you get to the terminal go forward into the building. Axel is sitting on the right. After you speak with him you will automatically go back to the map. Go visit Anna’s apartment and see if she is there. Speak with her and the end sequence will start. You will end up back at your apartment, finishing your letter to Lovisa. As you finish the mail arrives. There are 2 items, a postcard from Axel and Anna. It looks like they are doing well. You also get a letter from Urban’s wife Edit. It seems he is not really dead, but has disappeared while investigating the Draghat society. Is this a hint about the next Carol Reed mystery…
|