Navigation: NiBiRu uses the same cursor to examine, pick up and use items. I think the original intention was for the right mouse button to be used for examining and the left mouse button for picking up and using items. However, this concept is not consistent in this game so I have detailed whether a right click or left click will work in each situation.
Inventory is accessed at the bottom of the screen. A speech bubble will appear when you can speak to a character. Topics to discuss will be displayed at the bottom of the screen where the inventory normally resides.
The most important tip for this game is to save before attempting to solve any puzzles. The majority of the puzzles do not have a reset button. .
Let the game begin...
Prague
Charles Bridge -- Examine the statue. Speak to the painter. He needs to finish his painting before speaking to you. Examine the painter’s stand. Speak to the painter again. Ask about Barbora. He will give you some information. Speak to him one more time. He drew a portrait of a suspicious man who was there at the same time as Barbora. Martin will pay for the portrait to get more information. Examine the pedestal of the statue. Right click on the pedestal to have Martin look closer. Find the piece of paper. Examine paper in inventory. Barbora thinks she’s being followed. You need to contact the professor. Right click your phone in inventory to call the professor. The professor will give you the address and you will be transported there automatically.
Outside Barbora’s House -- Try to enter the front doors. They are locked. Click again on the front doors and you will have access to the doorbells. Only one doorbell is accessible to you. Ring it twice and Martin will decide to try other doorbells. Left click to pick the bell on the left with no label. The man will let you in.
Barbora’s Lobby -- Examine the letter boxes on the left and right. Martin will tell you they’re empty except for some commercial spam. Right click on the letter boxes and find Barbora’s box. Examine the notice board by the door. Use the elevator and automatically go to Barbora’s floor.
Barbora’s Hallway Upstairs -- Click on the double doors. This is Barbora’s Flat. Click on the doorbell. The lights go out inside. Click on the doors and Martin will knock.
Knock again and Martin will determine he needs to find another way in. Enter the stairs leading to the attic. The door is locked. Use the elevator to go to the lobby.
Barbora’s Lobby -- Right click to examine the notice board again. Martin will find a new notice. The keys to the attic are on the highest floor near the fire extinguisher.
Barbora’s Lobby -- Examine the notice next to the fire extinguisher. You now have the key to the attic.
Barbora’s Attic -- It’s dark. Click to the right of Martin. He will turn the light on. Examine the shelves on the right. Take the rag. Take the rope hanging on the wall.
Examine the stove. Examine the wardrobe. Left click on the bricks holding the wardrobe up. The wardrobe will collapse. Click on the hole in the floor. You will now have a marble. Left click on the window. Use the rag on the window. Use the rag on the window again to remove the broken pieces of glass. Use the rope on the beam. Left click on the window and Martin will climb out. He gets hit on the head and blacks out.
Barbora’s Apartment -- Right click on the television set and the round table. Left click on the purse on the floor. In inventory, right click on the purse to open it. You have Barbora’s ID card for the archives. Left click on the computer. You need a password. Enter that bathroom and find Barbora’s body. Right click on Barbora. Right click on the sink. Right click on the cat. The cat’s name is Felix. Go back to the computer. Type Felix and access the computer. You find the file on Bohemia. You get a phone call from your uncle. He tells Martin to get out of there. Automatically exit through window.
Barbora’s Lobby -- exit the front door.
Outside Central City Archive -- Conversation with uncle. You need to get permission to access the mine site. You need the report on the discovery. Go towards the building. Try to talk to the old gentleman. He can’t hear you. Enter the building.
Archives Lobby -- Speak to the doorman. Exhaust all conversation. He will not let you in with a visitor’s pass or an official appointment. Exit the building. Speak to the old man again. Use the “Exit to Park” option and Leave the area. You will be in front of the Bureau building. Go to the left to the kiosk.
Kiosk -- Try to enter the subway. A little girl above has thrown some firecrackers. Use the marble with the little girl. She will trade you for the firecrackers. Speak to the saleswoman at the kiosk to purchase some matches. Go back to the archive.
Outside Archives -- Try to talk to the old man again. Use the firecrackers on the old man. Martin will set them off at the end of the bench. The old man has his hearing aid on. Ask about the archive. You find out that the doorman is his nephew. He will help you get in if you get him a good bottle of red wine. Go back out to the bureau building.
Kiosk -- Speak to the saleswoman. She only has boxed wine. Purchase it.
Outside Bureau Building -- Speak to beggar. He won’t speak to you unless you buy him cigarettes.
Kiosk -- Speak to the saleswoman. Purchase cigarettes.
Outside Bureau Building -- Use cigarettes on beggar. He now owes you a favor. Ask him for one of his old wine bottles. Left click on the bottle all the way to the right. In inventory, combine the boxed wine with the bottle.
Outside Archives -- Use the wine bottle on the old man. He gives you his ID card to show to his nephew.
Archives Lobby -- Use the old man’s ID card on the doorman. You now can access the building. Barbora’s office is in the basement – door #24. Exit to the middle of the lobby. Use the elevator to get to the basement.
Archives Basement -- Use Barbora’s ID card on the card reader.
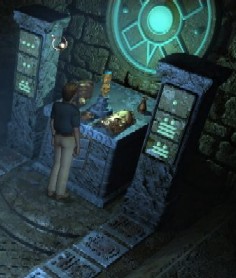
Barbora’s Office -- Right click on the filing cabinets. Right click on the flower near the computer. You now have a small key. Left click on the computer. It needs a password.
Exit out and left click on the table. Left click on the pencil holder and get a pencil. Right click on the cat picture. Notice it’s upside down. Find a pencil sharpener. Left click on the sharpener to collect. Combine the pencil and sharpener in inventory. Use the sharpened pencil on the notepad. Left click the notebook to see some numbers written down. Use the key with the desk drawer. Take the stamp & pad. Left click on the computer again. Type Felix in backwards or XILEF. Martin will print something out. Left click on the printer to take the report. In inventory, combine the stamp with the report. Right click on the report and Martin will tell you it now fulfills all prerequisites.
Archives Basement -- Left click on the mechanical elevator. Use Barbara’s ID card with the mechanical elevator and then immediately use the piece of paper with the code on it. Left click on the mechanical elevator and get the documents. Right click on the documents in inventory to examine. Left click once they are in view. Martin will read the front cover. Exit the building and go to the Bureau Building.
Bureau Building -- Enter front doors and speak to the secretary. She won’t process your application until the day after tomorrow. Try to enter the President’s office. She won’t let you in. Speak to the secretary again. You will get her call card. You need to get rid of her. Exit the building. Speak to the beggar again about the secretary. Find out which car she drives. Right click on the silver Mercedes out at the street. Get her license plate number. In inventory, use the secretary’s call card on the cell phone. The secretary leaves. Enter and go the President’s office immediately. Martin will automatically speak with him and get the permission he needs.
Western Bohemia
Camp Entrance -- Speak to the Major. Exit to further on in camp. Cross the bridge to the trailer.
Trailer -- Speak to Peter Stasek on steps of trailer. He has been unable to access the mine either. Exit to the Cabin. It’s locked. Exit to the mine.
Mine Entrance -- Speak to the soldier. Learn that there is more than one section in the mine. He will not let you enter.
Trailer -- Speak to Stasek again. Exhaust all conversation. Return to the front of the camp.
Camp Entrance -- Speak to the soldier guarding the entrance of the camp. Go back to the mine entrance.
Mine Entrance -- Speak to the soldier guarding the mine entrance. He still won’t let you in. Speak to him again and talk about the permission papers. He tells you to go away. Go back and speak to Stasek again. Stasek has a plan to get inside the mine with your help. It is now night.
Trailer -- Enter the trailer. It’s empty. Stasek is missing. Left click on the canned beans to take them. Left click on the coat. Right click the coat to examine further. You will now have a piece of paper with D282 on it. Left click on the can opener to take it. Exit the trailer.
Mine Entrance -- Go to the mine entrance. Martin will comment that he can’t get any closer and that there’s too much light. Looks like you’ll need to do something about that.
Camp Entrance -- Click on the lamp on your way there. Speak to the soldier at the front entrance. He’s tired and hungry. Learn about the lighting system and the old cabin. Leave the area and come back. The soldier will ask Martin to get him some food. Go back to the trailer.
Trailer -- Use the matches on the stove. In inventory, use the can opener on the beans. You’ll need something else. Go to the bridge and take the mushrooms at the edge of the bridge. Go back to the trailer. Use the mushrooms on the open can of beans. Use the opened can of beans on the stove.
Camp Entrance -- Bring the beans to the soldier. He will eat the beans. Leave the area, go over the bridge and then come back. The soldier is sick and runs off.
Major’s Tent -- Enter the Major’s tent. Right click on the Major’s uniform. Get the set of keys. Left click on the hand held radio to collect it. Exit the tent. Go to the old cabin.
Old Cabin -- Use the keys on the cabin. Left click on the locker. It is rusted. Left click on the hammer to take it. Left click on the tool bag to take it. Right click on the bag in inventory to get its contents. Left click on the rope to take it. Left click on the generator and the generator lid. Use the screwdriver on the lid to pry open the lid. You hear a ringing sound coming from the locker. Use the hammer on the lock. Left click on the locker to open it. Left click again to find a dead man. Right click on the corpse to identify him. He is the real Peter Stasek. Left click on the generator lid. Martin will tell you it’s the wrong switch and turn it back on. Click on the generator lid again to hit the correct switch. Martin will automatically run and hide under the trailer. The mine guard will walk past. Martin will automatically enter the mine.
Front Section of Mine -- Left click on the roots and the red sign to examine them. You have 2 choices of direction – either the corridors to left or right. Choose the left corridor. Left click on the cave-in. It’s completely blocked. Go back to the entrance. Left click on the rod sticking out of the barrel. You’ll need a tool to remove it. Use the wrench on the rod. Take the left corridor again. Use the rod on the cave-in. Left click on the crevice. Use the flashlight on the crevice. Find the body of a dead soldier. Left click on the pin on his jacket. The pin is now in inventory. Right click on the pocket and receive a set of keys. Go back to the entrance. Choose the right corridor.
Back Section of Mine -- Left click on the cogwheel. Left click on the cramp. Click again and Martin will take the cramp. There are 3 directions you can go at this point.
Take the left corridor. Left click on the crate. Left click on the trap door beneath. Click on the small opening to the right. It looks like something is missing. Left click on the heap of earth below the opening. Use the cramp on the heap of dirt. Find the Valve Control Wheel. Use the Valve control wheel on the opening. Left click on the wheel and the crate will be lowered. Take the hook. Exit back out to the crossroads. Choose the corridor in the middle. Left click on the air vent. Left click on the door mechanism. Left click on the center panel. It will open and a keyhole appears. Exit out to the crossroads. Take the right tunnel. Left click 2 times on the water. Use the flashlight on the murky water. You see a can full of oil. In inventory, combine the rope with the hook. Use the rope/hook combination on the oil can. It’s now in your inventory. Exit back to the crossroads. Take the center corridor. Left click on the door mechanism. Use the keys on the center spot. The left piece is stuck. In inventory, use the can of oil on the hand oiler. Use the hand oiler on the stuck metal part. Now you need to move each of the pieces into position. If you exit out and look above the door, you will see the Nazi symbol you need to recreate. Below is a picture of the solution.
Door will open and Martin will enter a dark room. The flashlight burns out.
Dark Corridor -- To the left of you is an unknown object. Left click on it. It is a lamp. Use the matches on the lamp. Left click twice on the lamp and Martin will use it. Left click on the generator engine. Left click on the lever above the engine. Left click on the left valve control. Martin will turn it. The right valve control is stuck. Use the hand oiler on the valve control and left click again. It’s still stuck. Use the wrench on the valve control and left click it again. Move to the left and left click the lever above the engine. The generator is now working and you have light.
Main Corridor -- Continue straight through the corridor. Left click on the sign on the right wall. It tells you right wing is archives and left is stack room or storage. Left click on the rat hole below the sign. Turn left at the first intersection. Left click to examine the crates and barrels. Try to enter the doors at the end of the hall. They’re locked. Use the keys on the door. Enter the storage room.
Storage Room -- Left click on the mechanism on the wall. It’s a meter to show levels of oil & pressure in the pipes. Left click to examine the tank. Left click to examine the battery. Left click on the test tubes at the back of the room. Martin will take one. Left click on the crate on the right. Use the cramp on the crates. Left click on the dynamite to take them. Enter the first gated area marked SA-44 on right. Examine the boxes. Martin will take a light bulb. Left click to examine the cans. Martin will take one of the cans of kerosene. Exit the storage room and go straight across to the archives room.
Archives Room -- Use the keys on the door. The key breaks off. Go back to the storage room.
Storage Room -- Left click on the battery. Use the test tube on the battery to get some acid. Go back to the archives door.
Archives Room -- Use the acid on the door. Enter the archives room. Remember the piece of paper you found with D2 82 on it. This is the archive location you need to find. Left click on the archive boxes on the left. Martin will examine them more closely, Use the piece of paper with the drawer marked D2-82. Left click on the small metal case. Right click on the box in your inventory and find the magnets. Exit out and continue on into the archive.
Archives 2nd Room -- Left click on the Nazi flag. Left click on the table. Left click on the ruler to take it. Left click on the box to take it. Left click on the records book. Left click on the document to the right of the microphone. Left click on the radio to examine. Left click on the magnifying glass in the bottom slot of the brown box to take it. Exit the table. Left click on the hoist platform. Left click on the ladder above it. Left click on the levers. They control the hoist. Left click on the light. It doesn’t work. Right click on the light to find out the bulb is missing. Use the light bulb on the light. Left click & right click on the iron cabinet. At the bottom of the cabinet, left click on the groove. Left click on the cabinet again and Martin will move the cabinet out of the way. Left click on the secret wall. Use the cramp on the secret wall. Martin will hack away until there is a crevice. Left click on the crevice. Use the dynamite stick on the crevice. The fuse is too short.
Storage room -- Get another stick of dynamite. In inventory, right click on the dynamite and Martin will pull the fuse out.
Archives 2nd Room -- Go back to the secret wall and use the fuse on the stick of dynamite. Use the matches on the dynamite. Martin will go and hide. Hear the dynamite go off. Left click on the crevice to see that the charge was not sufficient to destroy the door. You will need something to use with the dynamite. Remember the rat hole? (I hate this part). You will need to catch a rat. In inventory, use the can opener to open the beans. Combine the small box, ruler, and opened can of beans.
Main Corridor -- Go back into the hallway and use the rat trap on the rat hole underneath the sign. Go far enough away to change screens and then return. You will see the rat being trapped. Left click on the rat trap to collect it. Right click on the trap in inventory to get it out of the trap.
Storage room -- Get a stick of dynamite. In inventory, use the rat with the stick of dynamite. Martin will automatically tie it together.
Archives 2nd Room -- Go back to the secret wall in the archives room. Use the dynamite/rat with the crevice. No need to light. Martin will do that. It ignites and the door opens.
Secret Room -- Left click on the switch near the door to turn on the lights. Left click on the bed. Left click to examine the shelf. Left click on the wall picture. Left click twice on bookcase. Left click on iron cover. You will need to find a key. Left click on record player to hear some Beethoven. On the desk, left click on the iron to take it. Left click on the books to examine. Left click on the journal to take it. In inventory, right click on the journal to hear the original author read the contents. You will hear that he has locked his notes up and threw the key in the drain at the lab. Exit out of the archives back to the main corridor. Choose the straight path.
Lab Corridor -- Left click on the box on the wall. There is a large triangle inside an eagle. You need to use the magnets on the triangle. Now you will have to arrange all the magnet pieces to fit inside the large triangle. Pieces can be rotated by right clicking on them.
Press the red button and enter the elevator.
Lab -- Right at the entrance to the lab, left click to examine the drain on the floor. The key is in there. Left click on the table and automatically get the magnet. In inventory, combine the magnet and the string. Use the magnet on the drain. You now have the key.
Secret Room -- Use the key on the iron cover. It opens. Left click to access the safe. You need to find the combination. In inventory, use the magnifying glass on the unopened book. Martin will remark that there is a suspicious spot. Right click on the book and go to the last page. Left click on the suspicious spot. The paper is different. Perhaps we could use some steam on it. You do have an iron in inventory but you’ll need to heat it up.
Lab -- Left click on the burner. It has no fuel. Use the can of fuel on the burner. Use the matches on the burner. Use the iron on the burner. In inventory, right click to open the journal. Go to the last page and use the iron on the bottom where it is a darker color. Some numbers appear: 47922. Examine the diagram on the wall. Left click on the mechanism to examine. Left click on the large containers to examine. Left click on the pedestal. Go back to the secret room.
Secret Room -- For the safe puzzle, the left mouse button turns the dial clockwise while the right mouse button is counter clockwise. Enter the combination as follows where C=Clockwise and CC=Counter Clockwise: C4, CC7, C9, CC2, C2. The safe will open and a statue is revealed. Left click on the statue to take it. Exit the safe. SAVE YOUR GAME NOW. Exit the secret room. The fake Stasek confronts you with a gun. You will need to act fast here b/4 he kills you. He wants the status. Give it to him. Martin will throw the statue on the hoist platform. As soon as Stasek bends down, left click the lever on the wall next to the secret room entrance. The crate above will fall down and hit Stasek.
France
Hotel Lobby -- Enter the front door of hotel. Speak to the drunken guest at the reception desk. He’s waiting for someone named Daniel so he can make a joint reservation. Left click bell at reception desk. You’re told there are no rooms available. Exit the hotel and left click on the phone booth. You don’t need to make a call. Enter the hotel again and left click on the ash tray to find hotel matches. Right click on the matches in inventory to get the hotel phone number. Exit the hotel and go to the phone booth. Left click on the phone booth and Martin will call and cancel Daniel’s reservation. Enter the hotel again. You will automatically get a reservation. Go up the stairs to your room.
Hotel Room 24 -- Martin has rested. Exit the room and go to the lobby.
Hotel Lobby -- The clerk has looked up your Uncle’s phone number for you. Left click on the desk phone to call him. You uncle wants you to meet him at the house. It’s on an island so you’ll need to hire a boat. Exit the hotel and go forward to the docks.
Docks -- Speak to the fisherman. Martin will ask for use of his boat. He says he has to unload the boat first. Speak to the fisherman again. Speak to him once more and he will ask if Martin has changed his mind. Click on the smiling mask that appears at the bottom of the screen. Martin will help him unload. The fisherman takes Martin to the island.
Main Gate to Mansion -- Left click on the doorbell to gain access. Continue forward to enter the house.
Mansion -- Cut Scene of conversation between Martin and his uncle. You discover that you have one statue, your uncle has one and he now needs you to go to Mexico to get another one. Martin leaves his statue in his uncle’s safe. He must return in the morning to pick them up.
Outside Mansion -- Return to the Pier to meet the boat.
Docks -- Martin arrives at the docks. He’s called by someone and then gets hit on the head.
Warehouse -- Martin is now tied up in the warehouse. His foes are there and are after Project NiBiRu. During the conversation, you find out you are speaking to the author of the journal you found in the secret room. Martin gets hit once more. Only one of them is left – the fake Stasek. He has released gas in the room. He throws a knife at your feet and leaves. Martin has to get out quickly. Left click on the knife to pick it up. Use the knife on the red button next to Martin’s head. The gas is now off, but you still have to get rid of the handcuffs. Use the pin on the handcuffs. Left click on the green ladder and Martin will climb up and out of the building.
Main Gate to Mansion -- The police are in front of the mansion. Martin’s Uncle is dead. The police think it is a suicide. Martin must get in and find out what’s going on. You are allowed through the front gate.
Outside Mansion -- Speak to the detective. He has a suicide note. He wants proof that your uncle didn’t write it. In inventory, right click on the envelope your uncle gave you. You now have a letter and a plane ticket. Use the letter on the detective. You get permission to enter the mansion.
Mansion Front Room -- Left click on the body outline. Left click on the pyramid on the desk to take it. In inventory, right click on the pyramid. There’s a small opening which may be a lock. Go to the bookcase area.
Bookcase Area -- Left click on the photographs on wall. Left click on the poster above the fireplace. It says Tikal on it. Left click on the bust. Martin will move it and a safe will appear on another wall. You will need to find the combination somewhere. Left click on the telephone. Click on the red button to play the message. Listen to 2 messages. One of the voices sounds familiar. Notice how well you can see the number pads. Use them to translate the word Tikal to numbers. You should come out with 84525. Go to the safe and enter 84525. The safe will open and you find out the statues are gone. Click on the hourglass in the bookshelf. There is a little brass key in it. In inventory, use the knife on the hourglass. It will break and you now have the key. Use the key on the pyramid and you will get a map. Right click on the map to view it. Exit the area and leave the mansion.
Outside the Mansion -- Cut scene of conversation with detective again. Head to the main gate and the police officer will speak to you again. Martin will leave automatically.
Docks -- Head to the hotel.
Hotel Lobby -- Enter the hotel and see one of the men who tied you up in the warehouse. You’ll have to find another way to get into the hotel.
Back of Hotel -- Martin will immediately speak to Iris. Right click on the fire escape which is call the emergency staircase in this game. Left click on Iris’s walking stick. Left click on the ladder again and Martin will comment it is too high. Left click on the walking stick again. Iris will tell Martin to keep his hands off. Speak to Iris about the walking stick. She will let you borrow it if you get her a hot dog. Go to the front of the hotel.
Snack Shop -- Speak to the vendor to get a hot dog for 3 francs.
Back of Hotel -- Give Iris the hot dog. She hates mustard. You have to get her another one with ketchup.
Snack Shop -- The vendor does not have ketchup so you will have to get a plain hot dog. Now you need to find some ketchup.
Hotel Lobby -- Martin will not want to go in, but will do it if the plain hot dog is in inventory. Left click on the ketchup bottle to take it. In inventory, combine the ketchup and the hot dog.
Back of Hotel -- Give the hot dog with ketchup to Iris. She will lend Martin the walking stick. Left click on the stick to take it. Use the walking stick on the ladder to pull it down.
2nd Floor Hallway -- Use the stairs to go to the first floor.
1st Floor Hallway -- Try to enter the service door at the end of the hall. It’s lock.
Martin’s room -- Left click on the vase to take it. Exit the room.
1st Floor Hallway -- Speak to the repairman. Left click on the fire sensor above the door to examine it.
Martin’s Room -- Left click on the electrical outlet to remove the plug. Use the vase on the outlet to fry the circuits. Exit the room.
1st Floor Hallway -- Speak to the repairman. Martin will tell him he has no electricity in his room. The repairman will enter Martin’s room. Left click to take the repairman’s keys from the ladder.
Service Room -- Left click on the brooms to take one. Left click on the cabinet to examine. Left click on the diluter to take it. Left click on the rag on the floor to take it. Left click on the fire sensor to examine. Perhaps a smoky diversion will help clear the hotel so you can check on some rooms. Use the rag on the broom in inventory. Use the diluter on the broom. Use the matches on the broom. The coast is now clear and you can check out the rooms upstairs. First you will need a key.
Hotel Lobby -- Left click on the reception desk to get a close up of the keys. Right click on the keys and Martin will tell you it is room 32 he's looking for and take the key.
2nd Floor Hallway -- Use the key on Room 32 (the 2nd one on the left)
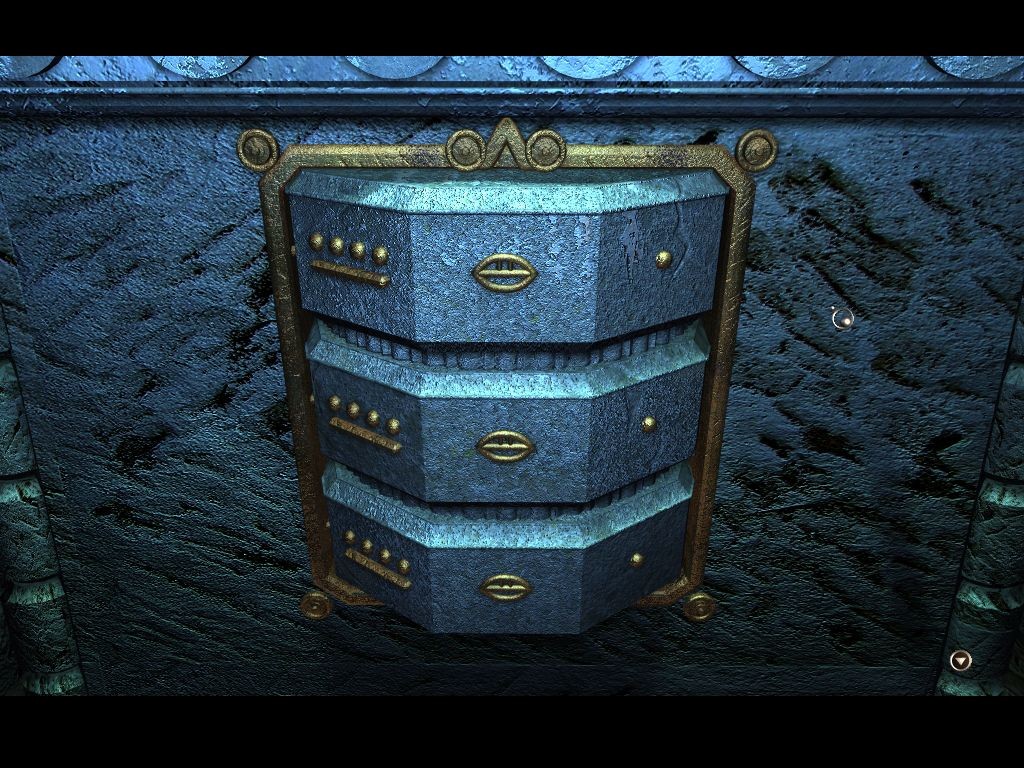
Room 32 -- Right click on the bed to examine under it. Left click on the briefcase to open. You will have to enter a numeric code. Left click on each tumbler until you hear a louder click. The correct combination is 371.
Mexico
Fountain -- Left click on fountain to examine it. Right click on the “George” sign. Try to enter the door. There’s a note on the door telling you George went to Rosie’s. Move to your left and choose the route marked “On through the street”
Outside Rosie’s Bar -- Speak to the bouncer. He won’t let you in. It’s poker night and only those invited by Rosie can go in. He tells you he’ll let you in if you can get Isabella to come see him. Left click on the door to the yellow house. No one answers. Go back to the main square.
Fountain -- Speak to the 2nd door of the yellow house. Isabella’s mother comes to the door. She will not let Isabella out until you find her husband and bring him home before he spends all his money on liquor.
Outside Rosie’s Bar -- Speak to the hobo on the bench. You can’t seem to wake him up.
Fountain -- Left click on the bowl next to the fountain to pick it up. Use the bowl on the fountain to fill it with water.
Rosie’s Bar -- Use the water filled bowl on the hobo. He wakes up but he has spent all the money on booze. You offer to pay the money he owes if he has anything of value.
Fountain -- Speak to Isabella’s mother again. Martin will give her money anyway to get Isabella out of the house.
Outside Rosie’s Bar -- Speak to the bouncer to tell him Isabella will be there in an hour. Now he claims you have to have a token to get in. Speak to the hobo again. He spent the night at Rosie’s and has a token. He doesn’t need it anymore and gives it to you. Give the token to the bouncer.
Inside Rosie’s Bar -- Speak to the bartender. Ask about a room to stay and George. The bartender will hassle you to get you to drink tequila. Speak to George who is sitting at the table. He will let you stay at his house. They will go back to George’s house and Martin will go to bed immediately.
George’s House -- Speak to George. Ask about the Temple of Jaguar. It will be added to your map. Speak to George again to ask about the Temple of Dawn. He will mark it on the map for you. Leave the house.
Fountain -- Speak to the stall keeper with the blue shirt. Martin will see a statue he wants. Martin will try to get a cheaper price. He gets the statue.
George’s House -- Speak to George and ask about the jeep outside. It’s George’s and he lends it to you. Exit the house and left click on the jeep. You will automatically drive to the temple of Dawn.
Front of Ruin -- Speak to the tourist. He tells you that his wife could not come on the trip to Mexico. He asks Martin to get a picture of the inside of the pyramid.
The archeologist won’t let him in. Martin takes the camera.
Inside the Ruin -- Left click on the pit in the center of the room to examine. Examine the openings and stone discs on the wall. Nothing happens yet. Go outside. Go to the right to the archeological site.
Archeological Site -- Speak to the archeologist on the steps. His name is Pierre. Speak to the archeologist in the pit. His name is Pedro. Pedro mentions treasure by accident. Martin notices he seems out of place and he doesn’t seem to know much about what he’s doing. Find out that he’s really here to find hidden gold in the pyramid. Martin makes a deal to meet him at night. Speak to Pierre one more time. Go back to where the tourist it and head to the left of the building where the temple is.
Temple -- Left click on the temple to examine. Enter the temple. The archeologist (Paul) inside will ask you why you are there. Martin will offer to help since he has knowledge of linguistics and archeology. Martin will decipher some ancient text for Paul. Speak to Paul again to ask for a picture of the inside. Paul needs something from the site before you can take the picture.
Archeological site -- Speak to Pierre. Left click on the box which is on the table to the left of Pierre. Go back to the temple.
Temple -- Give the box of scraps to Paul. Left click on stone relief on wall. Left click on the stone pedestal. Left click on the relief on the floor. Use the camera on the wall stone relief. Exit the temple.
Front of Ruin -- Speak to the tourist to give him the camera. He will give you a statue he found around the area.
Inside the Ruin -- Use the stone cylinder from the tourist on the opening on the wall. None of the statues you have will fit in the other opening. Leave the ruin and go to the temple.
Temple -- There are 2 large statues at the entrance to the temple. Left click on the statue to the left to examine. Left click on it again and Martin will try to remove its nose. But, it’s stuck. Left click on the statue to the right. It does not have a nose. There is an opening instead. Use the fake statue you bought from the vendor on the opening. Now go back and left click on the statue to the left. You will be able to take the nose. The nose is a stone cylinder exactly like the one you put in the wall at the ruins.
Inside the Ruin -- Use the stone cylinder on the other opening. Left click on the stone disc and a pedestal will rise in the middle of the floor. Left click on the pedestal to examine it.
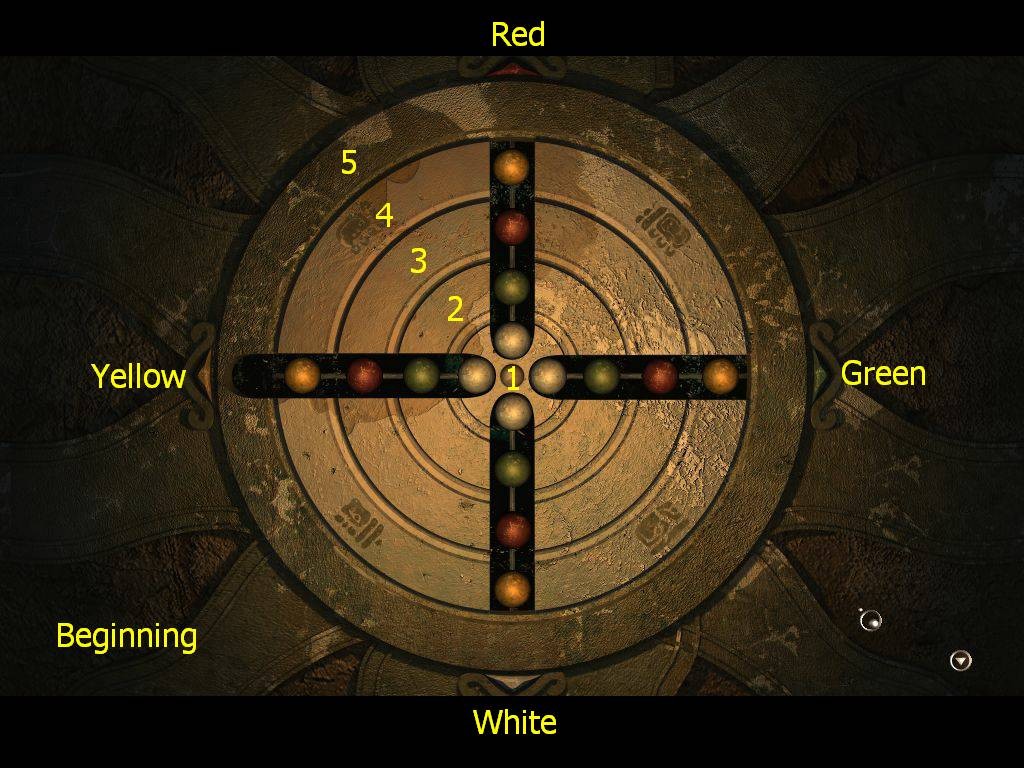
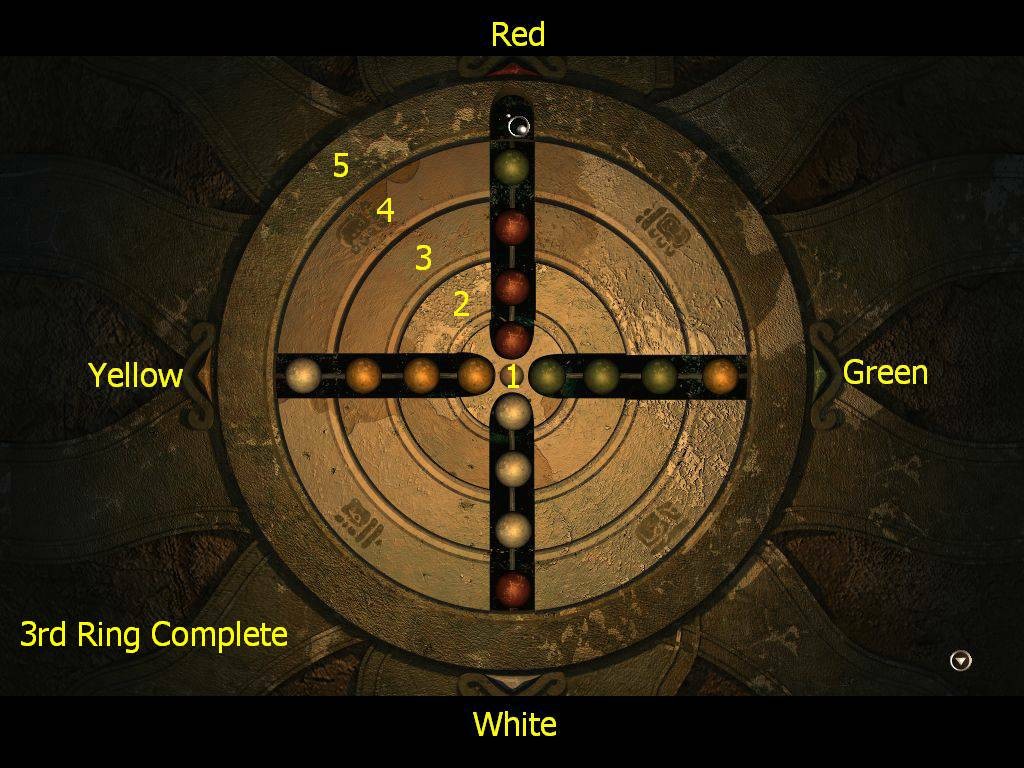
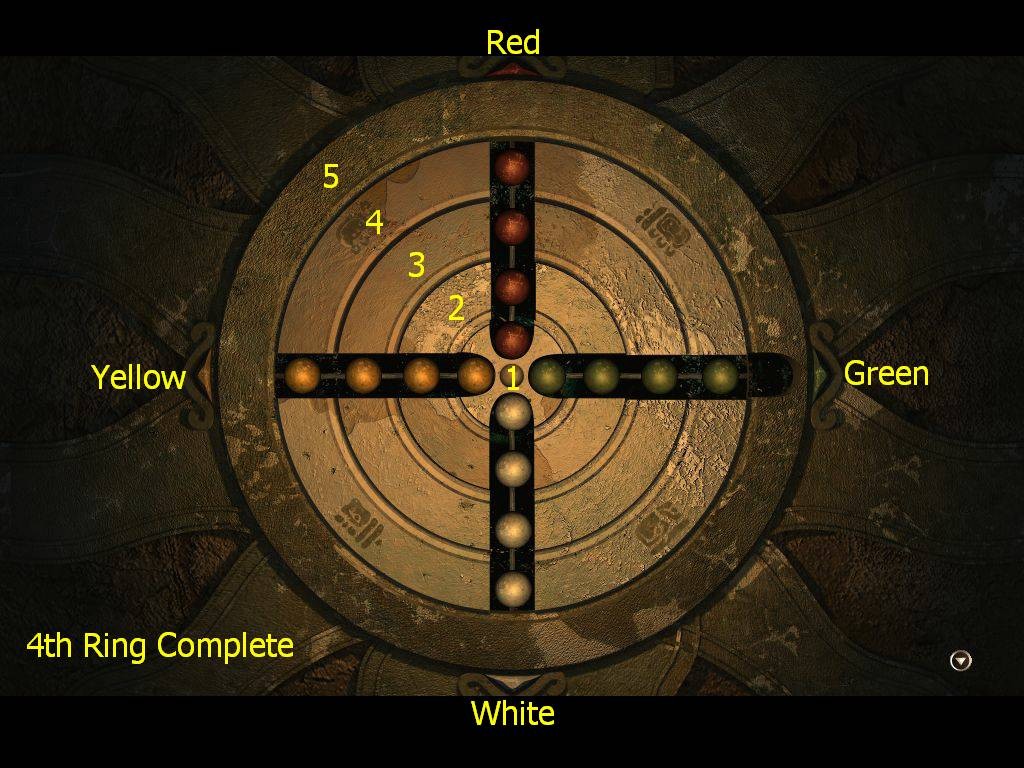
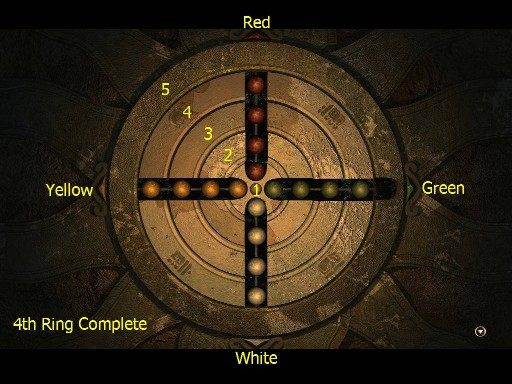
Marble Puzzle
There are four slots each with 4 different colored marbles in it: white, green, red, and yellow. At the outer end of each slot is a triangle with a color on it. The goal is to get each slot to have the same colored marbles as the triangle representing it. So, the slot with the yellow triangle should have all yellow marbles, the slot with the red triangle should have all red marbles etc…
Each ring can move individually. Left clicking will move a ring clockwise. Right clicking will move a ring counter clockwise. Marbles can be moved in any open direction by left clicking. One slot has an extra space in it, but this space will be moved as the largest ring is rotated. Each ring should be completed individually starting with the innermost ring. Be careful when moving items. It is too easy to click on a ring when you meant to click on a marble. So, go slow.
For the solution, I have numbered each ring 1 through 5 and each slot by its color. The first picture is the puzzle as you first encounter it. I have labeled all the areas I will be referencing.
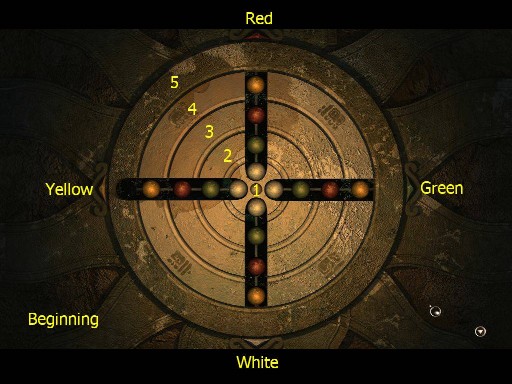
Ring 1
Yellow: Move all marbles in direction of ring 5
Left click ring 1
Red: Move all marbles in direction of ring 1
Left click ring 5
Red: Move yellow marble in direction of ring 1
Right click ring 5
Yellow: Move all marbles in direction of ring 5
Left click ring 1
Red: Move all marbles in direction of ring 1
Left click ring 5
Red: Move red marble in direction of ring 1
Right click ring 5
Yellow: Move all marbles in direction of ring 5
Left click ring 1
Red: Move all marbles in direction of ring 1
Left click ring 5
Red: Move green marble in direction of ring 1
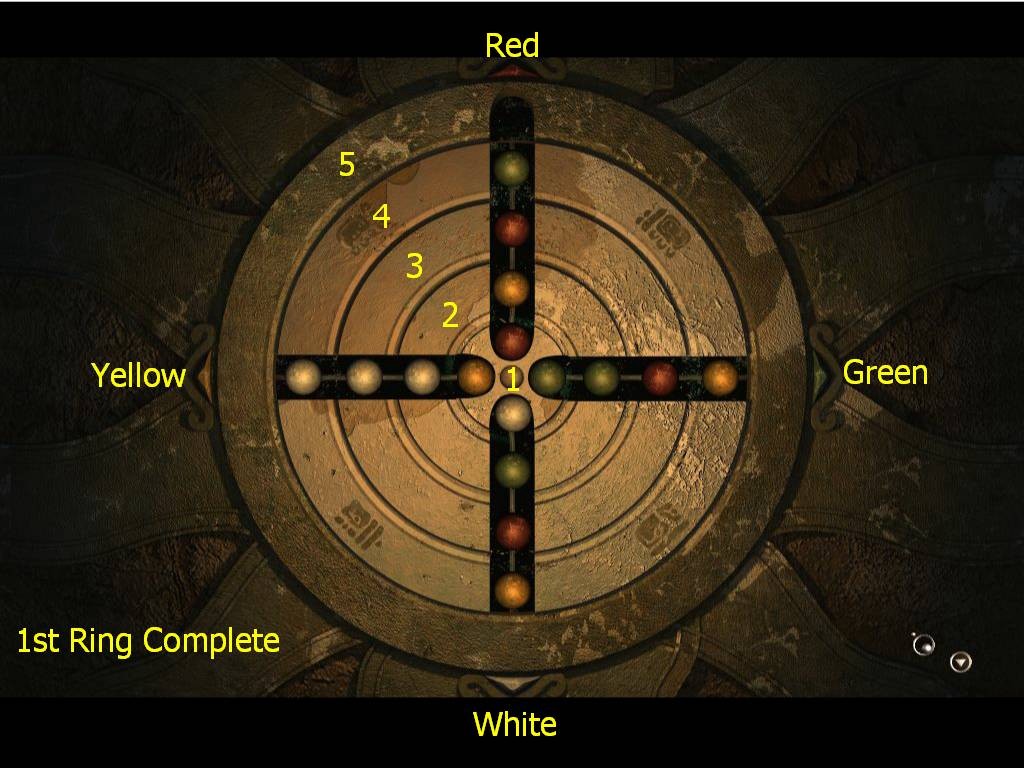
Right click ring 1
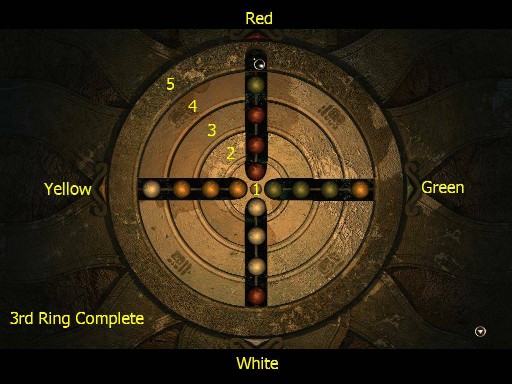
Ring 1 is complete. Your puzzle should look like the picture below:

Ring 2
Right click ring 2
Red: Move 1 green, 1 red and 1 green marbles in direction of ring 5
Left click ring 2
Green: Move 1 red and 1 yellow in direction of ring 1
Right click ring 2
Left click ring 5
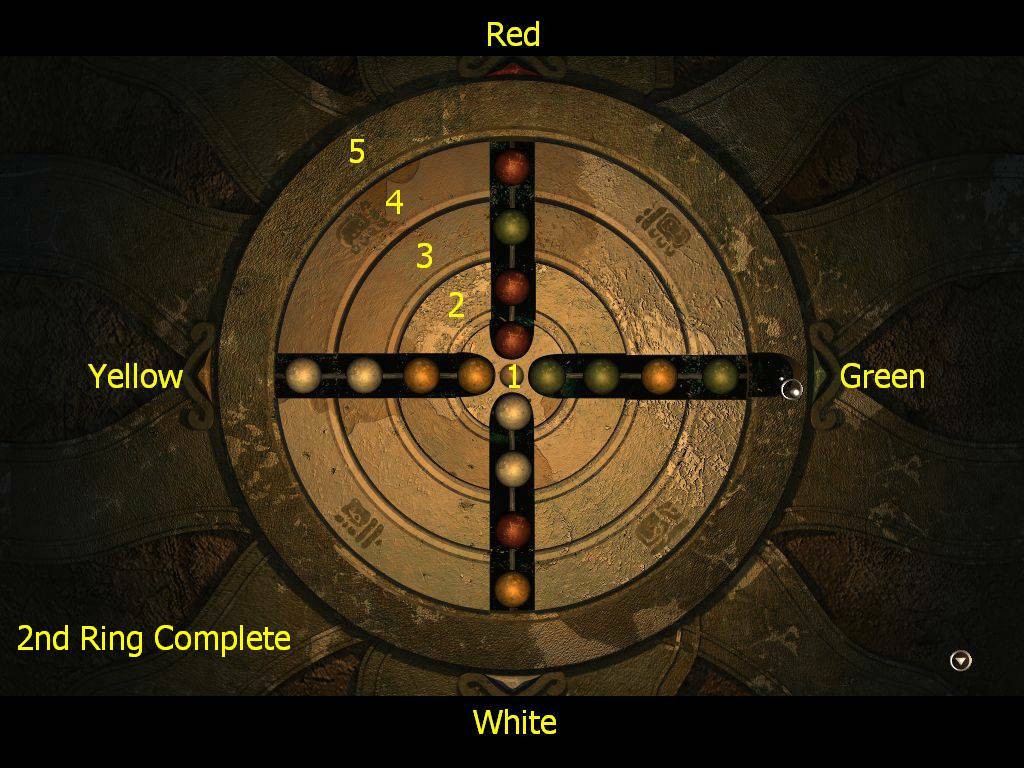
Green: Move 1 green marble in direction of ring 1
Ring 2 is complete. Your puzzle should look like the picture below:

Ring 3
Right click ring 5 twice
Yellow: Move 2 white marbles in direction of ring 5
Right click ring 3
White: Move yellow marble in direction of ring 1
Left click ring 3
White: Move red marble in direction of ring 5
Left click ring 3
Yellow: Move both white marbles in direction of ring 1
Right click ring 3
Left click ring 5
Red: Move red and green marble in direction of ring 5
Left click ring 3 twice
White: Move red marble in direction of ring 1
Right click ring 3 twice
Left click ring 5 twice
White: Move red marble in direction of ring 1
Right click ring 5
Move green and yellow in direction of ring 5
Right click ring 3
Red: Move green marble in direction of ring 1
Left click ring 3
Right click ring 5
Red: Move green marble in direction of ring 1
Ring 3 is complete. Your puzzle should look like the picture below:
Ring 4
Red: Move green and 1 red marble in direction of ring 5.
Right click ring 3 twice
White: Move red marble in direction of ring 1
Left click ring 3 twice
White: Move 1 white marble in direction of ring 5
Left click ring 3
Yellow: Move white marble in direction of ring 1
Right click ring 3
Yellow: Move 1 yellow marble in direction of ring 5
Left click ring 3 twice
Green: Move 1 yellow marble in direction of ring 1
Right click ring 3 twice
Left click ring 5
Green: Move green marble in direction of ring 1
Puzzle is complete and should look like the picture below:
A panel will open with a prism inside. Left click on the prism to take it. Right click on the prism in inventory to examine it. Exit the ruin.
Archeological Site -- Speak to Pedro again. He tells you he has been waiting for you and will meet you in about 3 hours.
Fountain -- A small boy meets you and tells you he has a message for you. Martin has to go to Rosie’s pub right away.
Rosie’s Bar -- Speak to the bouncer and then enter the bar. The author of the journal is waiting for you. He wants to made amends and to warn you. He now says he wants you to destroy the machine he designed. Exit the bar and go to the fountain area.
Fountain Area -- Left click on the jeep to take you to see White Bear
White Bear’s Hut -- White Bear tells Martin that he is the messenger of the gods. Martin must find the last statue (key) and unite the power.
Fountain Area -- Go to George’s place and speak to him about equipment. Martin will go to his room for a rest. It is now night. Left click on the bag on the counter to collect it. In inventory, right click on the bag to have the contents in inventory. Exit George’s place. Left click on the jeep to go off to your destination.
Temple -- Pedro meets you out front. The both of you go into the temple. He activates a mechanism and a puzzle opens up on the floor. Use the prism from inventory on the stone pedestal. Click on the opening on the wall behind the pedestal. A light will shine on the prism and highlight 3 blocks on the floor.
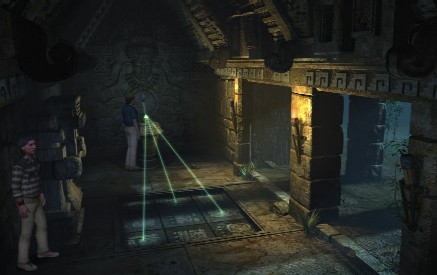
Martin will instruct Pedro to stand on one of them. Left click to pick up the rock on the floor. Use the rock on one of the stones that shows an active cursor. Left click on the remaining stone with an active cursor and Martin will stand on it. The statue will move revealing an opening. Martin will need to climb down using a rope. Use the rope on the statue. Left click on the dark opening.
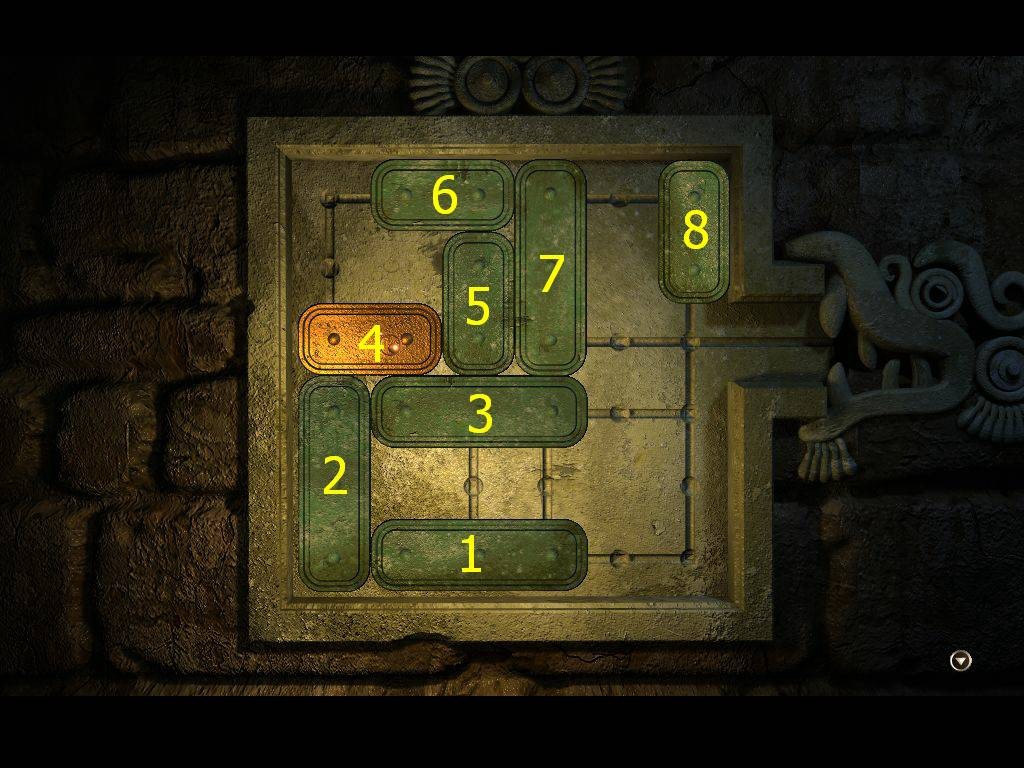
Dark Opening -- In inventory, use the lighter on the lamp. Left click on the box on the wall to the right of where Martin put the lamp. The goal is to get the orange block into the dragon’s mouth. It is very important to save your game before trying to solve. There is no reset button.
Vertical pieces can only move up and down using right or left mouse clicks. Horizontal pieces can only move right or left using right or left mouse clicks. Below is the original puzzle that I have numbered for easy reference:
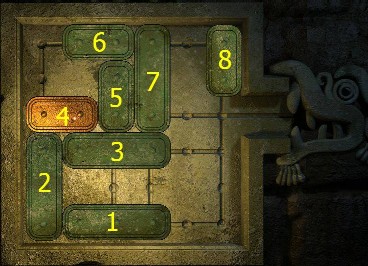
Left click on #1 twice to move it right
Left click on #3 twice to move it right
Left click on #5 three times to move it down
Left click on #4 once to move it right
Right click on #2 three times to move it up
Right click on #3 three times to move it left
Left click on #7 once to move it down
Left click on #8 once to move it down
Left click on #6 three times to move it right
Right click on #7 once to move it up
Left click on #3 three times to move it right
Left click on #2 three times to move it down
Right click on #4 once to move it left
Right click on #5 four times to move it up
Left click on #4 once to move it right
Right click on #2 three times to move it up
Right click on #3 three times to move it left
Right click on #1 three times to move it left
Left click on #7 three times to move it down
Left click on #8 three times to move it down
Left click on #4 three times to move it right into the dragon's mouth.
Bottom of Stairs -- Use the lighter on the stone torch next to the door. Left click on the symbol above the door. It stands for water. Left click on the door plate to examine. Examine the relief of the water god on the left. Left click on the stone stink. It looks like you will need some water.
Dark Opening -- Speak to Pedro through the hole. He will send down some water. Left click on the bucket to pick it up.
Bottom of Stairs -- Use the bucket of water on the stone sink. Use the hammer on the opening to the left of the sink. Left click on the hammer to have Martin use it as a lever. The water will pour out through a crack. Martin will need more water.
Dark Opening -- Speak to Pedro and ask for more water. Also, ask for some plaster. Pedro will throw the plaster down so Martin can catch it. Left click on the bucket of water to take it.
Bottom of Stairs -- In inventory, right click on the plaster to open it. Use the bucket of water on the plaster. Use the plaster on the crack. Use the bucket of water on the stone sink. Left click on the hammer. Hear the water drain correctly, but there doesn’t seem to be enough.
Dark Opening -- Speak to Pedro and ask for one more bucket of water. Left click on the bucket of water to take it.
Bottom of Stairs -- Use the bucket of water on the stone sink. Left click on the hammer to activate the lever again. Success – the door opens. Enter the water door.
Altar -- left click on the symbols on the floor. Left click on the artifacts on the altar. If Martin tries to take any of the items on the altar, he will die and you will restart at the altar again.
Right below the altar are 3 dials. Left click on the 3 dials to get a closer look.
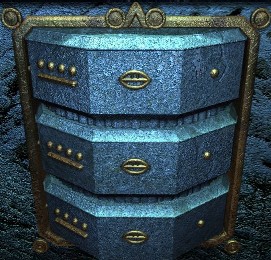
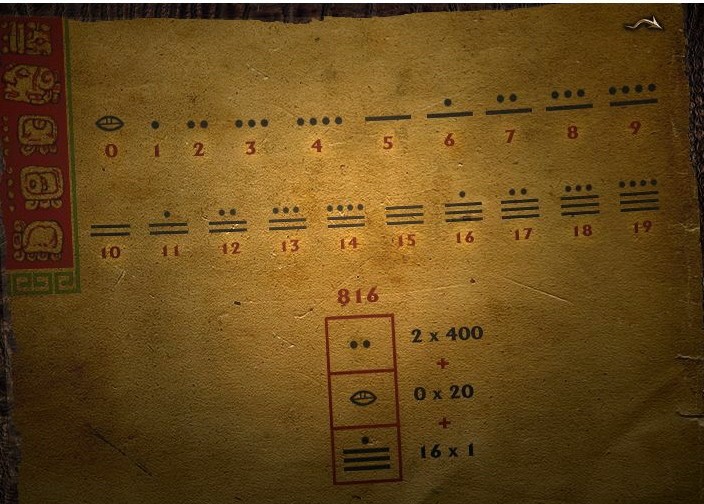
You need to turn the dials to the appropriate symbols. Back out of the puzzle and look at the columns to the right and left of the altar. These are numbers using Mayan symbols. In inventory, right click on your map to examine it. On the top of the map is a green arrow. Click on it to turn the map over. On the back is an explanation of the Mayan numbering system.

The basic premise is that numbers are built in 3 levels. Whatever number is in the first level should be multiplied by 1. The number in the 2nd level should be multiplied by 20. The number in the 3rd level should be multiplied by 400. All 3 totals should be added together to get the final number. What is needed in this puzzle is to examine the columns to the left and right of the altar. Determine the totals for each side and add them together.
|
Left Column:
Top box: 3 dots -- 3 x 400 = 1200
Middle box: 2 dots -- 2 x 20 = 40
Bottom box: 2 lines & 2 dots -- 12 x 1 = 12
Left Column Total: 1200 + 40 + 12 = 1252
Right Column:
Top box: 1 dot -- 1 x 400 = 400
Middle box: 3 lines & 2 dots – 17x 20 = 340
Bottom box: 2 lines & 2 dots – 12 x 1 = 12
Right Column Total: 400 + 340 + 12 = 752
Grand Total: 1252 + 752 = 2004
|
Now you need to figure out the symbols to make 2004.
Top box: 1 line – 5 x 400 = 2000
Middle box: Null symbol – 0 x 20 = 0
Bottom box: 4 dots – 4 x 1 = 4
Total: 2004 (See picture below)
The dragon heads will turn the other way so you can take all the items on the altar. Exit the room. Go up the stairs. Speak to Pedro through the hole. Use the rope on the hole. Martin will exit. You now have all 3 keys. You are transported automatically back to White Bear’s hut. He will mark the last location on the map. He gives you an amulet.
Temple of Gods -- Enter the temple. Left click on the door to reveal yet another slider puzzle. Move one of the tiles so that the center space is open. You will see a slot there. Use the amulet White Bear gave you on the slot. Move any of the tiles into the open spot leaving another spot empty. You will see a picture that will match one of the tile pictures. Your task will be to get each tile placed over the picture that matches it. The tiles can move left, right, up and down. Enter the temple.
Inside the temple -- Left click on the machine in the center of the room. There are 3 monoliths surrounding the machine. Each one requires a statue. Use the red statue on the monolith to the left. Use the yellow statue on the monolith in the center. Use the green statue on the monolith to the right. The machine begins working.
Watch the final cut scene.
|