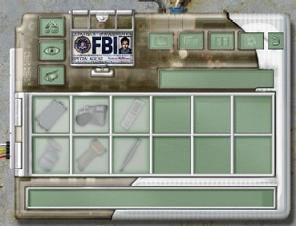
Navigation is pretty standard with magnifying glass to examine, open hand to pick items up and closed hand to interact with an item.
The inventory screen can be used examine items more closely. You will need to look at the back of some items. You can view all documents placed into inventory or read the ongoing journal. Clicking on the picture of a CD will access the main menu for saving, loading & quitting. You use your right mouse button to bring up the inventory screen at any time.
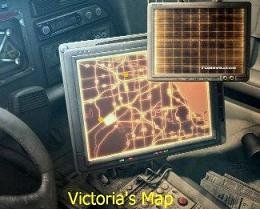
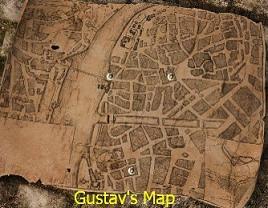
Getting around is made easy with a map. Victoria’s map can be accessed from her 4x4. Gus’s map can be accessed during gameplay at left or right of screen where star appears.
Crime Scene - Chicago - Victoria
Outside -- Talk to the officer guarding the front door. Exhaust all conversation by left clicking. This is the essential conversation. Then exhaust all conversation by right clicking. This is additional, more personal conversation. Enter the building.
Entrance -- Go up the steps. Turn right and talk to Miller. Automatically get the camera from Miller. Exhaust all right & left click conversation. Enter through the doorway next to Miller. Go straight once and turn left. Go to bathroom all the way at the end of the hallway.
Bathroom -- Speak to Claire. Exhaust all conversation. Enter the kitchen directly behind you.

Kitchen -- Take the forensic tools. Enter the room to the left of the forensic tool box. I guess that it is a dining room of sorts.
Dining Room -- Examine the dolls hanging from the ceiling. Examine the wall by the opposite doorway. Find the hair and fibers on the nail. Right click to open your inventory. Combine the camera with the film. Take a photo of the nail with hair/fibers. Use the tweezers to collect the hair fibers. Exit the doorway closest to you and turn left (Victoria’s left). Enter the next doorway which is the bedroom.
Bedroom -- Examine the wall next to the doorway. Spray the wall with luminal. Exit out and go over to the lights that are on a stand. Use the black light filter from inventory on the lamps. Read the word “Disturbed” on the wall. Take a photo. Go back and remove the black light filter. Examine the blood on the floor beneath where the word appeared. Use the camera to take a photo first. Use the forensic swabs on the blood stain. Exit the room.
Living Room -- Right in front of you is another blood stain. Take a photo. Use swabs on stain. Examine the wall with the big “eye”. Use luminal on the wall. Use the black light filter on the lights. The word “Sanctuary” appears on the wall. Take a photo. Remove the black light filter from the lamps.
Bathroom -- Speak to Claire. Put Claire’s tools back in her case. Evidence collected will automatically be removed. Speak to Claire again. Victoria will automatically take pictures of the body. Examine all hotspots on the body. Talk to Clair once more. Exit the room. Head back to the hallway Miller was in.
Hallway -- Cut-scene. The staircase has collapsed. You’ll have to find another way out of there. Speak to Miller. Go past the staircase. Examine the snow. Try the exit door. You need something to pry the boards off.
Living Room -- Examine the pile of junk. Take the lead pipe.
Hallway -- Go back and use the lead pipe to pry the boards off the exit door. Victoria will automatically kick open the door.
Fire Escape -- Click on the fire escape ladder. Victoria will lower it, but this won’t work. Click on the dumpster beneath the fire escape. Victoria will jump. Watch conversation between Officer Tate and Victoria. Click on Victoria’s 4 x 4. Choose Office on Map.
Office - Chicago - Victoria
Parking Lot -- Proceed to elevator. Click on elevator to open. Choose floor 8.
8th Floor Office -- Turn right and enter first doorway on left. Speak to Miller. Exhaust all conversation. Miller needs the preliminary report from Claire and needs you to drop the camera in the evidence chute in the hallway. There are 3 desks in the office – Victoria’s, Miller’s & Claire’s.
Victoria’s Desk -- Examine the desk. Click on phone to play message. Take the present off the desk. Take the ID card. Examine the card in inventory. Use the arrows to look at the back of the card. Note the word: Vodka. Exit the room
8th floor Hallway -- Put the camera in the chute directly in front of you. Go to the elevator. Meet Officer Tate. Claire wants to see you in the morgue. Enter the elevator and choose B2 as your floor.
Security Office -- This is the room with the brown door. You can take a look around in there if you want. There is nothing to do there right now.
Floor B2 -- turn right and click on the double green doors. Your access code does not work. Exit and go to the brown door. Examine the keypad.. Use your ID card on the keypad. Spell out Vodka on the keypad which translates to 86352. Press ok. The door will open. Enter the next set of double doors.
Floor B2 Morgue -- Enter the next set of double doors. Speak to Claire. Exhaust all conversation. Take the report from the medical table. Exit the room and go out through the green double doors. Vic’s Dad will call. He wants her to come to the house. Take the elevator to floor 8.
8th Floor Office -- Interrupt Miller and automatically give him Claire’s report. Speak to Officer Tate. Exit and take the elevator to B1 (garage). Take the 4x4 to Pat’s House (your father).
Pat’s House - Chicago - Victoria
Living Room -- Victoria automatically exchange Christmas presents with her father. A necklace belonging to her grandfather is added to inventory. Speak to Victoria’s father. Exhaust all conversation. Go towards the staircase. Take the umbrella. Use the staircase to go to the upper level of the house.
Upstairs Hallway -- Examine the painting at the top of the stairs. Enter the first doorway on the right.
Victoria’s Bedroom -- Examine the teddy bear. Enter the closet. Use the umbrella on the trap door to the attic. Climb the ladder into the attic.
Attic -- Click on the light bulb to turn on the light. Examine the chest under the window. It is Victoria’s grandfather’s chest. You must get all the cylinders to line up in a pattern. Right click to open your inventory. Examine the necklace. Use the magnifying glass with the + to get a closer look. Use the arrows to see all sides of the necklace.
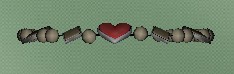
The necklace shows certain distinct beads: 2 diamonds, heart, 2 diamonds. That is the pattern you need to achieve on the chest.
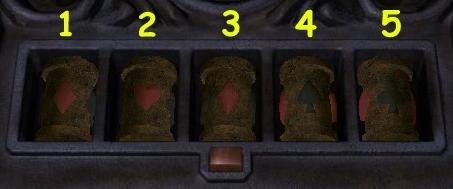
You can either randomly click until you land on it or you can do the following:
Click 1 time each on 2, 3, 4, 5. Then click 2 times each on 2, 4, 5 You should end up with 1,2,4,5 as diamonds and 3 as heart. Click the red button to open the chest.
Victoria will begin reading her grandfather’s journal. Cut-Scene - Flashback into 1920.
1920 Prague - Gus
Shore -- You are now Gustav McPherson. Speak to Inspector Skalnic. Exhaust all conversation. Go to the right. Speak to Kasimir Stasek. Exhaust all conversation. Keep going right. See Ida. Speak to Milena. Exhaust all conversation. Climb the stairs. Speak to Ida again. Exhaust all conversation. Head to the right and the map will appear. Choose the Old Chapel.
Observe conversation between Otakar Kubina (pimp) and his henchman, Peter.. Hear Otakar give instructions to rough up Gus if he sees him. Continue straight through the archway. Map will appear. Choose the Old Chapel again.
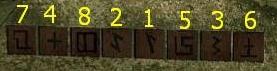
Chapel Morgue -- Enter the door on the left hand side of the building. Examine the bodies. Continue further into the chapel. Speak to Emile Korona. Exhaust all dialog. You need a file on one of the victims from the safe, but Emile can’t remember the combo. He wrote it on a piece of paper somewhere. Examine the bookshelf. Take the piece of paper. Examine the body on the table. Examine throat cut, slash on chest and paperwork. Go to towards the altar. Examine the altar. You have the numbers in your inventory: 74821536. You have to match symbols to numbers.
Go back and look at the clock on the bookshelf. Jot down the symbols on the clock for 3 and 6 o’clock. Go back to the altar. If you look at the symbol for 3, it has 3 corners. Look at the symbol for 6 – it has 6 corners. You will need to figure out the numbers the rest of the symbols stand for. The picture below shows the correlation.
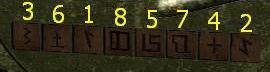
When completed it should look like the picture below:
Click on the lever to open the safe. You will automatically get a picture of the park and the coroner’s report. Leave the church. You will get roughed up by Peter. Go down the steps. Map will appear. Choose the Park.
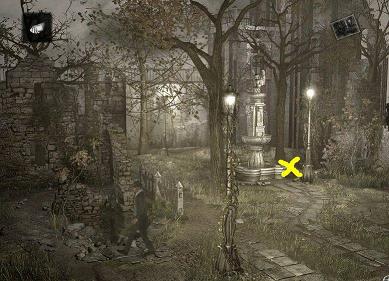
Park -- Talk to Apolina. Exhaust all dialog. Enter the park. Observe a cutscene. Examine the statue. Use the photo with the statue. Click back and forth to see the differences between the two pictures. I have highlighted below on the actual scene. I was unable to capture the photograph view. When the photo is in place, click on the approximate spot shown below.
Find a written message on the stone "the whore wasn’t worthy of my devotion, so I proposed to the angel". Examine the statue again. Try to take the ring. Cut-scene will ensue. A crow will steal the ring and fly away. Gus will follow.
Burnt Neighborhood -- Click on the front door. He will automatically kick down the door. Talk to the strange coachman sitting up above. Exhaust all conversation. He will give you back the ring. Exit the building. Ida meets you outside. She tells you of victim who survived hiding in a junkyard. Go around the corner of the building where Ida just went. Observe another cut-scene. Exit the alley and turn left to access the map. Choose the junkyard.
Junkyard -- Examine the car. Turn right and click on the direction to take you around the left corner. See Peter guarding the gate. Gus will immediately turn around. Access map again and choose the lingerie.
Lingerie -- Click on the front door. Exhaust all conversation with Kubina. Agree to do a favor for Kubina if he can get Peter to leave Gus alone. You need to get Roman out of jail. Head toward the map access point. Choose the police station.
Police station -- Enter the police station. Examine the bulletin board. Take the newspaper article. Speak to Stasek. Exhaust all dialog. Agree to do a favor for Stasek in return for Roman’s release. He needs his medal back which Apolina stole from him. Exit the police station.
Park -- Speak to Apolina. Exhaust all conversation. She will give you the medal. Speak to Milena.
Police Station -- Speak to Stasek. You will automatically give him the medal. Roman will be released.
Lingerie -- Favor with Kubina is complete. You can revisit the junkyard. He gives you a set of lockpicks.
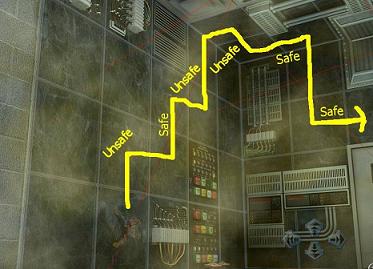
Junkyard -- speak to the brothers. Peter plays a joke on Gus which results in being chased by a Doberman.. You are on a roof now. Enter the small room. Try the controls. The crane is locked. Examine the control drawing on the wall. Exit the room. Continue around to the other side of the room. Look off the edge of the roof. You will need to make a bridge of sorts using the crane and the crates. Examine the mechanism on the wall. You will need to get them to match the picture inside the room. 123 should be on top. 456 should be on the bottom.
This is the method I came up with. Note the levers are numbered.
#2 Down 1 (position)
#6 Down 2, Left 1
#2 Up 3
#1 Up 3
#6 Right 1, Down 2
#1 Down 1, Left 1
#2 Down 3
#1 Right 1, Up 2, Left 1
#4 Left 1, Down 2, Left 1
#2 Up 3, Right 1
#6 Up 4
#3 Left 1, Up 3
#5 Right 2
#4 Right 1, Down 2, Left 1
#3 Down 1, Left 1
#6 Down 4
#2 Left 1, Down 3
#3 Right 1, Up 2, Right 1
#2 Up 3
#6 Up 3
#5 Left 1, Up 2, Left 1
#6 Down 3, Right 1
#5 Right 1, Down 2
The crane will begin working. Look left among the junk and find the bolt cutters.
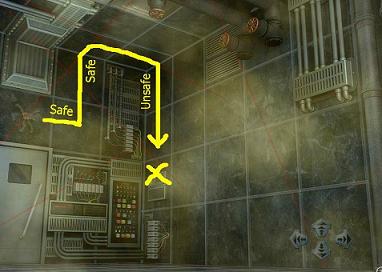
Make your first box arrangement like this:
Jump onto each crate to get to the double crate. Use the bolt cutters on the chains. Go back and operate the crane again.
Make your 2nd box arrangement like this:

Jump across until you get onto the tram car.
Pat’s House - Chicago - Victoria
Victoria’s Bedroom -- Claire calls. She needs to speak to you. Go to the police stations.
Office - Chicago - Victoria
Office -- Take the elevator to B2. Click on the double doors. They will automatically open for you. Cut Scene. The body has been mutilated further. You need to look at the security cameras. Exit the green doors and go into the brown door. Examine the monitors. Cut scene of chase.
Floor B2 Morgue -- Go back in to see Claire. Speak to Claire. Exhaust all conversation. Your boss wants to see you.
8th Floor Office -- Richard calls. Exhaust all conversation with Richard and learn about Mark Ackerman; a name you’ll need to remember. Enter your office. Miller is still on the phone. Inspector Todd yells at both of you. You need to get him coffee. Exit to the hallway and turn left.
8th Floor Hallway -- Enter the last door on the right. Take the coffee cup from the table. Exit. Examine the coffee maker. Use the cup on the coffee maker. Press the button to pour the coffee. Take the filled coffee cup and go back to your office. Enter Todd’s office.
Todd’s Office -- Speak to Inspector Browning. Complete all conversation. Exit.
8th Floor Office -- Speak to Miller. Exhaust all conversation. You have a new location on your map. Use the elevator to get to the car. Choose Campus on the map.
Campus - Chicago - Victoria
Campus -- Enter through front door. Go upstairs. Click on room 11. Speak to Vaclav Kolar. He will leave the room to get you a copy of his thesis. Grab a bottle from beside his chair for fingerprints. You can read the thesis in your inventory under documents if you want. Exit the building.
Office - Chicago - Victoria
Floor B2 Morgue -- Speak with Claire. She wants you to life the prints off the bottle.
Office 8th floor -- Go to Claire’s desk next to the Christmas tree. Examining the desk will place the bottle there to be worked on. Click on fingerprint powder to open the lid. Click on the brush. Click on the powder. Click on the bottle. Use the arrows to turn the bottle. Examine the full fingerprint. Click on the tape. Click on the biggest fingerprint on bottle.
Floor B2 Morgue -- Speak with Claire to give her the print. Exit
Pat’s House - Chicago - Victoria
Kitchen -- Victoria needs to make cookies for her father.
| Cookie Recipe - As written: |
1 cup of Love
˝ cup of Generosity
2 cups of Commitment
1 Cups of Sweetness
˝ Cup of Integrity
1 tablespoon of Romance
1 teaspoon of Sensuality
1 Common Sense
In a bowl, cream together generosity, sweetness and love to give your man a sweet heart. To give him devotion, simply sift together commitment, sensuality and romance. Blend devotion to his sweetheart. Finally, Add intelligence, a mix of common sense and integrity, and beat it with the rest to make your perfect man. Give him a form and place in the oven. Remember not to overcook.
|
|
| Cookie Recipe - Translation: |
1 cup of Love = 1 cup of milk.
˝ cup of Generosity = butter
2 cups of Commitment = flour
1 Cups of Sweetness = brown sugar
˝ Cup of Integrity = molasses
1 tablespoon of Romance = ginger
1 teaspoon of Sensuality = cinnamon
1 Common Sense = egg
In a bowl, cream together butter, brown sugar and milk. Hit the button to blend. Add flour, cinnamon, and ginger. Hit the button to blend. Add egg and molasses. Hit the button to blend. Click on the picture of the oven. Victoria will say it tastes right and put them in the oven.
|
|
Victoria’s Bedroom -- Enter room and flash back to the past.
1920 Prague - Gus
Train in junkyard -- Speak with Vladanna. Learn of her attack and Mark. Exhaust all conversation. Exit the train. Speak to Roman right outside. Exhaust all conversation. Find Peter near the entrance. Exhaust all conversation. Exit the junkyard. Access the map. Pick Mark’s place.
Mark’s Place -- Speak to Mark. Mark has certain prostitutes pose for his paintings. Apolina is there as you speak to him. Exhaust all dialog. He will tell you to speak to Inspector Skalnic.
Police Station -- Speak to Officer Stasek. He allows you to go and speak to Skalnic. Go through the office and up the stairs. Enter Skalnic’s office.
Skalnic’s office -- Speak to Skalnic. Gus will ask for his files and he will give Gus a hard time. Watch cut-scene of Skalnic driving away. Speak to Officer Stasek again. He will tell you to see if the workers outside could help you get to files in Skalnic’s office. Exit the police station and go to the side of the building.
Side of Police station -- Enter through gate. Try to use the ropes on the scaffolding. They will break and be in your inventory. Go outside the gate and pick up the wood block. In your inventory, combine the rope with the wood block. Use the combined item with the scaffolding.
Watch Gus climb up to Skalnic’s office.
Skalnic’s Office -- Examine Skalnic’s desk. Take the keys. Use the keys on the filing cabinet. You will gain 3 items in inventory (another ring and 2 photos).
Outside Police Station -- Examine the 2 new photos in inventory. One is of a back alley in the burned neighborhood and the other is a bridge near the docks. You will have to visit these locations and compare the pictures to the actual locations.
Burned Neighborhood -- Turn right to go to alley. Use photo. Again, I have marked the location you should click on when the photo is in view.
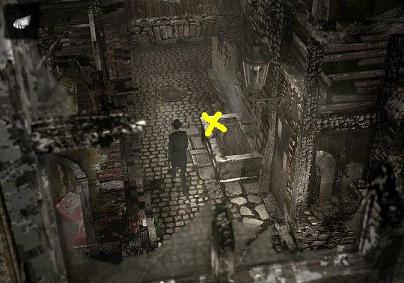
Gus will comment that bath was empty at the time. Find the message: The slut knows.
Park -- Talk to Melina. She will tell you that Inspector Skalnic threw something into the sewers at one of the crime scenes.
Burned neighborhood -- Go to the alley again. Click on the manhole and you will enter the sewers. Take the ring from the floor. Examine the gate and see that the lock is brand new. Exit the sewer.
Bridge -- Go down the steps. Ida shows up. She’s pregnant. They’re going to get married. Use the bridge photo. I have marked the location to click on when the photo is in view.
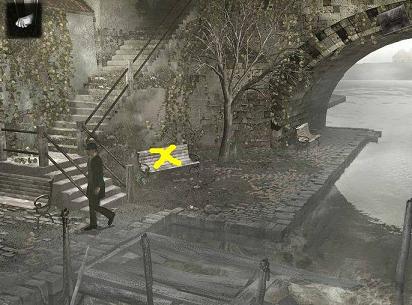
The benches have been changed. Where are the old ones?
Junkyard -- Speak to Peter. You will ask about the old benches. Peter will show them to you. Examine the benches. Take the ring. You now have 4 rings. Exit to the map. Melina will find you and ask you to check on Apolina at Mark’s place. She hasn’t returned yet.
Mark’s Place -- Click on the door. No one answers. Use your lock picks on the door.
Lockpick Puzzle:
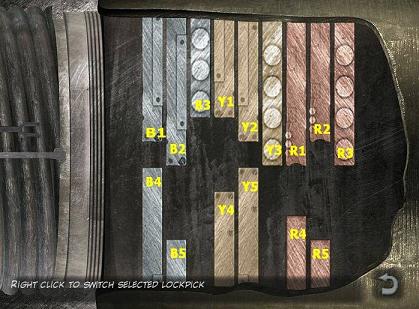
Use the right mouse button to switch between the Fork and the Round Pick. Instructions are provided on the screen when the lock pick puzzle first appear.
Here is my solution:
Fork B1, Round B1, Fork B4, Round B2, Fork B3. This will lock the Blue section.
Round Y1, Fork Y4, Round Y2, Fork Y3 This will lock the Yellow section.
Round Y1, Fork R4, Fork Y4, Round R4, Fork R1, Fork Y1, Retract the Fork, Round Y1, Fork Y3, Fork Y3, Fork R4, Round R1, Fork Y5, Fork Y5, Round Y3, Round Y3, Round R2, Fork R3.
The door will now open.
Examine the paintings on the left wall. Take the book from the table against the wall. Move further into the studio. Take and read the letter on the small ladder. Examine the couch and see the blood. Exit the studio.
Park -- Speak to Milena. Exit to map.
Police Station -- The station is empty. Head up the stairs to see Skalnic. Overhear a conversation. Learn Gus is to be framed.
Pat’s House -- Chicago - Victoria
Victoria’s Bedroom -- Miller surprises Victoria. He will meet you at the college campus.
Chicago - Victoria
Campus -- Go upstairs to room 11(Vaclav’s apartment) Speak to Miller. Victoria will automatically knock on the door and then kick it down. Investigate the bedroom. Examine everything. Exit the apartment and meet Mia gives you a card for the Red Lantern. Exhaust all conversation. Exit. Officer Tate will arrive to guard the door
Red Lantern -- Miller is waiting for you. Exhaust all conversation. Enter the front of the building. Talk to the bouncer. Exhaust all conversation. He will not let you in without a pass. Exit the location.
Campus -- Go upstairs and talk to Officer Tate. Exhaust all dialogue. Go to the end of the hall and knock on Mia’s door. Mia leaves the apartment briefly. While she’s gone, go into her bedroom. Examine the ˝ of a silver apple and examine the photo album on the bed. Examine all 4 photos starting at the right. Victoria will take one. Speak to Mia again. New location is added to map.
Gallery -- Enter the front door and speak to Richard. He will lead you to Mia’s studio. Another victim is discovered. Examine the purse. Take the Red Lantern ID card. Try to take the rose. It’s under the lift and can’t be reached. Go forward and examine the body. Take the picture. Examine the body again and read “It’s a sinner’s Pardon” in blood. Open inventory and examine the picture again. It’s Mia and the back of the picture states “She’s Next”. Exit. Try to open the big warehouse door. The chain breaks. Take the chain. Use the elevator to go upstairs and discover you are locked in. Go back towards the elevator. Examine the hook hanging from the ceiling. Use the chain with the hook. Victoria will climb down the chain. Take the silver rose. Go towards the body and cut-scene will occur. Speak to Claire. She’s busy. Examine the body once more. Exit through the open door. Talk to Officer Tate if you want. Continue to the front of the building. Go to the office.
Office -- Go to 8th floor. You will be in the interrogation room with Vaclav. Exhaust all dialogue. Inspector Browning arrives and releases the prisoner. You need to get back to the Red Lantern. But, you need a pass and a picture for that pass. Go to the desk where you lifted the fingerprints. Use the Red Lantern pass on the paper cutter.
Pat’s House -- go to the dining room. Take the picture of Victoria.
Office -- Go back to the 8th floor. Use the photo of Victoria on he paper cutter. In inventory, combine the photo of Victoria with the Red Lantern pass. Use the combined pass with the plastic laminator.
Red Lantern -- Enter the front door. Give the pass to the bouncer. Enter the doorway. Examine the double doors to your left. Read “In my memoirs you shall find the instrument of my suffering with which we celebrate our vows”. There are also buttons labeled 1 through 6. Go through the next doorway. Examine the bondage painting. It’s called “Perfect Love”. Note the playing cards. They represent 1 and 6. The painting on the other side of the door with sword says “For Better or Worse” and has a 3 & 5 on it. Go through the doors with the 2 paintings. Examine the painting with woman and man entitled “Dark Wedding”. It has the numbers 1 and 5 on it. Examine the knives on the wall. One is marked 3 and 6. Examine the masks next to the knives. Take the mask and the nail. Try the other pool room entrance and see the painting “Reminder” with a 4 & 2 on it.
Door Puzzle:

The goal is to match a painting to each part of the message.
In my memoirs = Reminder 4 & 2
You shall find the instrument of my suffering = Knife 3 & 6
With which we celebrate our vows = Dark Wedding 1 & 5
Enter on the panel: 423615
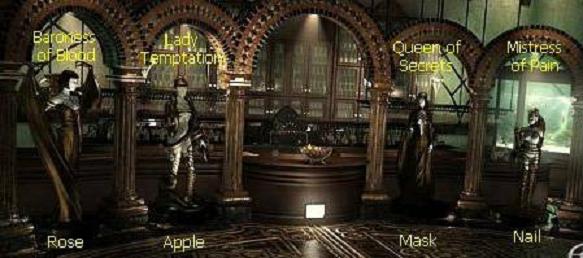
The door will open. See 4 statues. Examine the bowl in the center of all the statues. Take the ˝ silver apple. Victoria will comment that she’s seen this before and needs to find Mia. Examine the 4 statues. Starting from the right:
1st statue - She is the Mistress of Pain - Give her what she desires most
2nd statue - She is the Queen of Secrets - five her what she desires most
3rd statue - She is Lady Temptation - Give her what she desires most
4th statue - She is the Baroness of Blood - Give her what she desires most.
Gallery -- Speak to Mia. She will give you the keys to her apartment. Speak to Mia again and learn about how use the statues. Talk to Richard
Campus -- Use Mia’s keys to open her apartment. Go to her bedroom and take the ˝ apple. Examine the photo album again. Take the note. In inventory, combine the 2 halves of the apple together. You now have 4 silver items in inventory: apple, mask, rose & nail.
Red Lantern -- Read the Mia’s notes in inventory. The note will tell you the order in which to activate the statues.
Let us be behind a veil, left to our secret designs. Then present me with the object of your desire and I will show you the meaning of temptation. Be ready, because our passion will flow like the blood that runs through your veins, and at the end you will be ready to welcome the blissful pain that will open to you, a new world.
Following the instructions in Mia’s note, below is the order of the statues:
First - Queen of Secrets - Use the mask on the statue’s face.
Second - Lady Temptation - Use the apple on the statue’s hand.
Third - Baroness of blood - Use the rose on the statue’s mouth.
Fourth - Mistress of Pain - Use the nail on that statue’s hand.
Secret entrance is revealed.
Secret Rooms -- Examine the gate area. There is a book there that Victoria must see.
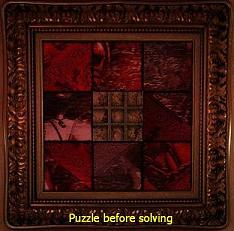
Go to the room on the left first. Examine the fireplace. Take the tile. Take the metal key handle. Examine the keyhole and the fire. There is a secret room. Take note of the painting above the fireplace. Go to the other room. Examine the photo above the fireplace. This is a basic slider puzzle
Use the tile from inventory on the puzzle. Take the key tip. Go back to the fireplace in the other room. In inventory, combine the key tip with the key handle. Use the combined key on the keyhole in the fireplace. Turn right and enter the next room. Examine the guest book on the desk. Mark Ackerman is on there. Inspector Browning is also listed there.
1920 Prague - Gus
Skalnic’s Office -- See cut-scene of Gus punching Inspector Skalnic. Exit the police station. Meet your policeman friend. There’s been another murder. Get to map. Choose Shore.
Shore -- Go down steps and keep going forward until you see the boat. Use the boat. As you arrive, the boat will be destroyed.
Lavatory -- Try to open the door. It’s locked. Climb onto the water wheel. Go forward and around the corner. Examine the body. Examine the body again and take the ring. The police shoot at Gus. You are inside now. Climb down the second ladder. Examine the generator.
Generator Puzzle
Examine the instructions on the wall. You need 4 liters to get light. You have a 3 liter bucket.
| 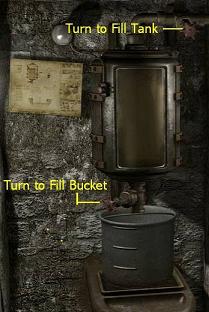 |
1. |
Take the bucket and place underneath the spigot. |
| 2. | Turn the red valve up above to fill the machine. 3. |
| 3. | Turn the bottom red valve to fill the bucket. 3 Liters will be put into the bucket. The machine now has 2 Liters in it. |
| 4. | Empty the bucket. |
| 5. | Put the bucket back under the spigot. |
| 6. | Turn the bottom red valve to empty the 2 Liters in the bucket. |
| 7. | Turn the top red valve to fill the machine again. |
| 8. | Turn the bottom red valve to release 1 liter into the bucket. The machine will be left with 4 liters. |
| 9. | Click the red button and the machine will go on and drain the water from the reservoir. |
Go back upstairs and outside. Go around to the other side of the reservoir and climb down into it. Gus will automatically remove the manhole cover and climb in. Go through the doorway to enter the maze.
Maze Puzzle
Go straight to enter the maze. Use the directional arrows at the right of the screen to go forward, back, left and right. This is the view you will have. In the center is your first destination.
These are turn by turn directions. I am listing direction only for each place you get to that there is the option to make a turn.
Step 1: East, East, North, West, North, North, East, North
You will arrive at a door. There is a puzzle on the door that involved 6 rings. You only have 5. You will need to find another one.
Turn around and Gustav will be in the maze in the middle of the first turn. The direction will begin from there: West, South, South, East, South, West, West, North, West, North, East, North, East, North, East, East, South, East, South, West, North, West
You will arrive in a small room. Examine the mutilated body. You will get the 6th ring. Now, you need to get back to the door.
East, South , East, North, West, North, West, West, South, Wet, South, West, South, East, South, East, East, North, West, North, North, East, North.
Door Puzzle - Ring Section

The first part of the puzzle is to make all six rings fit into the slot. You will have to rotate the rings and determine the best placement.
Position A = ring with 3 point and 1 to the left
Position B = ring with 3 points and 1 opposite
Position C = ring with 4 points in a row
Position D = ring with 2 points and 2 opposite
Position E = ring with 4 points on it evenly apart.
Position F = ring with 2 points spaced apart and 2 together
The goal of the 2nd part of the puzzle is to get the key from the bottom all the way up to the top next to the key cutout. You accomplish this by clicking on the handles to slide the tiles up, right, left, or down.
There may be a shorter way, but this is the way I solved it. Click on the following:
1,2,3,5,8,7,11,3,12,2,4,9,8,7,2,11,1,5,8,4,3,2,8,12,9,11,2,1,12,8,4,2,9,9,5,1,1
Door will open. See Ida being murdered by Mark Ackerman. Gus can do nothing to stop it.
Chicago - Victoria
Gallery -- Listen to descriptions of Mark Adam’s paintings. Speak to Mia. Talk to Richard at the front desk. Go straight down the center aisle past the fountain. Examine the book on the stand. The book will be in your inventory under documents.
Office Garage -- In the parking garage, take the fire extinguisher from the wall.
8th Floor Office -- Cut scene will occur. Claire interrupts Victoria typing on her computer. Exhaust all conversation with Claire. You will need to get into Inspector Browning’s office. Speak to the Janitor. He won’t give you the keys. You’ll need to distract him.
8th Floor Hallway -- Go down the hall to the coffee machine. Press the button to pour the coffee. It goes into the drain. You’ll need to block the drain. Take the napkins to the right and use on the drain. Press the button again to create a mess.
8th Floor Office -- Notify the janitor of the coffee spill. When the janitor leaves, take the keys and screwdriver from his cart.
Browning’s Office -- Take the tasar from the table on the left. Examine Browning’s desk. Try to use the computer. It is password protected. You will need to go directly to the archives downstairs. Examine the safe on the wall. It has a print scanner. You will need one of Browning’s fingerprints. Take the coffee cup from Todd’s desk. Go out to Claire’s desk and lift the fingerprint.
Claire’s desk -- Open the powder first. Then click on the brush. Click on the cup. Turn the cup to find a full print. Click on the tape. Click on the cup. You now have one of Browning’s fingerprints.
Browning’s Office -- Use the fingerprint on the safe. Open the safe. Take the key. Exit Browning’s office.
Elevator -- Insert the key into keyhole. Press B3.
Floor B3 -- The door to the Bomb Squad Room is locked. You need to jolt the circuits. Examine the small box below the blue sign. Use the screwdriver on the panel. Use the tasar on the exposed wires.
Bomb Squad Office -- Examine the guns. Examine the air vent near the floor. Remove both screws to get the cover off. Examine the computer. Press the release button. Next to the keyboard are two buttons. Press the top one to get a visual of the other rooms. Choose the screen that shows the security panel for the door. Press the red button all the way to the right to send the robot on its way.
Disarming the Security Door
Use the direction buttons to move the robot in the direction you want. I have highlighted the route you need to take for this first task.
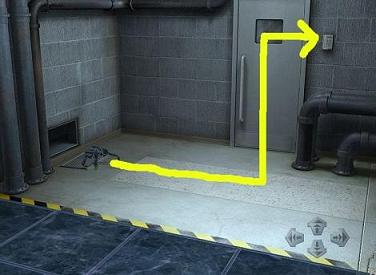
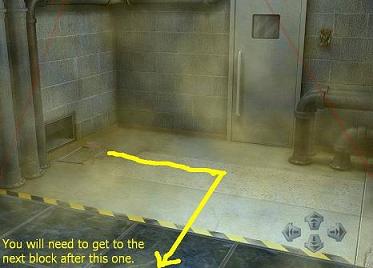
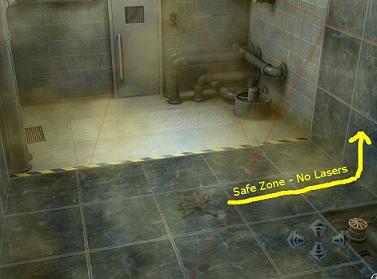
The robot will destroy the security panel. Leave the Bomb Squad room and go through the other door. The room is secured by lasers. You need to be able to see them. Use the fire extinguisher. Now you can see the lasers, but you will need to use the robot again.
Disarming Archive Door while Dodging Lasers
The goal is to avoid the lasers and get to the security panel on the other side of the room. You need to pay careful attention to the lasers and enter a block only after the laser has just left.
Timing is everything in this puzzle. Be prepared to start over again and again.
I will detail the path step by step as screenshots allow.
You can now enter the security door. Go through and open door to archives. Click on the computer. Observe cut scene of computer obtaining the documents. Most of the documents were deleted in 1932. Only one remains and that one was checked out by Gus in 1932.
Todd confronts Victoria. Victoria quits her job and threatens Todd with blackmail.
Pat’s House -- Go upstairs to the study at the end of the hall. Examine the painting on the wall. It will appear in inventory. Turn the painting around. Click on the eyeball to see there’s a lump on the back of the paintings. Go back downstairs to the hot tub room and get an exacto knife from the toolbox. Go back upstairs and use the exacto knife on the painting. Cutscene of Gus’s final story. Exit the room. Claire calls. Vaclav needs help.
Campus -- Enter the building and go upstairs. Victoria will go to Mia’s apartment.. The killer stabs Victoria with a drug filled needle and attacks. Victoria fights him off. Vaclav comes in and is killed. Victoria wakes up long after. She will automatically take a gun from Mia’s purse. You need to find Mia. The paintings are the key.
Gallery -- Enter and examine all the paintings. A word will show up on some of the paintings.
Women dead in the alley – Sewers
Painting of Prague --- Prague
Picture of Boat in Harbor --- Chicago
Picture of Doctor --- Doctor
Picture of Nurse --- Mental Institution
Man in Straight Jacket --- Los Angeles
Picture of woman w/bridge – Bridge
Note: For Bridge, you must examine the painting, examine the woman & examine the bridge itself (left) for the word to come up.
Go to Richard’s desk and use his computer. Pick any combination of words listed on the right and then press the magnifying glass at top left to get a result.
The correct combination will be Bridge, Chicago & Prague. You find Tominova Bridge, a replica of the Charles Bridge in Prague. Exit the gallery. A new location has been added. Choose Tominova Bridge on the map.
Watch final cut scene.
The End.
|