One of the greatest things about Voyage is that there are multiple paths you can take as you go through the game. Certain items are available at more than one location and some of the puzzles are optional. This walkthrough is simply intended to help you get through the game and provide solutions to the game’s puzzles. While I tried to point out some alternative solutions and optional content I was able to find, the walkthrough does not necessarily cover every single aspect of the game.
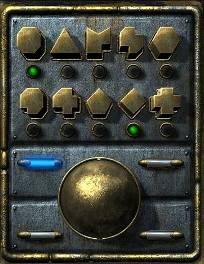
Note that the items you pick up will not be immediately distributed across the item slots in your inventory. You can either organize the items individually, or click on the “Auto” button to distribute the items automatically.
If you have trouble getting through any part of the game, feel free to contact me at Ugur@AdventureLantern.com.
Part I - The Journey
The game begins as Michel Ardan wakes up dizzy and confused inside the shell. There is a can underneath the sink behind you. Turn around and pick it up. Also pick up the funnel attached to the vibrating potassium hydroxide tank. Walk towards the men sleeping on the benches. Ardan will recognize one of them. There is an article attached to the wall to your right. Click on it to find out more about Ardan. Now click on the man lying down on the bench underneath the article.
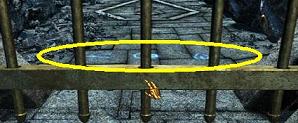
There is a wrench next to the article on the wall. Click on strap that is holding the wrench. When the wrench falls to the floor, click on it to pick it up. Underneath you, there is a glass window with a protective cover. Open your inventory and pick up the wrench. Use the wrench on the screws at the corners of the window. The protective cover will fall off and a cut scene will follow.
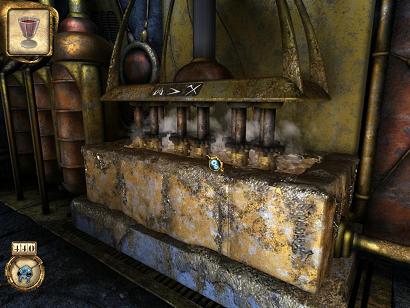
Just a few moments after the cut scene, Ardan will exclaim that he is suffocating due to a lack of oxygen and a puzzle with a time-limit will be triggered. Assuming the time limit has already begun, you can solve the puzzle as follows:
After the cut scene walk up to Barbicane. Look closer and Ardan will notice a dark stain. When you turn Barbicane over, a key will fall on the floor. Pick it up. Use the key you just found to open the cabinet. On the left side of the cabinet, there is a notebook on ideograms. Click on it to pick it up. Now pick up the package behind the notebook. Go back to the spot where you found the can and the funnel. Click on the bowl over the flame to bring it closer. Use the chlorate of potash package you just took from the cabinet on the bowl. Click on the bowl one more time to move it back over the flame. The oxygen level will return to normal.
Once you solve the oxygen puzzle, continue your investigation. Click on the piece of paper in Barbicane’s hand. Click on Barbicane’s hat. Finally, click on the wallet in his pocket. Turn around and click on Nicholl. Pick up the rifle he is holding. Look at the wallet inside Nicholl’s pocket. Click on Nicholl’s face.
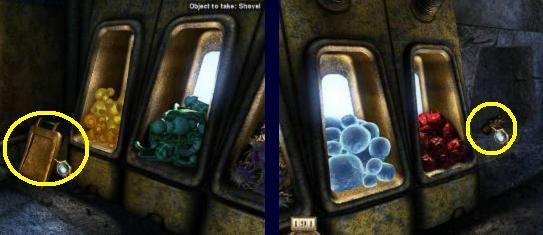
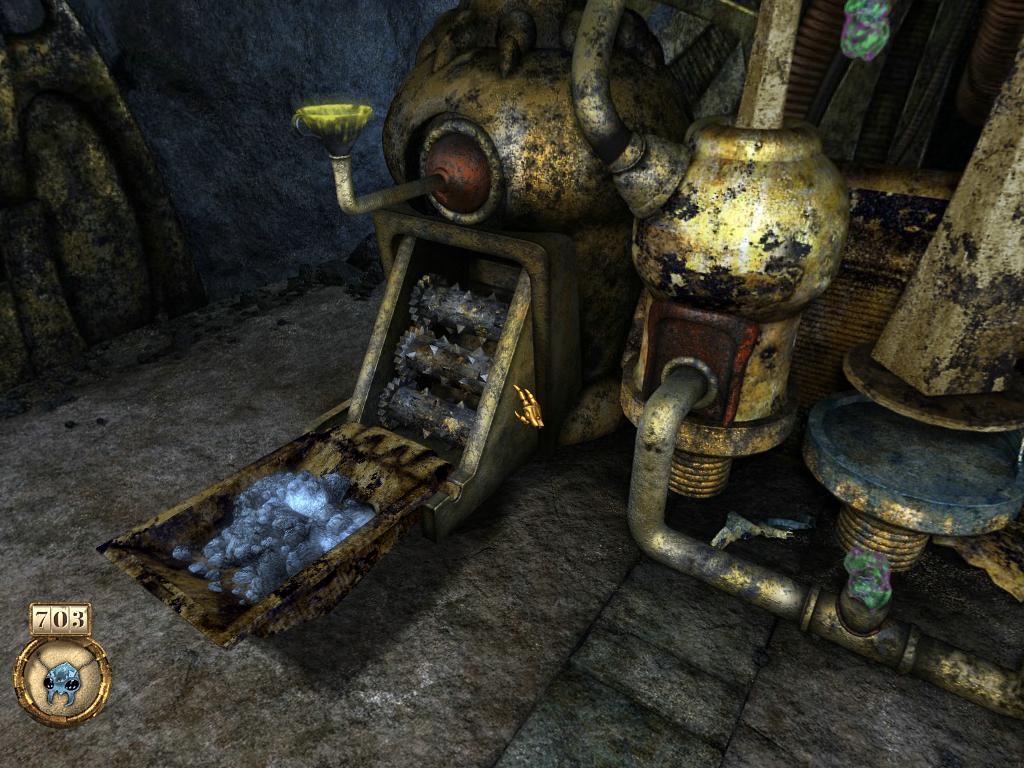
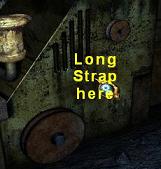
Go back to the cabinet where you found the chlorate of potash. There are many items you can take from the cabinet. There is a gun powder barrel on the top right and a vine plant next to it. Underneath the vine plant, you will find a disinfectant bottle and Ardan will figure out how Nicholl must have died. You can also take the long strap, cartridges, empty pot, and knife located on the shelves under the disinfectant bottle. Use the pocket knife on Barbicane’s hat.
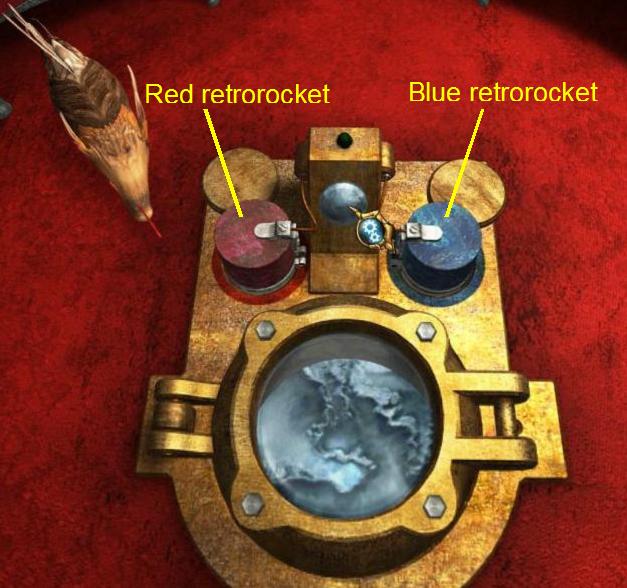
In the middle portion of the cabinet you can pick up three pieces of raffia. Beneath the raffia there is a blue and a red retrorocket you will need for landing. You do not necessarily need them, but you can also take up to three cans of food. Finally, open metal grate to find the wine. Take the glass on the left.
Eventually, the shell will reach a point where there is no gravity. The potassium will come flowing out of the tank. Access your inventory. Use combine the funnel and the can. Select the combined item. Now Ardan will be able to gather the liquid. Collect all of the floating liquid and a cut scene will follow.
Click on the window at the bottom of the shell to note that it is covered with frost. You should also see a rooster next to the window. Walk up to the animal and click on him. After the cut scene, take the burnt piece of paper behind the rooster. Turn the valve on the oxygen generating machine. The shell will begin to warm up. In a few moments, a cut scene should follow as the shell begins its descent.
Select the raffia you had taken from the cabinet. Click on the blanket underneath Barbicane. Now pick up Barbicane’s corpse. Click on the window at the bottom to open it. Toss Barbicane’s corpse out. Do the same thing with Nicholl’s corpose. Once you lift Nicholl’s corpse, you will see a can opener on the bench. Take it.
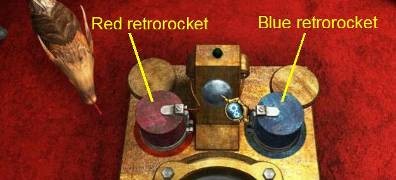
Note the red and blue circles on each side of the bottom window. Click on the metal covers to reveal two holes. Select the red retrorocket from your inventory and use it on the opening marked by a red circle. Go back to your inventory. Combine the wrench with the powder barrel. Ardan will break open the barrel and reveal the gunpowder. Use the gunpowder to fill up the empty blue retrorocket. Put the filled blue retrorocket in its slot. When both of the rockers are in place, the machine will start blinking.
If you click on the gray button now, the shell will fall too fast and Ardan will die. Instead, open the window and throw out the following items: Long strap, short strap, burnt paper, plant, pocket knife, potassium can, rifle, and any raffia left in your inventory. Ardan will refuse to throw out the tin cans, the can opener, the glass, and the empty pot. You also need to get rid of the protective covers on the side windows and the top window. To accomplish this, walk up to each window and use the wrench on the screws. To reach the protective cover at the top, you will first have to climb up the ladder inside the shell. Once you get rid of the excess items in your inventory and the window covers, click on the gray button at the center. The shell should drop at the right speed and Ardan should safely reach the moon.
Part II - Exploring the Moon
Watch Ardan’s landing on the moon. Before leaving the shell, restock your raffia from the cabinet. You will need it later. Open the bottom window and walk outside. Ardan will comment on the plants and the rock that stopped his shell.
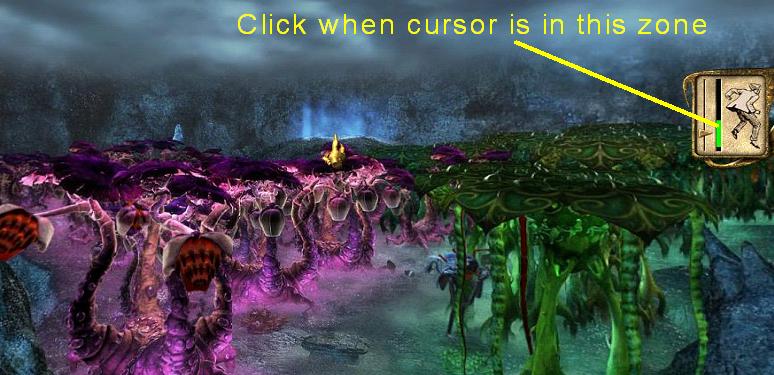
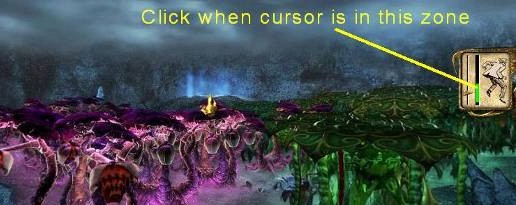
There is a patch of green fruits to the right of the red plant. Collect three of these fruits. Walk up to the edge of the cliff. Take the yellow fruit in front of you. Ardan can jump across the gap between where you are standing and the forest ahead. Turn to the left towards the cliff edge that is sticking out. A cursor will appear on the right side of your screen. You need to click on the left mouse button when the cursor is within the green zone. If you are successful, Ardan will jump across. You will have to repeat this process as you proceed to new areas or jump back towards the shell. However, you only have to perform a specific jump successfully once. After one successful jump from one point to the next, you will not have to time the same leap again.
When you reach the forest, you should see purple and green plants in front of you. If you walk towards the plants, they will not allow you to pass. Instead, look up and jump over the plants. You can use the screenshot below as a reference to find the hotspot. You will reach the hill at the center of the forest. Pick up the twisted plating to your left.
Turn around and face the blue and yellow plants. You should see machines on either side. Walk up to the one on the left. When you reach the machinery, you will notice a contraption with a coin slot. Click on the slot and Ardan will notice the lunar coin on the ground. Take the coin.
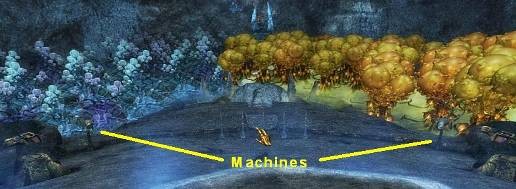
Now go across to the machine on the other side. You will see a similar contraption with a coin slot. Fortunately, this device is not broken. When you hover your mouse pointer over the coin slot, Ardan will realize he is supposed to use a lunar coin. Click on the slot to look through the lunar telescope. Ardan will notice a building in the distance. That will be our next destination.
Turn around and go back to the highest point of the hill. If you look towards the blue and yellow portion of the forest, you should find a place in the distance Ardan can jump towards. Click on the left mouse button when the cursor is inside the green zone to make Ardan leap across. Now you should see a light in the distance. Jump towards it. Ardan will arrive in a small area with two machines. One of them seems to be supplying fire whereas the other is supplying water. Hover your mouse over the ideogram on the fire machine. Ardan will decipher the meaning of the ideogram. Now hover your mouse over the ideogram on the water machine. Ardan should decipher this ideogram as well.
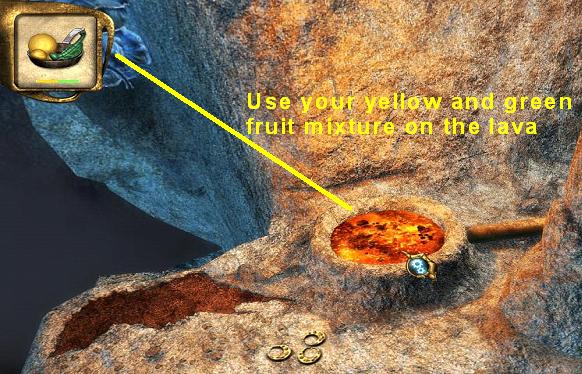
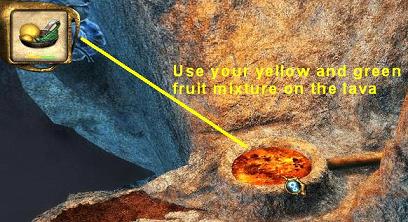
Since we are about to perform several more jumps, you can do something in this area to help you out. Open your inventory and combine your cooking pan with a green and a yellow fruit. Now use the pan on the lava to your left to cook the mixture. Once it is ready, access your inventory again and use the cooked meal on Ardan. He will consume the food and temporarily become energized. The jumping sequences will now be significantly easier.
Before proceeding, pick up the lunar coins next to the lava. You will also notice some blue fruits floating up every few seconds. Catch three of these by clicking on them. Now turn around. We will resume our climb. Note that at various sections of the mountain there are ideograms like the one illustrated below. These ideograms provide you important hints. You can probably already guess their meaning right now. But before we can fully implement the solution, we will need some more items. For now, just continue up the mountain.
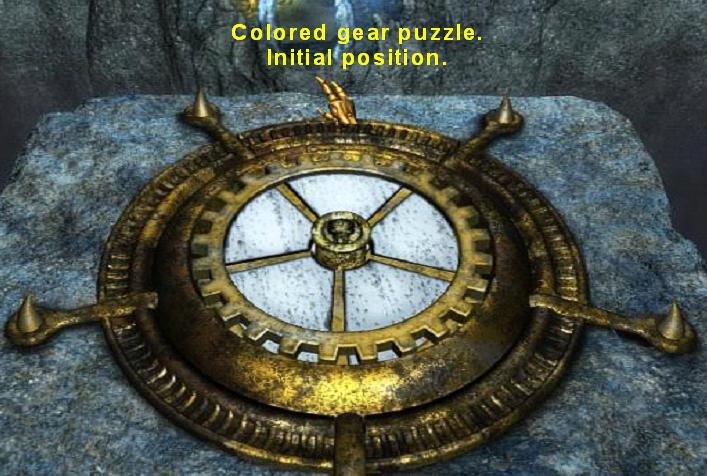
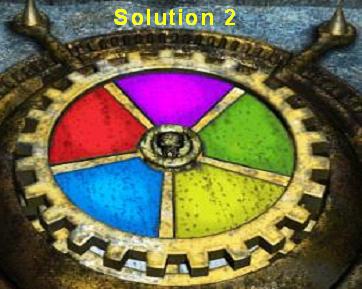
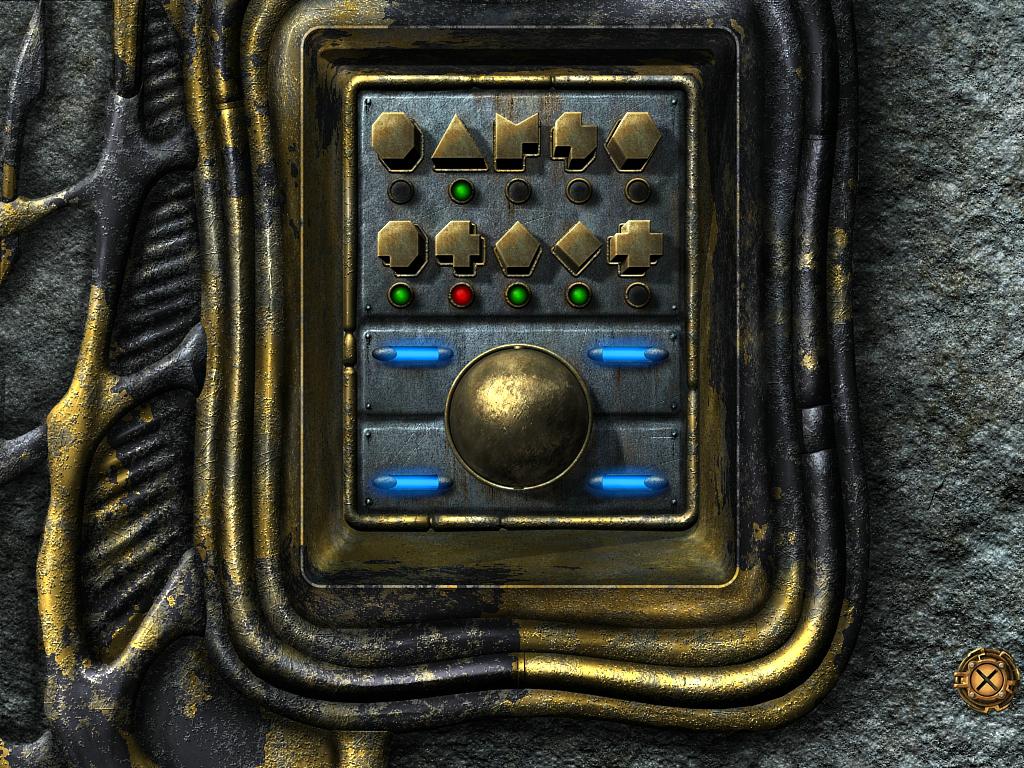
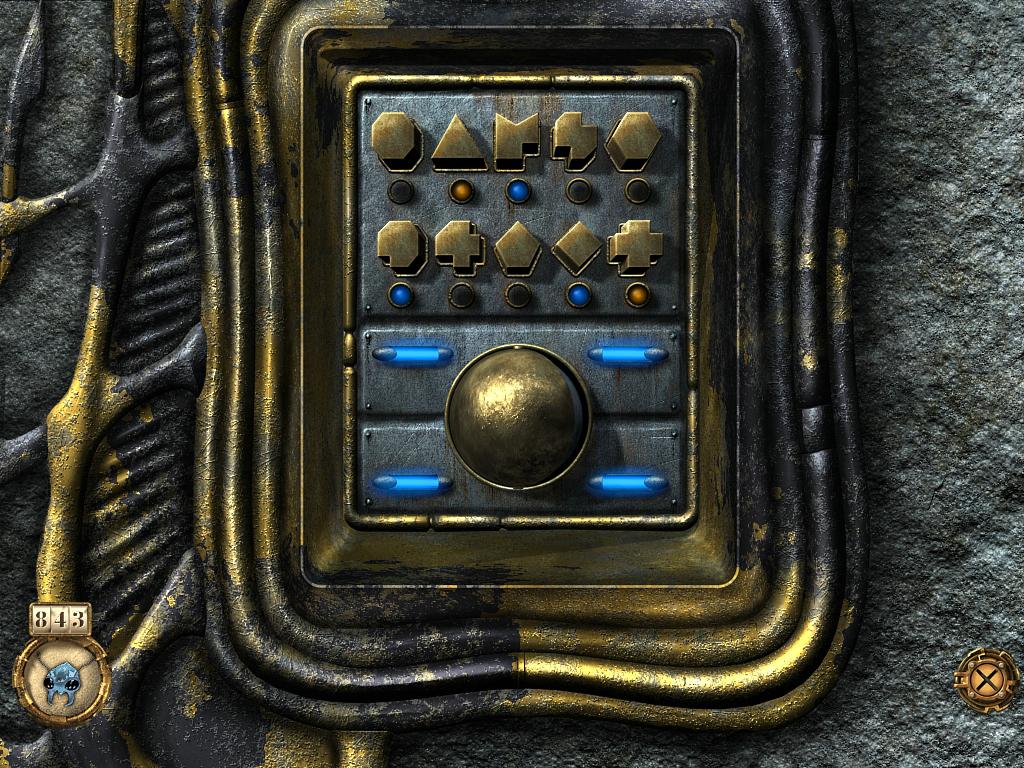
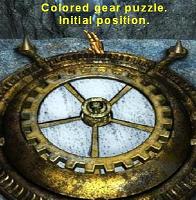
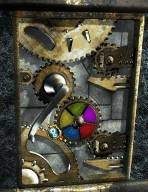
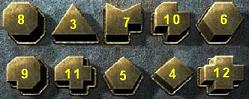
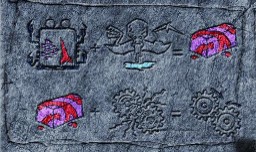
Jump from the location with the lava and the water to the next higher edge. Repeat the process a few times and you will eventually arrive at the bottom of a set of stairs. Before climbing the stairs, turn around and take a look at the white wheel in the ground. You can change the colors of the wheel’s tiles by clicking on them. When you enter a correct combination, a colored gear will be produced and Ardan will be able to take it. There are two possible solutions to this puzzle.
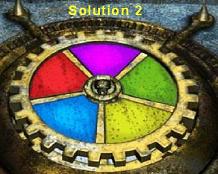
To get the first gear, you will have to match the colors on the wheel to the colors of the forest in the distance. Purple should be at the top. Going clockwise, follow with red, blue, yellow, and green. When you assemble the colors in the right order, the gear will come off. Put it in your inventory.
To get the second gear, you need to use a similar combination to the first gear. Keep the purple on top, but switch the positions of green and red. Also switch the positions of blue and yellow. Take the gear. The correct solutions are:
Note that you can continue making wheels by alternating the first and second solution. You only need two of them to complete the game. It is optional, but you can also make a third one right now to help open a shortcut later.
Now that you have both of the wheels you need, climb the stairs and you will finally arrive at the location you observed with the telescope. When you reach the top, a Selenite should immediately turn around and spit in front of you. He sure does not seem to be a friendly creature. You will have to come up with a way to make him leave the mountain area. You cannot do anything else here for the moment. Turn around and go all the way back to the center of the forest where we originally used the lunar telescope.
To return to the center of the forest, climb down the stairs and look forward towards the forest. When you are back in front of the colored wheel puzzle, you should see a hotspot where you can jump directly across to the section with blue and yellow plants without having to climb down the mountain. Use this hotspot to quickly return to the forest area. When you reach the section with blue and yellow plants, jump towards the center of the forest.
Part III – Summoning the Selenites

You should be back at the highest point of the hill at the center of the forest. Go towards the machines on either side. Move forward one more time and you should find yourself in front of stairs leading down to more machinery. Note the patch of yellow fruits. Pick up fruits until you have three in your inventory. Turn around. You should see a sealed door. Walk up to the door. When you are in front of the door, there will be a place where you can take lunar potting soil, lunar raffia, and a dead branch to your right. Take three portions of the soil, three pieces of raffia, and the dead branch.
Across from the place where you will find the raffia, you will notice an organ with colored buttons. Walk up to the organ and Ardan will comment that the instrument needs air and water to function. Walk up the stairs next to the organ. You should get to a room with a couple of levers and a large fan.
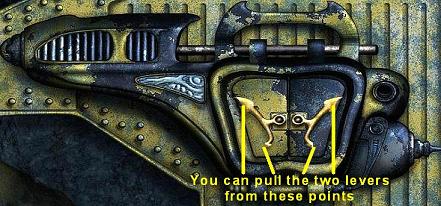
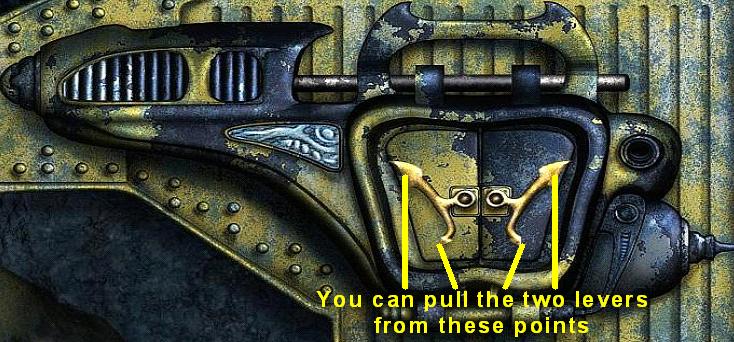
Let’s deal with supplying air to the organ first. On the far right corner of the room, you should see a sealed box attached to the wall. If you walk up to the box and click on it, you can start a puzzle. The goal is to use the two golden levers to remove the bar that is keeping the box locked. Click on the levers in the following sequence to solve the puzzle:
- Bottom portion of the left lever.
- Top portion of the left lever.
- Top portion of the right lever.
- Bottom portion of the right lever.
- Bottom portion of the left lever.
- Bottom portion of the right lever.
- Bottom portion of the right lever.
The box will open and reveal a lever. Click on it to open the trap door above you. Now go back to the place where you entered this room. Click on the left lever illustrated in the picture below. The fan will start and Ardan will decipher the meaning of the ideogram on the lever. Click on the second lever as well. Nothing will happen yet.
It is time to supply water to the organ. To accomplish this you have to go back to the place where you found your first lunar coin. You can leave the room through the newly opened trap door. Once you exit the room, turn around and you should see the machinery where you found the coin. Walk up to the device and click on the box with ideograms. This time around you need to click on the correct ideograms to remove the metal bar. Ardan had mentioned that the organ needed water. The ideogram with the two lines resembles water. In fact, if you have been following the walkthrough, Ardan will have already deciphered this ideogram’s meaning. You will notice that the water ideogram appears on each row and column of buttons.
To solve the puzzle, you need to click on one water ideogram on each row and column. The correct buttons are:
- The second button on the top row
- The third button on the second row
- The first button on the third row
- The fourth button in the last row
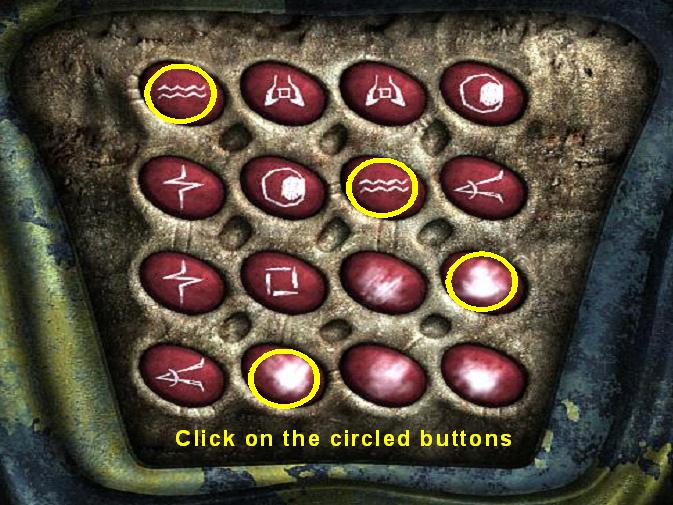
When you solve the puzzle, the box will open to reveal a lever. Click on it once to start the water flow in the direction of the organ. The lever should be pointed to the right once you click on it. Now turn around to solve the puzzle on the opposite side. Before starting the second water ideogram puzzle, note the lunar reeds on the right. Take three of them. You will need it later.
The second water ideogram puzzle follows the same pattern. But this one is a little bit harder since some characters have been wiped off. To solve the puzzle, click on the following buttons:
- The first button on the top row
- The third button on the second row
- The fourth button on the third row
- The second button on the last row
You can also use the images below for the solutions to both water ideogram puzzles:
 
The box will open and a lever will be revealed. Click on the lever to adjust the water flow towards the organ. You should need three clicks and the lever should be pointed to the left when you are done. Now that both water devices and the fan are active, the organ is ready to use.
You can now go back to the organ. Starting at the lunar telescope, you will have to go forward once and climb down the stairs. You have probably noticed the large dial at the base of the stairs and next to the yellow fruit patch. This dial controls a machine that serves as a weight sensor. The sealed door leading into the mountain can be unlocked if the number of creatures indicated by the dial are standing in front of it. Note that it is currently pointing to three creatures.

The organ can be used to summon Selenites working out in the fields. These seemingly mindless drones will assemble in front of the dial as you call them. When three of them arrive, the door will open. However, you cannot yet make much progress in the caverns behind the sealed door. Thus, we will only summon the Selenite blocking our entry to the location we saw through the lunar telescope. We will come back here and summon all three Selenites later.
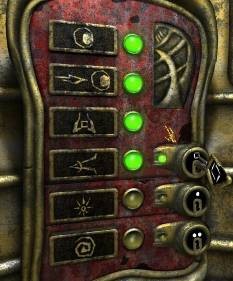
To the left of the organ, you will see a panel with colored dots at the top. Each pair of dots indicates a Selenite out in the fields. You will have to enter the proper notes through the organ to call the Selenite back. The summoning process works by entering the correct notes. You will start by clicking on the notes indicated by the colored pairs of dots. The Selenite will respond with a longer sequence of notes. You will have to repeat the sequence back and go through several similar iterations. Eventually the alien will arrive.
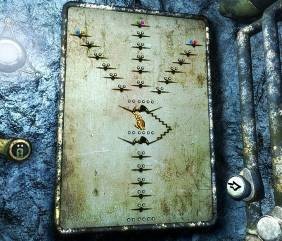
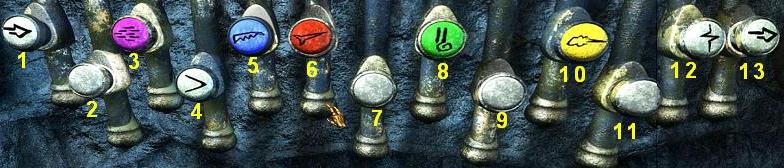
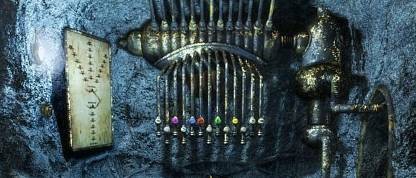
I have assigned numbers to the notes on the organ. There are a total of 13 notes you can press. The first and the last note are the same. We will number the notes 1 through 13 starting with the first one on the left. You can use the following image as a reference:

To call your first alien, use the following combination. If you make a mistake at any point, you will have to start from the beginning. If you take too long to respond, you will also have to start from scratch:
- Press buttons 5 and 10. These are the blue and yellow buttons.
- When the Selenite responds, press buttons 5, 10, 13, and 12.
- Press buttons 5, 10, 13, 12, and 12.
- Press buttons 5, 10, 13, 12, 12, and 13.
- Press buttons 5, 10, 13, 12, 12, 13, and 10.
- Press buttons 5, 10, 13, 12, 12, 13, 10, and 5.
The green and purple Selenite should arrive. If you look back at the panel, you will see that his colors are now at the center line.
Now you have nothing preventing you from exploring the place you saw in the telescope. Before you leave, note that the panel next to the organ has changed to reflect the creature’s new location.
Ardan will refuse to go near the lunar creature. Instead, turn around on go up the stairs into the room with the fan. Exit the room through the trap door. Once you are outside, turn around and go to the highest point of the hill. Jump towards the blue and yellow part of the forest. Jump across again to get to the machines delivering lava and water. Climb up the mountain to go back to the area where a Selenite spat at you.
Part IV – The Necropolis
Before you go towards the door, click on the spit in front of you to collect three samples. Now walk up to the door. To the left of the door, you will see a device with gears. Use the colored wheel you found earlier on these gears. Click on the lever. The door will open.
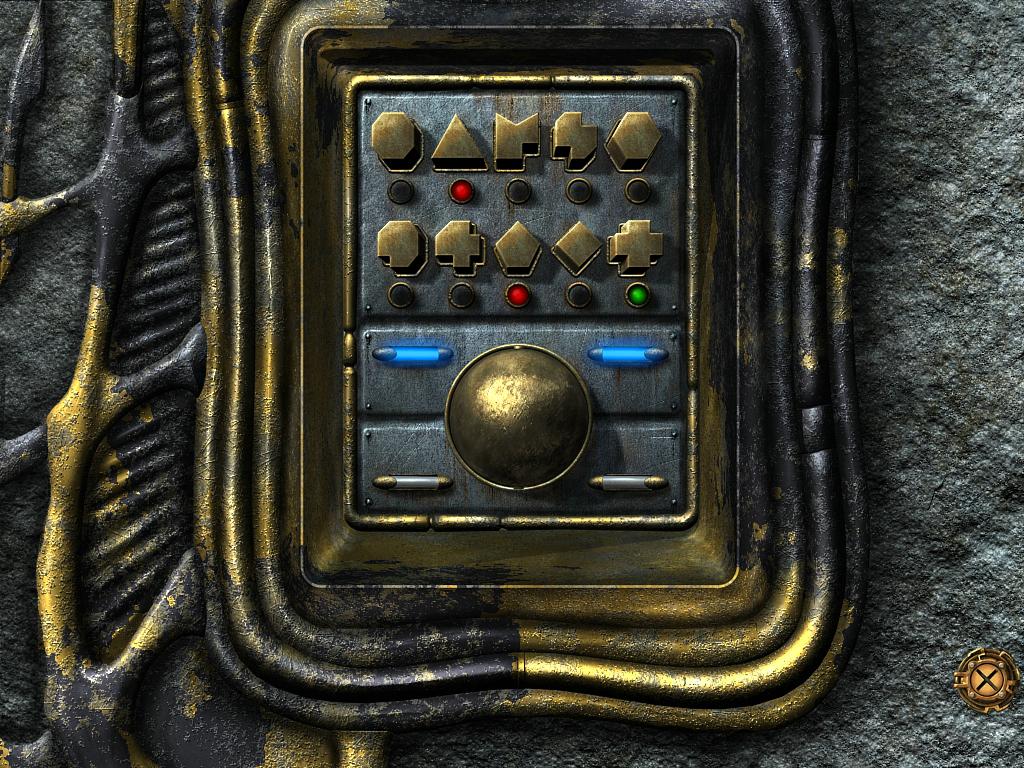
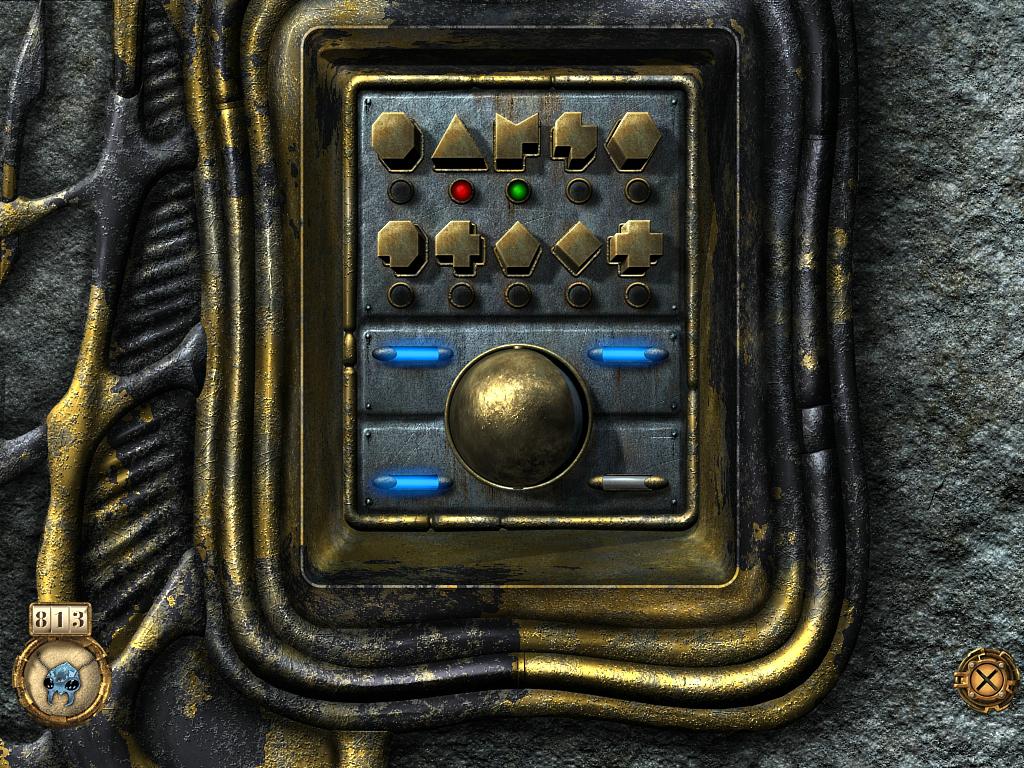
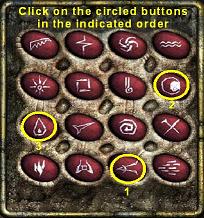
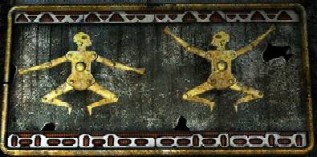
Walk up to the second door blocking your path. Ardan will stop briefly and comment on the pictures on the wall. When you get to the metal barred door, you will notice three ideograms drawn behind it on the ground. To the left of the door, there is a series of buttons with ideograms. Look closer to start the puzzle.
All you have to do is enter the pattern you saw behind the barred door. Click on the following buttons to solve the puzzle:
- Click on the third button on the last row from the top.
- Click on the fourth button on the second row.
- Click on the first button on the third row. The door will open.
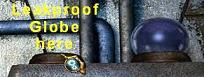
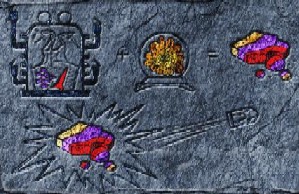
Walk inside. The door will close behind you. Ardan will make a few comments and decipher the meaning of three new ideograms. When he is finished, move forward. To your left, you will see a sarcophagus. Ardan will point out that it looks like a tin can. Use your can opener to access the sarcophagus. Take the iron bar on the left. Also take the Selenite key, lunar tool, and leakproof globe on the right. Finally, click on the inscription to the bottom of the sarcophagus. Ardan will copy it in his notebook. The inscription is the key to solving the next puzzle and it will help you understand the Selenite numbering system.
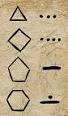 Looking at the inscription, you will see three dots next to a triangle, and four dots next to a diamond. The pentagon has a line next to it, whereas the hexagon has a line and a dot. As you can probably guess, the figure means the following about the Selenite numbers:
- 3 dots = 3
- 4 dots = 4
- A line = 5
- A line and a dot = 6
Go back towards the entrance of the necropolis. When you are in front of the door, take a look at the coffin on your right. You can use the iron bar you just picked up from the sarcophagus to open the tomb. Take the damaged mechanical arm, damaged flute, and gold necklace.
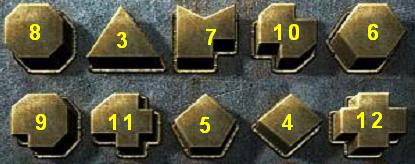
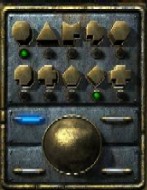 It’s time to leave the necropolis. Click on the control box to the right of the door. You will get to solve another puzzle. You should see a series buttons in different shapes. Two of the buttons will have a green light underneath them. Let’s use the picture on the right as an example. Note that the green light is on under the first shape on the left. The light is also on under the diamond. The first shape is an octagon, which has 8 sides. The diamond has 4 sides. If we add up the two numbers, we get 12. To answer the question we have to click on the shape with 12 sides. It is the rightmost shape on the second row. You will be asked a similar addition problem several times. Each time you answer correctly, a portion of the golden cover will be removed. When the silver globe underneath is completely revealed, the door will open.
To make it easier for you to answer the questions, you can use the image below. It contains the number of sides under each figure. This should keep you from having to count the number of sides each time.
When you open the doors, you have to go all the way back to the area with the organ. However, if you walk back into the necropolis, the door will close behind you. You will have to solve a different variation of the shape puzzle. There are a total of four variations. When you solve all of them once, the door will open automatically when you click on the control box.
You are not required to solve all four variations. For now, it is recommended to solve the puzzle only once. However, you can find answers the remaining three variations later in the walkthrough.
Part V – Gaining Access to the Selenite Caves
To return to the organ, walk down the stairs back to where you got the colored wheel. Jump across towards the blue and yellow part of the forest. Jump to the center of the forest. Go towards one of the two lunar telescopes. Go forward one more time. Ardan will refuse to go down the steps and approach the Selenite. Instead, turn around and go down the trap door into the room with the fan. Go down the stairs inside the fan room and you will be back at the organ.
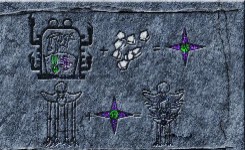
Call the second Selenite using the following combination on the organ.
- Press buttons 8 and 3. These are the green and purple buttons.
- Press buttons 8, 3, 13, and 12.
- Press buttons 8, 3, 13, 12, and 12.
- Press buttons 8, 3, 13, 12, 12, and 13.
- Press buttons 8, 3, 13, 12, 12, 13, and 3.
- Press buttons 8, 3, 13, 12, 12, 13, 3, and 8.
The blue and red Selenite should arrive at the center.
Now that you have two Selenites in front of the dials, take a look at the plants they are carrying on their shoulders. These are smaller versions of the plants from the forest. It seems like the Selenites need the smaller plants when they are working with the larger ones. This information will become important later in the game.
Call the third Selenite using the following combination:
- Press buttons 3 and 5. These are the purple and red buttons.
- Press buttons 3, 5, 13, and 12.
- Press buttons 3, 5, 13, 12 and 12.
- Press buttons 3, 5, 13, 12, 12, and 13.
- Press buttons 3, 5, 13, 12, 12, 13, and 5.
- Press buttons 3, 5, 13, 12, 12, 13, 5, and 3.
The blue and yellow Selenite should arrive in front of the dial. The sealed door will open.
Follow the Selenites through the door and into the mountain. Turn right and go forward once. You will end up in front of an elevator. Press the button to call the elevator. When the elevator arrives, walk inside. To your right, you will see buttons and a set of key slots. Select the Selenite key you found at the necropolis. Click on the slot that matches the inscription on the key. A number of floors will become available. Click on the fourth button from the top.
Part VI – Discovering the Selenite Culture
A cut scene will begin as soon as you arrive at the chosen floor. Selenites will escort you to a dignitary. When the Selenite is done with his monologue and Ardan decides what his next course of action should be, click on the dignitary. Talk to him about all of the topics.
The Selenite will ask for money when you ask about the space cannon. Even if you had enough money, all he gives you is a small tip. For now there are plenty of other challenges to overcome before you need access to the space cannon.
You will notice that you now have an “intelligence” score. You can increase this score by solving the puzzles in the game. Besides improving your self esteem, having a high intelligence score gives you access to the higher level keys in the game. The very room you are standing in has a couple of puzzles for you to learn the Selenite language and increase your intelligence.
When you are done chatting with the Selenite, click on the button underneath the illustration of three keys. The Selenite will explain how the key system works. When he is done, hover the mouse over the key request button again. You will see that you need 200 points of intelligence before you can get a level 1 key. If you have followed the walkthrough to the letter, you should not yet have the desired level of intelligence. We can solve a few puzzles to help you attain the right level.
Now click on the button in front of the screen directly between you and the dignitary. When the Selenite explains the purpose of the device, click on it to learn some new ideograms. The game will show you a series of ideograms. If you have followed the walkthrough, you should already know a number of these symbols. If you don’t know the meaning of the ideogram in the question outright, you should be able to use deduction to guess it. If you make a mistake, you will be given the opportunity to answer the question again when you go through all the questions for the first time. Answer all the questions and Ardan will learn all the ideograms he needs to complete the game. The number of intelligence points earned depends on how many answers you can guess correctly the first time around.
If you encounter a question you cannot answer, try checking your ideograms log. This will allow you to review the symbols you already know. At this point, you might have trouble answering the questions past the sixth one correctly since they are about plants. If you remember some of the buttons of the organ were colored. You can use the ideograms on these colored buttons to help you answer the plant questions. You can use the picture below to remind yourself of the colors and symbols on the organ:
Give the following answers to pass the test:
- Question 1: Conquer, agress
- Question 2: Empty, zero, reset
- Question 3: Light, truth, wisdom, luminous liquid (“lumen”)
- Question 4: Gloom, secret
- Question 5: Hunger
- Question 6: Moon, Supreme Lunar Ruler
- Question 7: Sagittaria (purple plant that propels stingers), fruit of this plant
- Question 8: Voracia (blue carnivorous plant), fruit of this plant
- Question 9: Gladiata (red sword-bearing plant), fruit of this plant
- Question 10: Strangulica (green strangling plant), fruit of this plant
- Question 11: Mephitia (yellow suffocating plant), fruit of this plant
When you complete the writing test, turn to your left. Click on the device and the Selenite will describe the machine’s purpose. Click again to start the sound test. You will see two sets of buttons. You need to match the sounds you will hear by pressing the buttons on the left with the sounds from the buttons on the right. Since the buttons on the left change every time, a direct solution for the puzzle cannot be provided. However, the following technique might be helpful:
| - | Click on any of the ideograms on the right. Click on the ideogram a few times to learn the sound. |
| - | Now start clicking on the ideograms on the left. You should eventually find the sound that matches the ideogram from the right. |
| - | Leave the ideogram on the left side pressed down and click on the matching one on the right. If you truly got a match, both ideograms will be lit with a white light. |
| - | If you make a mistake, you can use trial and error until you find a correct match. In fact, if you don’t even want to bother with trying to listen to the sounds, you can just click one ideogram on the left side and click on all the ideograms on the right until you find the match. |
The fewer mistakes you make, the more intelligence points you will earn from the puzzle. You can also try it multiple times to improve your score and earn extra points. There are four difficulty levels. With each new difficulty level, the puzzle will allow you to make fewer mistakes before you find all the matches. When you work your way up to the highest difficulty level, the puzzle will fail if you make a single mistake.
Once you complete the puzzle for the first time, the Selenite will congratulate you. If you don’t want to bother trying the puzzle again, or if you get a perfect score the first time around, click on the button of the machine across the room from the sound puzzle. The Selenite will explain the machine can be used to buy items. He will also explain that you can sell items to the Selenite by showing him an object.
The Selenite will buy just about anything with the exception of the Selenite keys. Some objects are more valuable than the others. When you show the Selenite an item, he will tell you its price in his native language. You will have to solve the sound puzzle before you can understand the prices. Initially, the prices at the shop will only be revealed by Selenite numbers. Before the prices will be shown to you in regular numbers, you need to solve another puzzle. The items offered at the store can be obtained in other ways as well. You will notice that the store is already offering some items you can easily find outside. Make sure you look around for the object before you buy anything so you don’t waste any money. For now, we don’t have to buy or sell anything.
Before leaving the room, click on the shell next to the Selenite. Ask all the questions about the shell. When you ask the Selenite to give it to you, he will once again ask for money in return for information. For now, you don’t have to worry about giving him money. Later on in the walkthrough, you can find out how to obtain the item without paying the Selenite.
Leave the room and go back to the elevator. It’s time to explore the other floors and help you get to 200 points of intelligence. You should already be very close if you got a perfect score on the sound puzzle.
The key you inserted should still be on the elevator. This time, go to the floor labeled with the food ideogram. It is the third one from the top. Remove the key from the slot when you get to the floor. If you do not remove the key, a Selenite will claim it for himself and you will have to figure out a way to get it back. If you do let the Selenite claim your key, use the next paragraph to recover it. Otherwise, you can skip the next paragraph.
Take the elevator to the second floor from the top. It will be labeled “Go, come, enter”. You are back at the floor where you entered the caves. Turn right and go forward twice. You should find yourself in front of a dial similar to the one by the organ. However, unlike the dial by the organ, you can actually adjust this one right now. Click on the first red dot from the right to adjust the dial as shown in the picture. The door will open. Go all the way back to where your shell landed. The entrance to your shell will be blocked by a green plant. In your inventory, combine potting soil and red fruit. You should produce a red plant. Use it on the green plant. It will stop blocking the shell. Go inside the shell. Open the cabinet to reveal the wine keg. Use your empty glass on the wine keg to fill it up. Go all the way back to the food floor of the Selenite caverns. To access the caverns again you will have to play one of the three Selenite summoning songs. When you get back to the food floor, use the glass of wine on the machine mixing the food. The Selenite guarding your key will get drunk. Go to the opposite end of the floor and talk to the guard. He should let you take back your key.
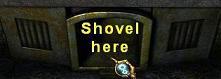
When you enter the food floor (or after you recover your key) walk to the part of the food floor with machinery supplying water and heat. You will also see a machine mixing food on the left. To your right is an unlimited supply of all five types of fruit. Fill your inventory with all the fruit you can carry. Take the shovel to the left of the fruit and the cogged cylinder to the right of the fruit.
We are done here for the time being. Go back to the elevator. Insert your key into the correct slot and go to the top floor. Remove your key when you get there.
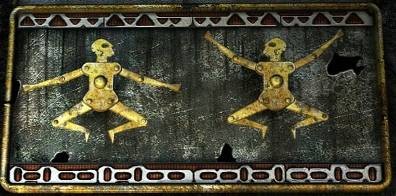
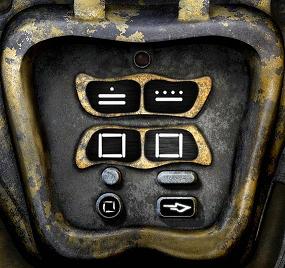
Leave the elevator and go forward twice. You will get to a puzzle. You will see a picture of two men at the top. You can move their legs and arms by clicking on them. The tiles at the bottom provide hints. By clicking on the arrow buttons, you can reveal the correct position for different pieces of the picture at the top. You can solve the puzzle by using the following instructions:
| - | The first hint is showing you the right leg of the man on the right. Click on the illustrated leg in the upper picture to bend it. |
| - | Click on the down arrow on the bottom part of the puzzle to see the next tile. This tile is showing the left leg of the man on the right. Click on the illustrated leg to bend it. |
| - | Click on the right arrow to see the next hint. Now we can see the correct position for the left arm of the man on the right. It needs to be pointing up so you don’t need to do anything. |
| - | Click on the up arrow. This tile is showing the left arm of the man on the left. It needs to be pointing down. Click on the illustrated arm to make it point down. |
| - | Click on the right arrow. We are looking at the left leg of the man on the left. Click on the illustrated leg to bend it. |
| - | Click on the down arrow. Now we see the right arm of the man on the left. Click on the illustrated arm to point it down. |
| - | Click on the right arrow. We are looking at the right leg of the man on the left. Click on it to bend it. The puzzle should be solved. If you had trouble following the instructions, you can use the image below. It shows the correct solution. |
When you solve the puzzle, a drawer will open. Take the control box from the drawer. We cannot make any more progress on this floor. We only solved the puzzle at this point to earn you a few extra intelligence points.
 Go back to the elevator. If you have been following the walkthrough, you should have over 200 hundred points by now. However, we will assume you do not have enough points and take care of a couple of things outside. Take the elevator to the second floor from the top. It will be labeled “Go, come, enter”. You are back at the floor where you entered the caves. Turn right and go forward twice. You should find yourself in front of a dial similar to the one by the organ. However, unlike the dial by the organ, you can actually adjust this one right now. Click on the first red dot from the right to adjust the dial as shown in the picture.
This adjusts the required number of creatures that must be on the scale before the doors will open. Setting the dial on the first dot means only one creature is necessary. Since Ardan is already standing on the scale, the door will open. Go outside. It is time to discover what the forest is hiding.
Part VII – Calming down the Plants
Now that Ardan understands written Selenite, we can decipher the mysterious ideograms we saw earlier as we climbed the mountain. When you exit the caves, go forward once. You will be in front of the first dial we encountered. Turn around and look up. Jump to the top of the stairs. Walk towards one of the telescopes. Walk to the center of the hill. Jump towards the familiar blue and yellow portion of the forest. Jump across to the lighted area with the machines supplying water and heat.
 You can see the first ideogram collection on the wall to your right. It reads Voracia conquers Sagittaria. In other words, the blue plant conquest the purple plant.
 Jump up to the next section. The ideogram here reads Sagittaria conquers Mephitia. The purple plant conquers the yellow plant.
 Go up one more level to find: Mephitia conquers Gladiata. The yellow plant conquers the red plant.
 The next set of ideograms read: Gladiata conquers Stangulica. The red plant conquers the green plant.
 Finally, the ideograms close to the colored wheel read: Stangulica conquers Voracia. The green plant conquers the blue plant.
Now let’s put all of this information to good use. Jump back to the edge of the yellow and blue forest. Jump back to the hill at the center of the forest. Return to the area with the organ. Across from the organ, you had found potting soil earlier and lunar raffia. Since we need more than three portions of potting soil and lunar raffia, return to that area.
Remember the messages saw as we climbed the mountain:
- Blue plant conquers purple plant
- Purple plant conquers yellow plant
- Yellow plant conquers red plant
- Red plant conquers green plant
- Green plant conquers blue plant
The forest is divided into five different sections. Each section is guarded by two kinds of plants. What you need to do is grow smaller versions of each plant. When you have the small plants, you have to combine them into pairs with the required strength to overcome the bigger plants guarding the forest. Follow the instructions to make all the plants you need. Take more potting soil and raffia as needed.
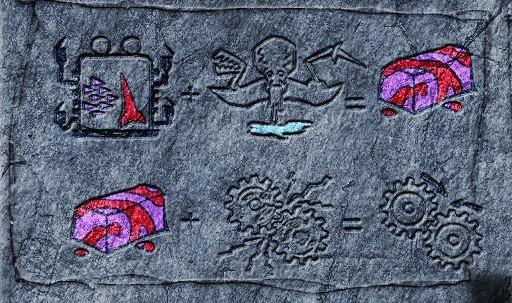
You can overcome the plants in the blue and yellow section by growing plants with the following combinations:
- Combine potting soil and green fruit. This will create a small green plant.
- Make a small purple plant by combining potting soil and purple fruit.
- Combine the purple plant, green plant, and raffia. The plants will be joined together.
To overcome the yellow and green portion of the forest, use the following combinations:
- Combine potting soil and purple fruit, making a small purple plant.
- Mix red fruit and potting soil to make a red plant.
- Combine the purple plant, red plant, and raffia.
To defeat the green and purple plants, try the following:
- Combine potting soil and red fruit making a small red plant.
- Mix potting soil and blue fruit making a small blue plant.
- Combine the red plant, blue plant, and a piece of raffia.
To calm down the plants in the purple and red section, you need this combination:
- Combine potting soil and blue fruit, growing a small blue plant.
- Mix potting soil and yellow fruit to make a yellow plant.
- Combine blue plant, yellow plant, and raffia.
Finally, the red and blue section of the forest requires the following items:
- Combine potting soil and yellow fruit.
- Combine potting soil and green fruit.
- Combine the yellow plant, green plant, and raffia.
Now that all the plants are ready, you can go to each section of the forest.
| - | Go to the blue and yellow section. Instead of jumping over the plants, we’ll walk up to them. Use the green and purple plant combination on the big yellow and blue plants. They will calm down and let you pass. Walk forward and you should see some yellow and blue fruit. Collect as many as you need to restock your inventory. We’ll need more fruit later. Walk forward one more time. To your left, you should find the burnt paper that you threw out of the shell. To the right is the pocket knife you threw out. |
| - | Go back to the beginning of the blue and yellow section. Turn left and jump towards the red and blue section. Walk up to the plants and calm them down using the yellow and green plant combination. Restock your red and blue fruits as needed. In this area, you should find the can and short strap you had thrown out of the shell. Take both of these items. |
| - | Proceed to the purple and red section of the forest. Calm down the larger plants using the blue and yellow plant combination. Move forward and take all the red and purple fruit you need. In this part of the forest, you should find the rifle, bolts, and the long strap. Take all of these items. |
| - | Now go to the purple and green section of the forest. Use the red and blue plant combination to quell the bigger plants. Restock your fruit as needed. Here you will find the funnel, protective shield, and a plugged-up conch shell. Take all of the items. |
| - | Finally, go to the green and yellow section of the forest. Use the purple and red plants to calm down the big green and yellow plants. Take the fruit needed. You should find a vine plant in this area. |
From the entrance of the green and yellow section, jump across to your shell. Walk up to your shell. Unless you came back earlier as part of the puzzle to recover your key that was taken by the guard, a green plant should be blocking your entry to the shell. Use the blue and red combination to calm down the green plant blocking your way. You can also calm down the red plant using the blue and yellow plant combination.
Enter your shell. Open the cabinet. Fill your empty glass with wine. Do not have Ardan drink the wine. You will need it against the Selenites.

By now you should have close to three hundred points. Let’s go back to the Selenite caves to acquire the next level key.
Part VIII – Deeper into the Selenite Caves
Go back to the organ. In order to regain access to the caves, you will have to call one of the Selenites out. When you initially summoned the creatures, they went into the caves to sleep. The second call will wake up the corresponding creature and send it back to work.
You can call out the Selenited depicted by the blue and yellow colors by using the following combination:
- Press buttons 3 and 5. These are the purple and red buttons.
- Press buttons 3, 5, 13, and 12.
- Press buttons 3, 5, 13, 12 and 12.
- Press buttons 3, 5, 13, 12, 12, and 13.
- Press buttons 3, 5, 13, 12, 12, 13, and 5.
- Press buttons 3, 5, 13, 12, 12, 13, 5, and 3.
The blue and yellow Selenite should leave the cave. The sealed door will stay open. Enter the caves.
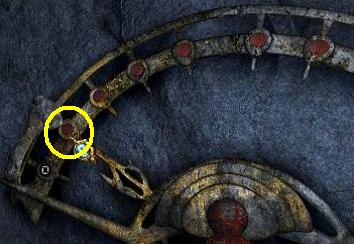
Turn right and go all the way to the end of the cave. It’s time to completely figure out the Selenite numbering system. At the end of the cave, you should see a metal box similar to the ones that contained the puzzles for the organ’s water and air supply. Click on the box for a closer look. You will see two rows of numbers. To the left of the box, there are some sample additions to help you understand the numbering system. From the shape puzzle earlier, we had figured out that 1, 2, 3, or 4 dots represented the corresponding number. A single line represented a five. Observing the sample additions should reveal that the maximum number that can be represented on the right bucket is 19 (three lines and four dots). A twenty is represented by a zero in the right bucket and a single dot in the left bucket.
To solve the puzzle, you need first click away from the puzzle and look at the number inscribed on the ground underneath the puzzle. A single line and a dot should be drawn to the ground. This represents the number 6.

Now look back at the puzzle. You need to add the number on the ground to the number displayed on the puzzle and enter the solution. Since the number on the puzzle is random, use the following sample solution as a reference:
| - | The number depicted by the puzzle in the image is 229. A line on the left side depicts 5 20’s adding up to 100. On the sample image, there are two lines and a dot on the left side. This adds up to 100+100+20=220. The right side contains four dots and a line. A line on the right side indicates a 5. 5+4=9. The entire number is 220+9=229. |
| - | Adding 6 to 229 gives us 235. We need to enter this number correctly using the buttons. Initially, the number on the right will be highlighted. You can click on the buttons shaped like a line or a dot enters the corresponding symbols. Clicking on the arrow button submits the answer. Clicking on the zero button clears your input. |
| - | 235 can be entered as follows: Select the input box on the left. Click on the line button twice. Click on the dot button once. This enters 220. Now we need to enter 15 on the right side. Select the right input box. Click on the line button three times. Submit the answer. |
The actual question changes every time you try the puzzle. The above solution is only meant to serve as an example. If you enter a correct answer, the box will open and reveal a lever. Click on the lever to open the door on your left. Right now, there is not much you can do in this area. However, solving the puzzle at this point should have easily given you enough points to go over 300. Instead of just getting the 200 point level 1 key, you will also be able to request a level 2 key when we go back.
Get into the elevator. Go to the floor labeled “to see, to know”. Walk up to the Selenite dignitary and click on the key request button. You should at least have 200 points by now. If you already have over three hundred points, as soon as you get the level 1 key, you can click again to request the level 300 key. If you do not have enough points, the next few puzzles should give you what you need. It is recommended that you come back as soon as you have enough points. When you request the level 2 key, the Selenite will announce that only the Supreme Ruler can grant it. Before we can get an audience with the ruler, we need to find a way to speak Selenite.
Before leaving the Selenite dignitary, we need to sell some items from our inventory and buy a couple of different items from the shop. The most valuable items in your inventory are the things you brought from earth. However, since you need some of these items, we will only sell the things for which we have an unlimited supply. Start by selling the three pieces of brown earth raffia that should be in your inventory. Now sell three cans of the food you brought from earth. Selling these items should earn you around 155 lunars.
Turn to your right and click on the distributor. Buy the mechanical hand and mechanical elbow. Open your inventory. Use the lunar tool you found at the necropolis on the damaged mechanical arm. You will end up with a mechanical forearm, mechanical upper arm, and corroded parts. Combine the mechanical forearm, mechanical upper arm, mechanical hand, and mechanical elbow. You will end up with a mechanical arm.
Get into the elevator. Use your newly acquired key in the level 1 slot. You can now access the “Light, truth, wisdom” floor. Go to this new area and exit the elevator.
 As soon as you get out, you will see a second addition puzzle in front of you. This time, the number on the ground is 22.
Click on the puzzle. Once again, you have to add the number on the floor to the number on the puzzle. You can use the following example as a reference.
| - | Assume the top line of the puzzle has three dots and one line on the left box. Assume there are four dots and three lines on the right box. |
| - | In the example the number depicted is 179. The line on the left translates to 5x20=100. The three dots on the left translate to 3x20=60. Without factoring in the right side, the total becomes 100+60=160. The lines on the right side represent 5 each for a total of 3x5=15. The four dots represent 4. The right side alone adds up to 15+4=19. The entire number is 160+19=179. |
| - | The number on the ground was 22. 179+22=201. To enter 201, select the input box on the left. Click on the line button twice. This is equivalent to 200. Now enter a single dot on the right input box. Submit the answer. |
When you enter a correct answer for your version of the question, the box will open and reveal a lever as usual. Pull the lever to open the door to the laboratory on your left. Enter the laboratory. You will see potting soil and raffia on the left and the purifier machine on the right. You can use the purifier to make interesting items using plants. However, the purifier needs to be repaired first.
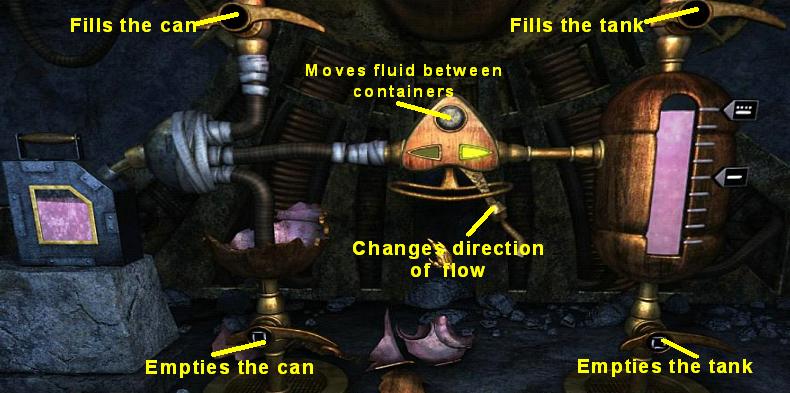
Use the leakproof globe from your inventory on the top left corner of the purifier. You should insert it on the opposite side of the existing globe. Combine the long strap and the short strap in your inventory. Place the combined strap across the wheels to the right of the machine. Use the shovel on the bottom part of the machine. The machine is ready.
 You can find two sets of recipes on either side of the purifier. We will first make an item that will allow the purifier to operate more easily. The recipe for this item is to the right of the machine. Combine a purple fruit, a red fruit and your cooking pan. Use the cooking pan over the lava in the laboratory. Put the cooked food into the compartment at the bottom of the purifier. Quickly equip the mechanical arm.
As your combination is getting purified, the machine will start overheating. Valves will randomly start getting hot and turning red. Use the mechanical arm on the hot valve to let out pressure. If you do not respond fast enough, your item will be ruined. If you successfully tend to the valves, zubroo concentrate will be created. Take the item from the compartment. Combine the zubroo concentrate with viscous secretion from your inventory. You will end up with Zubdssik’s greasy amalgam. If you do not have any viscous secretion, or do not remember what it is, this is the substance the Selenite spat in your direction in front of the necropolis. You can go back to that area to get some. Use the grease on the valves of the purifier. You will no longer need the mechanical arm to operate the machine.
 The next item we will make is glue. The glue recipe can also be found to your right. Combine a purple fruit, a green fruit and your cooking pan. Cook the solution over the lava. Put the cooked item into the purifier. You will end up with Yrsagtt concentrate. Combine the Yrsagtt concentrate with another sample of viscous secretion. You will get the extremely handy glue called Yrshnouff’s gluance.
For now, we have one last thing to do at the laboratory. You should already have a green and purple plant in your inventory. Put this in the purifier. If you do not have the plant, you can make it as follows:
- Combine green fruit with potting soil.
- Combine purple fruit with potting soil.
- Combine purple plant, green plant, and raffia.
 After you put the plant in the purifier, it will transform into Xulmi’s crystalline powder. Combining this powder with another item, as indicated by the recipe collection to the left of the purifier, can create an item that can shrink you in size! Just keep the mixture in your inventory for now.
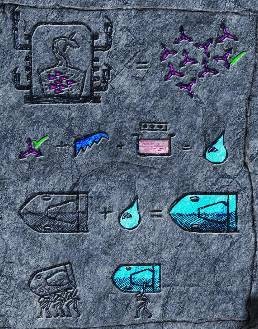
Leave the laboratory and go up to the Selenite in the next room. As soon as you walk in, he will turn around to greet you. He will not let you pick up any of the items in the room. To talk to this Selenite, we need to create a new item. Open your inventory. Combine damaged flute, Yrshnouff’s gluance, and lunar reeds. If you do not have any reeds, you can find some by the functional lunar telescope. When you combine the three items, the damaged flute will be repaired. Ardan will become able to speak with the Selenites in their own language.
Now you can talk to the Selenite in front of you. Talk to him about all topics. He will give you important information about lumen that we will need to use later. For three of the questions, he will request money. If you would like, you can go back to the dignitary and sell more items to make enough money. However, the information he provides is only a few small tips that you will not need if you are using the walkthrough. When you are done chatting, leave the room. The Selenite will not let you take any of the items here.
Go back to the floor marked “to see, to know”. Now that we can speak Selenite, we can request an audience with the Supreme Ruler. Walk up to the dignitary and click on the key request button. The Supreme Ruler will give you a couple of orders and grant you the level two key.
Part IX – Experiments with the Selenites
Once you acquire the level 2 key, return to the food floor. Walk up to the machine mixing food for the Selenites. Use your glass of wine on the machine.
Go to the Selenite guard at the other end of the corridor. Talk to him about both topics available. When you complete the second topic, you will be able to ask about getting help moving your shell to the space cannon. The Selenite will agree to help you if you play a logic game. He will ask you a series of questions. If you get them right the first time around, you will earn intelligence points. If not, you will get to try again once you have gone through all the questions.
The correct answers for the first test are:
| - | Question 1: The lunar residents crack their cartilage. |
| - | Question 2: The artificial jaw is in front of the lunar inhabitants. |
| - | Question 3: Lunar beings don’t crack their cartilage. |
| - | Question 4: The artificial jaw is not before the lunar citizens while they crack their cartilage. |
| - | Question 5: The artificial jaw is not set before lunar citizens. |
The correct answers for the second test are:
| - | Question 1: The lunar citizens who are present light up their cerebral lobes. |
| - | Question 2: We can not affirm anything for sure. |
| - | Question 3: We can not affirm anything for sure. |
| - | Question 4: The Supreme Ruler blinks his frontal ommatidia, and the lunar citizens present do not light up their cerebral lobes. |
| - | Question 5: The Supreme Ruler does not blink his frontal ommatidia. |
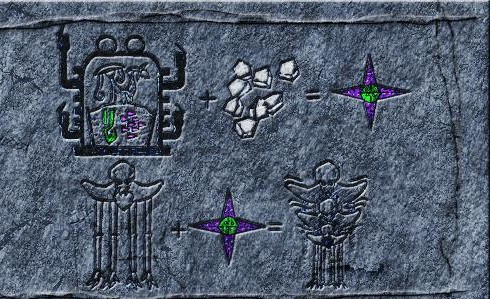
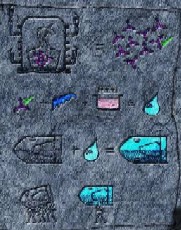
The Selenite will give you information about moving your shell. When you are done chatting, turn left. Use your level two key on the slot on the wall. Click on the statue. When it falls on the ground, pick it up. In your inventory, break it further using your iron bar. You will end up with sodium chloride and a shattered bust. Use the glue on the shattered bust. Put the repaired bust back in place. Combine the sodium chloride with Xulmi’s crystalline powder. You will complete Xuldakir’s Star.
Return to the area where you can add things to Selenite food. There is a lever to the right of the food mixer. Click on it to pump in water and cleanse the effects of wine. Now combine yellow fruit, green fruit, and your cooking pan. Cook the mixture on the lava fountain in this room. Mix the cooked meal into the Selenite food supply. Go back to the elevator and return to the floor labeled “light, truth, wisdom.”
The Selenite technician will now be extremely energized because of the food you mixed into the supply. He will be too busy to even notice you. Enter his room to take several items. Take the shovel to the left. Take three portions of blue ore. Use your empty can on the acid vat to take some azotic acid. Mix the azotic acid with the plugged-up conch shell. You will end up with the fabled Belbaab conch that lets you understand all creatures. Fill the can with azotic acid again. You will need it one more time.
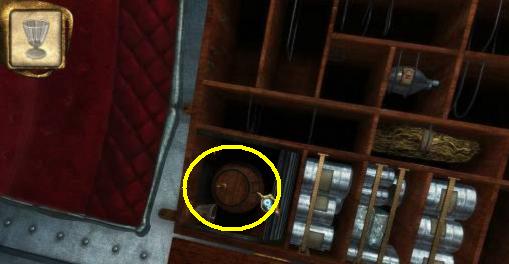
To the right side of the room, there is a closed cabinet. Click on it to open it. Inside you will find a belt, a handle, a leakproof globe, an ax, and a cogged cylinder. You can take all of these items.
Now return to the top floor of the Selenite caves. The floor is labeled “Planet Earth”. When you get to the top floor, follow the corridor until you get to a large broken machine.
Take the funnel from your inventory and put it on the pipe sticking out of the left side of the machine. Use your can of azotic acid on the funnel. For now, we cannot get the machine fully operational. However, using these items not only solved part of this puzzle, but also emptied your can. You will no longer need azotic acid in the game. But we do need to fill the can with a different substance from the Hall of Antiques.
Part X – The Hall of Antiques
Go back to the elevator. Use your level 2 key to activate the elevator. This will grant you access to the bottom floor. When you get to the bottom floor and exit the elevator, you will see a device in front of you.
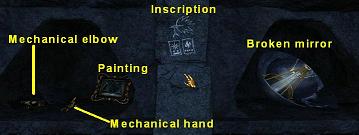
Use Xuldakir’s Star on the device. Ardan will shrink down to a smaller size and run through the opening on the right. Now you are in the Hall of Antiques. Move forward once and look at the items on the left. Click on the image on the wall. Ardan will take a copy of the inscription. It is a hint for a later puzzle. You do not necessarily need them, but you can take the mechanical elbow, mechanical hand, and the painting. You have to take the broken mirror.
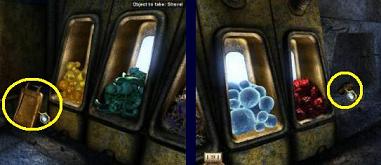
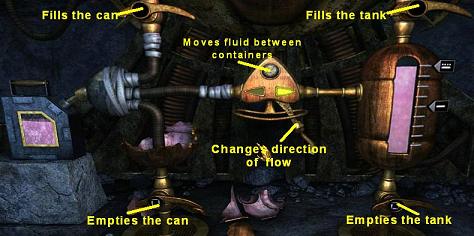
When you are done picking up the items, turn around. You will see a machine that can provide Klipsaggt’s essence. If you will remember the recipes from the Selenite laboratory, one of them had called for a purple liquid. Over the illustration of the purple liquid, the Selenite number 3 was inscribed. Using this clue, your goal is to fill your can with three portion of the yellow liquid. You can use the following instructions to complete the task:
| - | Use your can on the hotspot to the left of the machine. Ardan will place the can here. |
| - | Use Zubdssik’s greasy amalgam on the lever at the center of the machine. Now the machine is fully operational. |
| - | Click on the lever on the top left. The can will be filled with four portions of liquid. |
| - | Click on the lever at the middle. Now click on the button right above the middle lever. The liquid will be transferred to the tank. |
| - | Click on the lever on the top left. The can will be filled with four portions of liquid again. |
| - | Click on the button in the middle. The liquid will be transferred over. The tank on the right will now have eight portions of the liquid. |
| - | Fill up the can one last time. |
| - | Click on the button to transfer the liquid. The can will be left with three portions of the liquid. This is the right amount. Click on the can to take it back to your inventory. |
If you make a mistake, you can drain the can or the tank by clicking on the levers on the bottom left and the bottom right. If you do not have Zubdssik’s greasy amalgam, you can use this alternate solution to fill your can:
| - | Click on the lever on the top right. This will fill up the tank with nine portions of liquid. |
| - | Click on the button at the center of the machine. 4 portions of liquid will be transferred to the can. |
| - | Click on the lever on the bottom left to empty the can. |
| - | Transfer 4 more portions of liquid to the can by clicking on the button at the center. Empty the can. The tank should now have one portion of liquid. |
| - | Transfer the remaining liquid from the tank to the can. |
| - | Fill up the tank with 9 portions of liquid. Transfer liquid to the can. This will leave 6 portions in the tank. |
| - | Empty the can and transfer four portions of liquid from the tank to the can. |
| - | The tank should now have 2 portions of liquid. Empty the can. Transfer the liquid from the tank to the can. |
| - | Fill up the tank with 9 portions of liquid. The can should already have 2 portions. Click on the button to transfer 2 more to the can. The tank will be left with seven portions. |
| - | Empty the can. Transfer 4 portions of liquid from the tank to the can. The tank is finally left with 3 portions. |
| - | Empty the can. Transfer the 3 portions from the tank to the can. This is the correct amount. Take the can back in your inventory by clicking on it. |
Now that you have the right amount of liquid and all the other items, you can leave the Hall of Antiques. Walk up to the door. Click on the lever to the left of the door to open it. Get back on the elevator and head to the food floor.
Part XI – More Jobs for the Purifier
To complete the next section, you will need Ardan to eat more of the yellow and green mixture. If you do not already have enough in your inventory, take some green and yellow fruit from the food floor. Combine yellow fruit, green fruit, and your cooking pan. Heat the mixture on top of a lava fountain. You can find one at the food floor or at the laboratory. Use the cooked meal on Ardan.
Before you continue, restock your inventory with different types of fruit from the food floor. You will need some in just a moment.
Get on the elevator and go to the floor labeled “Go, come, enter”. When you arrive at the floor, exit the elevator and go to the left end of the corridor. You should see some explosive mushrooms falling from the ceiling. With the green and yellow fruit meal’s effect, they will appear to fall very slowly. Catch one of these mushrooms. Quickly use one these mushrooms on the leakproof globe in your inventory. Ardan will catch the spores of the explosive mushroom.
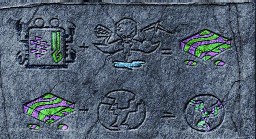
Go back to the elevator and return to the laboratory. Take a look at the collection of recipes to your right. It looks like we can make an item that produces air! We need one more item before we can completely finish this recipe, but you can at least complete the part of it that requires you to use the purifier right now. All you have to do is put a purple fruit in the purifier. The purifier will make Brozlyss concentrate. For now, just put the item in your inventory. We’ll complete the recipe later.
Take a look at the collection of recipes to the left of the purifier. It looks like there is a recipe we can use to create an explosive. Ardan could make use of the explosive to launch his shell. Use the following instructions to make some:
| - | You will need a purple and red plant. If you do not already have one, combine purple fruit with potting soil to make a purple plant. Combine red fruit with soil to make a red plant. Now combine the red plant, purple plant, and a piece of raffia. If you do not have any soil or raffia, you can find some on the far left corner of the laboratory as you face the water and lava supplying device. |
| - | Use the purple and red plant on the purifier. You will end up with Prultuuk’s crystalline powder. Take it from the purifier and put it in your inventory. |
| - | Combine Prultuuk’s crystalline powder with the explosive mushroom spores trapped in your leakproof globe. Ardan will make Prulmis’s explosive mixture. |
The recipe collection on the left also indicates a mixture that seems to make objects lighter. Use the following instructions to prepare the item:
| - | Combine potting soil with purple fruit to make a purple plant. |
| - | Use the purple plant on the purifier. The machine will make Klisgaal’s isotopes. Take the prepared item. |
| - | Turn around and use Klisgaal’s isotopes on the weighing machine. You need to determine the lightest isotope. |
| - | You can complete the puzzle with two weighing operations as follows: |
| | Put three isotopes on the left tray. Place three isotopes on the right tray. Conduct your first weighing operation. The two sides will either match in weight, or one side will be lighter than the other. If the two sides match in weight, the correct isotope must be one of the three that you didn’t weigh. If one side was lighter than the other, you know one of the isotopes on the lighter triplet must be the lightest one. Either way, you will have identified a set of three isotopes that contain the lightest. |
| | Now put any one of the isotopes from the lightest set on the right tray. Put another isotope on the left tray. Conduct your second weighing operation. If the weights match, the only remaining isotope must be the lightest. If one of them is lighter than the other, you will have also identified the lightest isotope. |
| - | Now that we have isolated the lightest isotope, we can finish making the item. However, once you complete the item you will have a limited amount of time before you have to use it. Therefore, we will first get to the area where you need to use the item. |
Go back to the elevator and take it to the floor labeled “Go, come, enter.” Go right as you exit the elevator and stand in front of the dial to open the door. Exit the caves. Before we proceed, walk up to the organ. Use your second level lunar key on the slot next to the panel showing the Selenite positions. Now, if you use the summoning song again, after you press the two starter notes, the correct note will be highlighted on the organ. This should make it easier for you to complete the song.
Also walk up to the dial next to the yellow fruit patch and in front of the steps. If there are Selenites blocking your path, use the summoning songs to send them inside the cave as needed. Once you do make it in front of the dial, look up and use Zubdssik’s greasy amalgam on any one of the red dots. Now you can move the dial. Click on the first red dot from the left. This will mean that the dial will now require only a single creature to stand on it for the doors to open. Thus, Ardan alone will be able to stand on the scale and open the door. You will not need to use the Selenite summoning songs again.
Part XII – Transferring the Shell & Completing an Investigation
Now that we made it easier to get back to the caves, let’s move forward. Jump to the top of the stairs leading to the dial. Make your way to the highest point of the hill. Jump towards the purple and green portion of the forest. Turn to the left, face your shell and jump towards it. Walk up to the shell.
Enter the shell and turn towards the rooster. Now that you have the Belbaab conch, you can talk to the rooster! The rooster will explain the missing details about Barbicane and Nicholl’s deaths. This will accomplish one of the Supreme Ruler’s orders.
When you are done talking to the rooster, walk out of the shell. Combine the lightest isotope with a blue fruit and the three portions of essence of Klipsaggt in your can. Ardan will make Klipso’s lightening paint. This mixture can be used to make Ardan’s shell lighter. Use the paint on your shell. Now use the iron bar on the rock next to your shell.
Ardan’s shell will fall into the chasm. Return to the caves. Take the elevator to the top floor.
Part XIII – The Telescope Pointed at Earth
Once you get to the top floor, follow the corridor until you get to a room with a massive machine on the right. Unfortunately, the machine is broken so we’ll have to repair it. Take the hopper to the right of the machine. Take the ax in front of the machine.
If you had not done so earlier, take the funnel from your inventory and put it on the pipe sticking out of the left side of the machine. Use your can of azotic acid on the funnel. You can find the azotic acid in the technician Selenite's room. You will first have to feed him the yellow and gree fruit mixture. He will become energized and will not notice you fill your can with azotic acid.
 Use the hopper on the hotspot to the left of the machine. Now use blue ore on the hopper. In your inventory, combine a colored gear, ax, and cogged cylinder. This should create a cogged cylinder. Use it on the empty cogged cylinder slot on the machine.When you complete these steps, the left side of the machine should look like the image to the right.
You will also notice broken tubing at the bottom of the machine. Use Yrshnouff’s gluance at this hotspot. At the top portion of the machine a section is stock. Use Zubdssik’s greasy amalgam on this spot. You should have a handle in your inventory. Use it on the empty slot to the right of the machine. Click on the handle.
The machine finally works! You will notice the blue tubing underneath the handle fill with Lumen. Use your empty can on the Lumen to collect some.
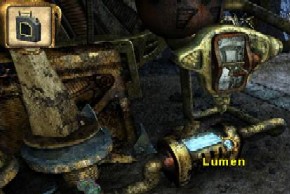
Combine the lumen with the Brozlyss concentrate and a blue fruit. Ardan will make Brozludjak’s oxygenizing preparation. You will need this item right at the end of the game.
Walk up to the broken mirror. Ardan will remark that the mirror is aimed at earth, but it is smashed. Use the control box on the hotspot around the middle of the broken mirror. In your inventory, combine the broken mirror from the Hall of Antiques with Yrshnouff’s gluance. The mirror will be fixed. Put the repaired mirror in place of the broken one.
 If you’ll remember, Ardan had seen a picture on the wall in the Hall of Antiques. He made a copy of the drawing in his notebook. The drawing had a picture of the mirror you just fixed. Click on the control box. You will see that the dials have the same ideograms as the drawing. Let’s adjust the dials to the settings indicated by the drawing. The left dial must be on the seventh position. The right dial must be on the fourth position. The machine will start functioning.
Once you fix the device, you will be able to communicate with Earth! Ardan can now request items from his friends on Earth. You do not need to request any items to complete the game. However, there is an optional request you can make to see some bonus content. If you are interested, follow the instructions on the next paragraph. If not, you can proceed to the next section.
Request “Some earth plants that I will try to acclimate to the moon.” Go back to the forest area. The shell should have landed at the blue and red section of the forest. If you look around, Ardan will see that cotton has merged with the blue plant. Take some lunar cotton. In your inventory, mix lunar cotton, the painting you took from the Hall of Antiques (the painting is called The Tunnel of Communication), and essence of Klipsaggt. The essence of Klipsaggt is the purple liquid from the Hall of Antiques. If you do not have any in your inventory, you will have to get more at the bottom floor of the caverns. When you combine the items, a new painting, Lumenplay in a Grotto will be revealed.
Part XIV – Returning Items to the Necropolis
The Supreme Ruler had ordered Ardan to do two things. His first task was to complete the investigation on the deaths of Barbicane and Nicholl. We completed this task by talking to the rooster. The second task was to return the items we took from the Necropolis. Now we can take care of this.
Leave the caverns and head to the blue and yellow part of the forest. Jump from the edge of the forest across to the lighted area. When you are next to the machines that deliver fire and water, note the patch of fertile soil on the ground. This is optional, but you can grow a lunar vine plant for a few extra points.
Combine blue fruit and potting soil in your inventory to make a blue plant. In your inventory, combine the blue plant, the vine plant you brought from earth, and raffia. This will create a Voracia-grape plant. Use the Voracia-grape plant on the fertile soil. A huge vine plant will grow. This will serve as a shortcut for climbing the mountain.
If you bothered to grow it, click on the new Voracia-grape vine to climb up the mountain. Otherwise, climb up the mountain by jumping from one edge to the other as you had done earlier. When you get to the spot where you can make colored wheels, if you do not have any left in your inventory, you can create one colored wheel. You do not have to have the item, but it can be used to open a shortcut to the caverns. You can use the images below as a point of reference.
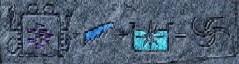
Climb up the stairs and return to the Necropolis. When you get to the barred doors, click on the control box to open the gate. Walk up to the sarcophagus we had raided earlier. Put the iron bar back on the left side. Put the leakproof globe on the bottom right slot. Place the lunar tool over the leakproof globe. Finally, place your level 0 key into the slot over the lunar tool. You can now leave the area.
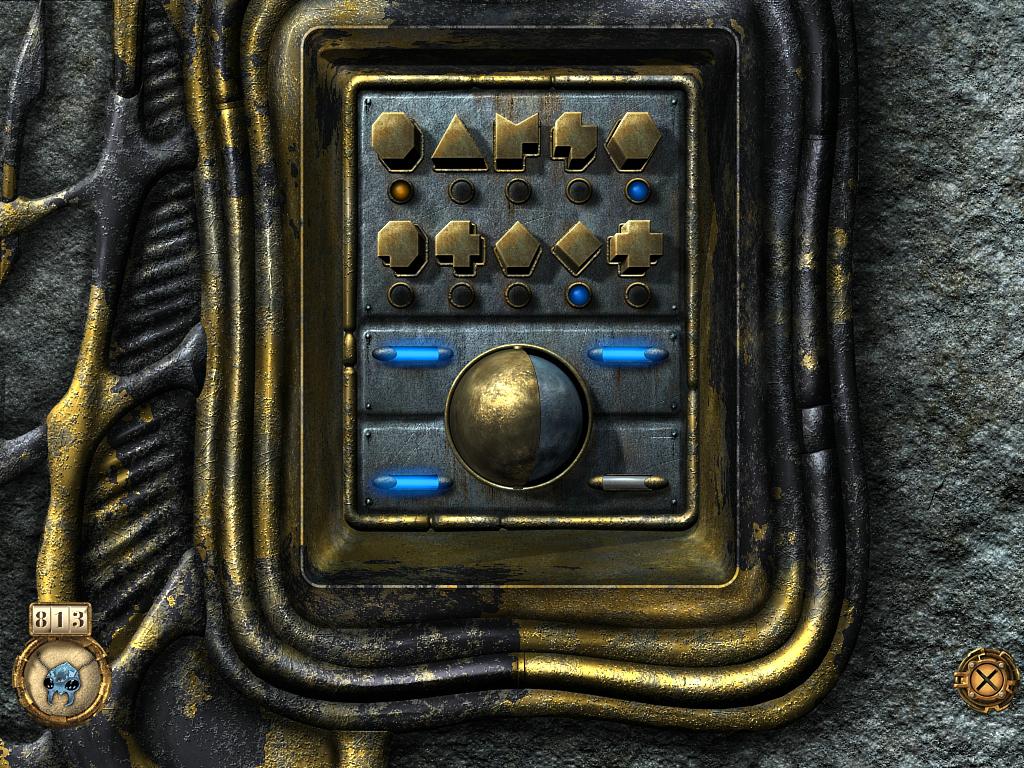
Walk back to the barred door. Before you can leave, you need to solve the second variation of the shape puzzle. The first time around, we had to add the number of sides. The second variation of the puzzle uses slightly a different logic. This time, two or three shapes will have lights underneath them. Add the number of the sides from the shapes that have red lights. Do the same thing for the shapes with green lights. Subtract the grand total of red sides from the grand total of green sides. The resulting number is the answer. Click on the shape that has the same number of sides as the result. You can use the following image to help you remember how many sides each shape has:
 You can use the image to the right as an example.
| - | In the example, the shapes with three and five sides have a red light. 3+5=8. |
| - | The shape with 12 sides has a green light. 12-8=4. |
| - | The shape with four sides, the diamond, is the correct answer. Click on the diamond to submit the answer. |
When you answer a question correctly, part of the golden cover will be removed. Answer questions correctly five times in a row and the door will open.
If you would like, you can try the third and fourth variations of the puzzle as well. This is completely optional, but it will earn you some extra points. It is recommended that you save the game before attempting the third and fourth variations to avoid getting stuck. If you just want to carry on with the game, continue from Part XIII.
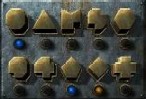 Exit through the door and come back in. The metal door will close behind you one more time. Click on the control box to start the puzzle. This time the puzzle will feature two different patterns. The first pattern involves multiplication and division. The puzzle will have some shapes with a blue lights and some shapes with a yellow lights. In the example to the right, the shapes with 8 and 5 sides have a blue light underneath. The shape with 4 sides has a yellow light. The correct answer is obtained as follows:
| - | 8x5 = 40 |
| - | 40/4=10 |
| - | Clicking on the shape with 10 sides is the correct answer. |
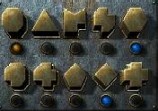 A second example for this pattern is the image to the right. Obtain the right answer as follows:
| - | The shapes with 6 and 4 sides have a blue light. The shape with 8 sides has a yellow light. |
| - | 6x4=24 |
| - | 24/8=3 |
| - | Clicking on the shape with 3 sides is the correct answer. |
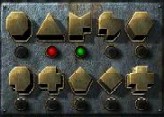 Occasionally, the third variation of the shape puzzle will also require you to add and subtract. The image to the right is an example. The answer is obtained as follows (Note that this works the same way as the second variation of the puzzle):
| - | Green light indicates a positive number. Red light indicates a negative number. In the image, the shapes with 3 and 7 sides are lit. 3 is red, 7 is green. |
| - | 7-3=4. Clicking on the shape with 4 sides is the correct answer. |
 Upon completing the third variation, leave the area and walk back in. The metal door will close. Click on the box to start the final version of the puzzle. The fourth and last variation is exactly the same as the third variation. The puzzle simply includes more numbers. Use the image on the right as an example for the addition and subtraction questions. The answer is obtained as follows:
| - | Shapes with 3, 9, 5, and 4 sides are lit green. The shape with 11 sides is lit red. |
| - | 3+9+5+4-11=10. Click on the shape with 10 sides to submit the correct answer. |
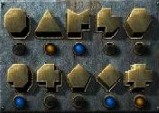 Use the image on the right as an example for the multiplication and division questions. The answer is obtained as follows:
| - | Shapes with 7, 9, and 4 sides are lit blue. Shapes with 3 and 12 sides are lit yellow. Multiply the numbers with blue lights. Divide the result by the numbers with yellow lights. |
| - | 7x9x4=252. 3x12=36. 252/36=7. Click on the shape with 7 sides to submit the correct answer. |
Once you solve the final variation, the door will start automatically opening when you click on the box. It is time to beat the game!
Part XV - Preparing the Shell for Takeoff
When you open the barred door by solving the shape puzzle, walk forward once. You will see a sealed door on your right. If you have a colored wheel, use it on the gears to the right of the door. When the colored gear is in place, click on the lever to open the door. You will have revealed a shortcut to the top floor of the Selenite caves.
If you do not have a colored gear and do not want to bother with making one, go back to the Selenite caves through the forest.
Once inside the Selenite caves, make your way to the floor labeled “To see, to know”. When you arrive, click on the key request bell. By now, you should have well over 500 points. In fact, you will be close to 900 if you followed the walkthrough. Since you completed the Supreme Ruler’s orders, he will grant you a level three key.
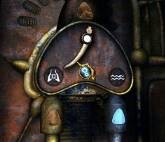 Take the key and return to the food floor. Talk to the Selenite guard. If he complains about not being in the right mood to chat, go by the machine mixing food. There is a lever to the right of the machine. Click on it to supply water to the Selenites. This should help the guard calm down.
When the guard agrees to talk to you, choose the third option: “I obeyed all your instructions to the letter! As you promised, now order the exiles to carry my shell to the cannon.” Your shell will be delivered to its new launch position. You will also be automatically transported to the room with the shell.
Select the Prulmis’s explosive mixture from your inventory. Use it on the table across from your shell. Go inside your shell. If you do not have enough in your inventory, take three pieces of raffia from the cabinet. Use all three pieces of raffia on the flame from the oxygen producing machine. This should produce the potassium you will need for the return journey.
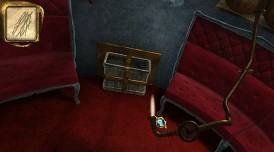
Use the protective shield from your inventory on the glass window on the bottom side of the shell. Use the bolts from your inventory on the corners of the protective cover. Finally, use the wrench on the bolts to tighten the cover.
Exit your shell. Use your level three key on the lock in front of you. There should be an open door to your left, leading to a dial and two levers. If the door is not open, you can open it by pulling the lever on your right. Walk into the adjacent room. Once inside, pull the lever on the ground to your right.
Before you adjust the dial and pull the lever attached to the dial, make sure you have potassium and Brozludjak’s oxygenizing preparation in your inventory. If you do not have these items, earlier parts of the walkthrough will help you obtain them.
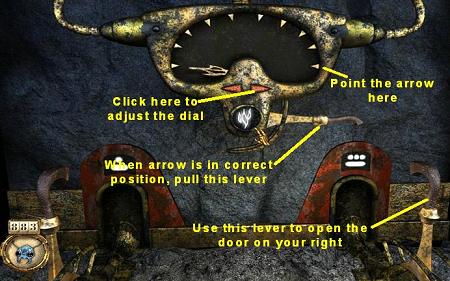
When you are ready, click on the small triangle pointing to the right. Keep clicking until the dial completely points to the right. Now pull the lever attached to the dial and next to the fire ideogram. Quickly pull the lever on the ground to your right. Return to your shell and close bottom window of the shell by clicking on it. In a few seconds, the shell will be launched.
Congratulations! You finished Voyage. Enjoy the surprise ending.
|