Valadilene
Hotel Lobby – Take the brochure on Valadilene from the bulletin board. The brochure will appear in examine mode. Read the whole brochure. Examine the bell on the front desk. Take the key to the right of the bell. Use the key on the figure of the man. Press the red button to ring the bell. Speak to the man at the front desk about the “Kate” topic. Close the dialog box. Click on Kate’s suitcases. She doesn’t want to carry them up. Speak to the man at the front desk again. Choose the topic “Help”. Learn that Anna Voralberg has died. That was the funeral procession you just saw. Kate is escorted to her room.
Hotel Room -- Click on the letter which is on the nightstand next to the bed. Take the letter & read it. Right click your mouse to access inventory. Click on cell phone. Click on the down arrow to get Kate’s office. Click on send to call the office. A conversation with the boss reveals you will get a fax from him so you can contact the local notary. Exit Kate’s room and go back downstairs. Speak to the front desk manager. Speak to him regarding the topic “mission” and he will give Kate her fax. Discuss all the other topics on the list starting with “mission” again. Go to the side of the room where Momo (the boy) was sitting. Take the 2 cogs from the floor. Examine the table. Take the 2 cogs from the table. Exit the hotel.
Street – When you exit the hotel, turn to Kate’s right. Continue straight. Speak to the man outside the bakery. Continue left until you see a big building with 2 benches in front of it. Take the newspaper off one of the benches. Read the newspaper. Go to the door. To the left of the door is an automaton mounted on the wall. Use Fax 2 on the automaton’s hand. Click on the lever in the middle of his body. Then click on the lever on his shoulder. The front door will open.
Notary’s Office – Enter the waiting room. Enter the 2nd set of doors. Click on one of the chairs to sit down. Speak to the notary about the first 2 topics. You will learn that Anna’s brother is still alive and is the rightful heir of the factory. Unfortunately, he is in Syberia. Kate will get the letter to read. The notary has left the key to the factory in the waiting room. Exit the office. In the waiting room, examine the desk. See the approval stamp on the desk. This will come in handy later. Go to the front door. Take the key from the coat stand. Exit the notary’s office. Go past the baker towards the hotel. Kate’s boyfriend Dan calls. After the conversation, move your cursor along the wall to the right. You should find the factory gate.
Factory Gate – Use the key on the top automaton. Wind the key on the bottom automaton. Click on the lever to open the gate.

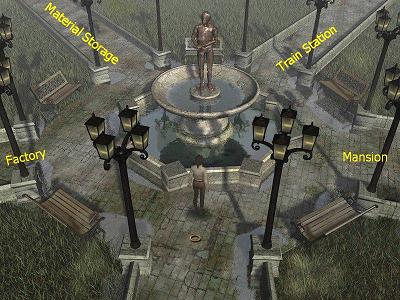
Go forward once. You will be at a 4 way intersection. Take the path that goes east.
Anna’s Mansion – Try to enter through the front door. It’s locked. Take the path to the back of the house. Examine the mechanical ladder. It needs a key. The back door is locked also. Keep going until you find the maze.
Maze – Enter the maze (For game play, it’s not truly a maze). Speak to the woman who is pulling weeds. You have 2 options. You can go straight or left. Choose the left path. Go straight and take the first right. Examine the water fountain. Take the key. Go back to where you started. You can take the straight path and examine the statue, but that’s all that is there. Exit the maze and go back to the mechanical latter.
Anna’s Mansion – Use the key on the mechanical ladder. Watch Kate climb up the ladder and into the window. You are in the attic now.
Attic – Go to the left (Kate’s right). Examine the desk. Take the bottle of ink and Anna’s diary. Read Anna’s diary. Go to the opposite end of the attic. Turn the light on by clicking on the light bulb. Kate will hear someone walking and exit that side of the attic. Momo has appeared in the attic. Speak to Momo. He wants a Mammoth picture and gives Kate a pencil and paper. He has a secret but won’t tell Kate until he gets his drawing. Go back to where the light bulb was. Examine the Mammoth carving in the wood on the wall. Use the paper & pencil on the carving. Go back and give drawing to Momo. Momo tells Kate to follow him to learn the secret.
Momo’s Secret – Make your way back to the entrance and exit to the street. Go past the baker and past the notary’s house. Keep going until you see Momo at a gate past the next group of houses. Follow him inside the gate. Go over the bridge and up the steps. Go up the next set of steps. You will be in a forest. Keep going forward on the path. Cross over the small bridge. Go past the boat until you see Momo. Speak to him again. Ask about all dialog topics. Go towards the river. Click on the cave across the way. The water is too deep. You will have to find a way to get across. Go back to Momo and climb the steps behind him. Try to pull the lever to lift the gate. It’s too hard to turn. Go back and ask Momo for help. Ask using the topic “Help”. Momo will push the lever, but it will break. Take the broken lever. Go back to the boat. Try to grab the oar. It’s too far away. Use the broken lever on the oar. Go speak to Momo about the topic “help” again. He will go get the oar and carry it for you. Speak to Momo again about “help”. Kate will ask Momo to help fix the dam. Momo will automatically fix it and raise the gate. Now you can cross the river and walk to the cave
Cave – Enter the cave. Go to the other side of the cave to find the mammoth doll. Take the mammoth doll. Exit the cave. Kate will get a phone call from her friend. Finish the conversation and go back in the direction of the factory. Exit to the street.
Church/Graveyard – Go past the hotel and continue up the hill. When you reach the graveyard, Kate’s boss will call to yell at her. Try to enter the front door of the church. It’s locked. Head to the right (Kate’s left). Stop at the elevator. This elevator will take you to the bell tower.
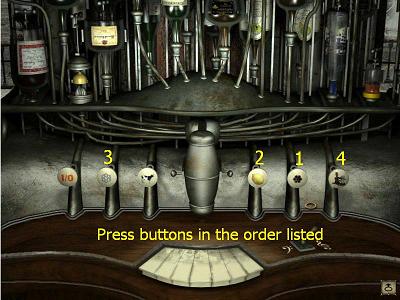
Bell Tower -- Examine the box next to the elevator. It looks like there are pieces missing. Remember that you picked up some cogs at the hotel. Place the cogs in the correct places. The “use” cursor will appear if you have picked the correct location. It should look like the picture below:

Pull the lever and Kate will use the elevator. Enter the room. Examine the automaton. You will see a slot on his back, but something is missing. Exit the bell tower.
Church – Continue on the path towards the back of the church. Enter the doorway at the back to the church office
Church office – Move towards the opposite side of the table. Examine the cross on the wall. You will see marks that show you that it moves. Click on the cross and retrieve the key. Exit out. Examine the chest of drawers with the winding mechanism on the side. Use the key on the keyhole. Open the first drawer and take the punch card. Open the 2nd drawer and take the punch card. Open the 3rd drawer and then turn the winding key on the side to reveal the back of the drawer. Take the winding key. Take the scroll and read the letter about how the priest found out that Hans was not actually dead. Click on the winding key again to close the back half of the drawer. Open the 4th drawer. Take the punch card. Open the 5th drawer and take the punch card. Exit out. Go back to the bell tower.
Bell Tower -- Use the purple punch card on the automaton. See cut scene of the graveyard and an automaton lowering his hat. Go to the graveyard.
Graveyard -- Take the straight path back to the Voralberg tomb. Examine the extended top hat. Use the key you got in the church office on the top hat. The tomb will open. Enter the tomb. Examine the tomb of Hans Voralberg. Click on it and Kate will pull it open. Examine the casket. Take the newspaper article and the strange cylinder. Exit the tomb and go back to the factory. As you cross over the bridge, make sure to say hello to the old man on the bench.
Factory – At the crossroads take the Southwest path to the actual factory. Go through the front doors. Head as far right (Kate’s left) as possible. Go past the robots and enter through the door. Enter the room and pull the cord at the right to start the wheel outside which powers the factory. Pull on the lever to the left. Exit the room. As you exit the room, you will hear that the power is definitely on. Go to the other side of the warehouse and go up the stairs. Enter the double doors on the first level. This is Anna’s office.
Anna’s Office -- Examine Anna’s desk. Examine the letter on the stake next to the ink automaton. Read the letter in the middle of the desk. Learn about the automaton locomotive that Anna has built for Hans. Examine the plans for the locomotive. Exit the desk and examine the bookcase in the center of the room. Click on the 2nd book from the right. The panel will flip and there is a small music box with a boy and girl on top. Use the cylinder you got from Han’s coffin on the music box. Watch a reenactment of what happened to Hans long ago. After the scene, the top of the music box pops off. Take it and exit the office. Go up the 2nd set of steps. Examine the controls. You can’t do anything just yet. Go back down the steps to the factory floor.
Factory Floor – Go to the left (Anna’s right). Continue straight and get a phone call from Kate’s mother. Go in through the door at the right. See the automaton hanging in the air. Go behind where he is hanging. Click on the lever that works the pulley. Go back to the front and speak to the automaton. Learn his name is Oscar and he was designed to drive a locomotive (must be the one Hans made). He is not completed and needs his legs. Speak to Oscar about all available topics. You must make his legs. Exit the room. Examine the automaton forklift. The forklift supplies material from the conveyer belt to the production line. There is no material here for the forklift to supply. You must find the material. Exit the factory and go back to the crossroads.
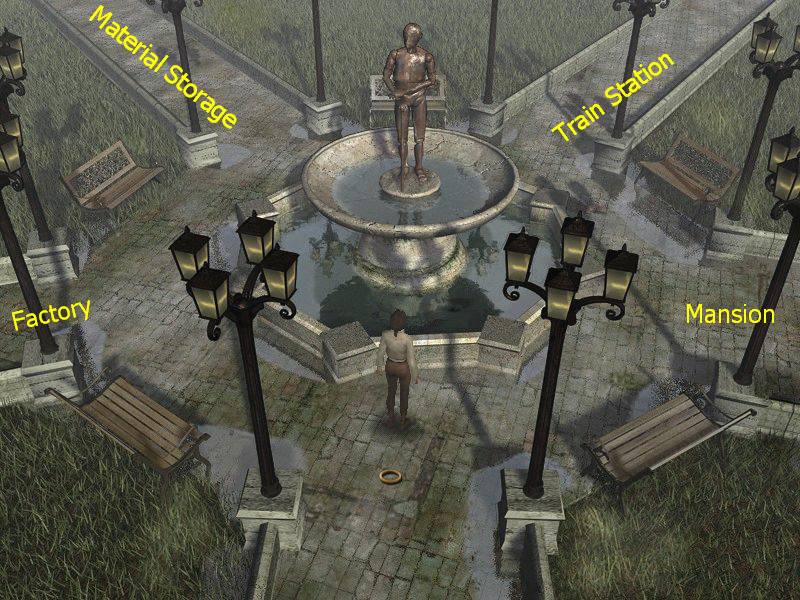
Material Storage – At the crossroads take the Northwest path. There is a lever on one of the steel supports. Click on the lever and a hook will come out and pick up the container of material. Go back inside the factory to where the forklift is.
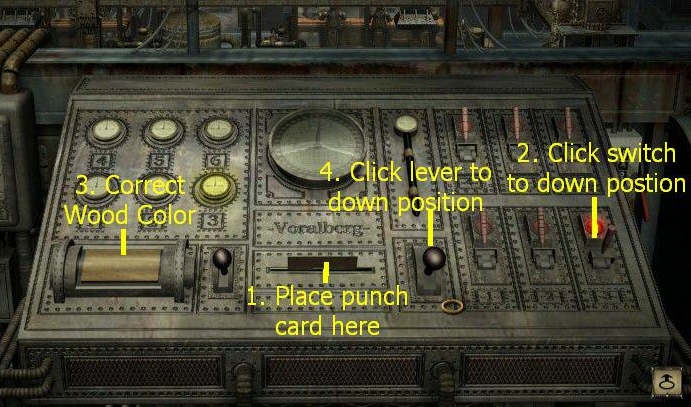
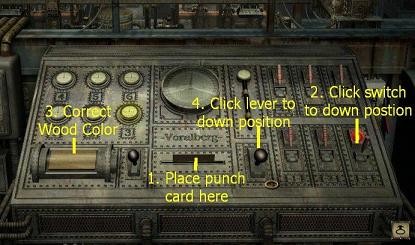
Factory Floor – Click on the forklift. It will take the material to the production line. Now you have to go back up the steps to where the control box is. In inventory, examine the brochure of Valadilene that you got from the hotel. You will see a sample of the correct wood color to use. Examine the control board. There are 6 switches on the right. On the bottom row, click on the one all the way to the right. A red light will come one. On the left side is the wood color switch. Click through the choices until you find the lightest slightly yellow one. Click on the middle lever and production will begin.
Go downstairs all the way to the right of the production line to get the legs. Go back to Oscar’s room and give him the legs. He will immediately leave to go run the locomotive. Exit the factory and go to the crossroads.
Factory Path Crossroads – Take the Northeast path to the train station.
Train Station -- Enter the station and continue forward. Across from the ticket booth is the train.
Train -- Step up onto the back of the train and enter through the door. Speak to Oscar and cover the 1st two topics. Oscar will tell Kate she needs a ticket and that the ticket office is now open. Exit the train.
Ticket Booth – Speak to Oscar in the ticket booth. Ask Oscar about the topic “mission”. He will give Kate a ticket to travel. He will also give Kate an authorization to release the train. Oscar leaves the ticket booth. Go back onto the train.
Train – Speak to Oscar about the “mission” topic. He will ask for the ticket. Give Oscar the ticket. Now Oscar tells you all the departure regulations have not been fulfilled. Give him the authorization for release. He tells you it is not signed. It has to be signed before he will accept it. Go to the notary’s office.
Notary’s Office – Examine the desk in the outer office. Use the train release on the pad. Click on the stamp’s head. Use the ink you got from the attic on the stamp’s open head. Click on the red button to authorize the document. Take the approved document and go back to the train.
Train – Give the approved release to Oscar. Oscar takes it but then does nothing. Speak to him again about the mission. He wants Kate’s ticket again. Give him the train ticket. Again, he won’t accept the ticket. Kate still hasn’t fulfilled all the departure regulations. In the luggage compartment are 3 spaces that require 2 very important objects. Go to the back of the train. In the middle of the room is a pedestal. Place the music box top on the pedestal. To the right is another empty place. Use the mammoth doll on that space. Examine the cabinet. There are 4 empty spaces. Place the 2 cylinders into any of the open spaces. Go back and speak to Oscar about the mission yet again. He will ask for the ticket. Give it to him and then scream as he refuses again. The train needs to be wound. Exit the train door. Take the opposition direction off the back of the train. Find the winding mechanism. Turn the wheel, and then pull the lever. It will wind the train. Then, turn the wheel again. Get on the train and give Oscar Kate’s ticket. Oscar will finally begin the journey. Watch cut scene of the train’s journey to the next stop.
Barrockstadt
Train -- Walk to the front of the train and speak to Oscar. The train needs winding, but Oscar will not go outside due to the humidity level. Cover all conversation topics. Exit the train to the left (Kate’s right).
Train Station -- Go to the right (Kate’s left) Continue walking forward and down the steps until you see what looks like a huge wall with a winding mechanism. Kate will need to find a way to get the train moved up to the wall. Return to the train area. As you approach the train, Oscar will call out to you. Enter the train to speak to Oscar.
Train – Oscar tells you that the rectors of the university have requested a meeting. Exit the train at Kate’s right again.
Train Station -- Go forward and you will be on a bridge of sorts. Walk up the steps away from the train. Go through the open door. Walk straight ahead and up the steps to go to the university. Continue forward to the university entrance. You can talk to the guy out front. He wants to party with Kate. Enter the university.
University -- Once inside the university, turn left and walk to the 2nd set of double doors and enter the rector’s office.
Rectors Office – Go forward and speak to the three rectors. After they babble amongst themselves for a while, cover all topics on your notepad. You need to find a way to move that train as fast as possible. Exit the rector’s office.
University – Go straight across to the opposite end of the university. Speak to the Professor Cornelius Pons. He remembers Hans and bonded with him over mammoths. He tells Kate about the bandstand in the square that Hans created and that Hans spoke about a Mammoth doll. Exhaust all subjects. The professor will suggest you check out the library which is the first door on the other side of the university.
Library – Circle the top level until you find a ladder you can climb. Take the yellow book that is upside down. Read about the sight enhancing properties of the Yangala-Cola mushroom. Go down to the lower level of the library. There is a blue book on the edge of one of the desks. Take it and read it. The book talks about the Amerzone and the Red Amerzone Cuckoo. The Cuckoo has a passion for Sauvignon grapes but they make the birds drunk. The university seems to have cultivated these plants somewhere on the premises. Keep this in mind for later. Exit the library and go back to the train station.
Train Station – Instead of walking over the bridge, turn to Kate’s left. Continue straight and go down the steps. See a tug boat ahead. Speak to the couple on the boat. Cover all topics. They will tow the train if Kate opens the locks blocking the barge and pays $100.00. Exit the area and go to the opposite end to find the lock control. Examine the panel in the middle. You need a key to open it. Read the sign on the right. Exit out. In inventory, click on Kate’s cell phone. Enter 27666742 on the phone’s keypad. Press send. You are connected to the East Lock Control Center. This is an automated system. Press the # key. Press 4 for Barrockstadt lock. Press 2 to lower the water level. Press *. After going through all this Kate finds out the technician is on vacation and the control panel should be operated manually. Figures. Go back to the train and get the mammoth doll. Exit the train on the side closest to the university exit. Go to Kate’s right. Go over the steps and continue until you see the stationmaster. Speak to him about all topics. Learn about the Amerzone bird eggs that have been building up and about the broken eagle automaton that normally collects the eggs. Pick up the hook lying near the water. Go back towards the train, but take the bridge that crosses over the train. Go to Kate’s right. Try to climb the ladder. The birds will try to bite Kate. Go to see the rectors again.
Rectors Office – Ask first about Sauvignon and money. They agree to pay you if you fix the bandstand.
University – Go to the other side of the university and speak to Professor Pons again. Ask him about Sauvignon. He tells you to speak to the stationmaster who is also the greenhouse keeper. Use the mammoth doll in inventory on the professor. He is thrilled and will give it back to Kate after his seminar. He will phone Kate when the seminar is about to start. Notice that the door to the right is now open. This is the laboratory. Go inside.
Laboratory – Examine the cabinet next to the door. Take the voice cylinder. Examine the table at the front of the room to the right of the professor. Take the test tube holder and the Yangala-Cola powder. Go outside to the front of the building.
Front of University – Go around the bandstand until you find a door with the examine cursor. Upon examination, you will see a scale with an egg on one side. It looks like you need something to even out the scale. Exit and go back to the train station. The station master mentioned something about eggs.
Train Station – Walk onto the bridge and speak to the stationmaster again. He will refer you to Professor Pons again. Professor Pons tells you to speak to the rectors.
Rector’s office – Speak to the rectors about the Sauvignon plants again. They let it slip that there is a garden behind the station and Professor Pons uses the plants to make wine for them.
Laboratory – Speak to Professor Pons about the sauvignon plants. He now admits the truth. Go see the stationmaster again.
Train Station – Speak to the stationmaster about the sauvignon plants. He will now open the gate to the garden. Use the bridge that crosses over the train and follow the garden path. The door to the garden is now open.
Garden – Enter the garden and follow the path forward as far as you can go. There are 2 bushes in front of you. Take some Sauvignon grapes from the left bush. Exit the garden and go back to the ladder in the train station.
Train Station – Find the ladder with the birds hovering around it. Use the Sauvignon grapes on the birds. They will leave the ladder. Climb up the ladder. Examine the eggs on the automaton eagle. Use the test tube holder that you got from the laboratory on the reddish colored egg. Go back to the train. Do not enter the train from the side you are on as the game will crash. Use the bridge to go around to the other side.
Train – Go to the back of the train where the music box is. Use the voice cylinder you found in the laboratory on the slot below the music box. After watching the message from Anna, Kate will automatically put the cylinder away on the shelf. Now it’s time to fix the bandstand. Go to the university. As you go over the bridge, the station master will stop Kate and apologize. He gives her a bottle of wine.
Outside University – Find the scale again on the bandstand. Use the reddish egg on the scale. Then click on the wheel to open the door. Climb down the stairs. See the large mechanism. Pull the lever on the right to start the bandstand. It works now. Kate can collect her money from the rectors.
Rectors Office – Speak to the rectors about the topic “money”. They give you the money. Exit and go see the couple on the tug boat.
Train Station – Use the money with the people on the boat. In finishing the conversation about money, they throw Kate the key to the lock mechanism. Pick the key up from the ground; go up the steps and straight across to the lock mechanism. Before Kate can get there her mother will call. Finish the conversation and keep going to the lock mechanism. Examine the panel in the middle. Use the lock key you just obtained to open the panel. There is a keypad just like a telephone. Enter the same commands you did on the cell phone. So, press 4 (for Barrockstadt) and 2 (for lower the water level). Then, press the * key.
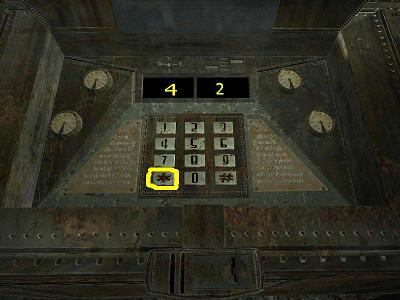
The water level will lower and the gate will open. Go back and talk to the couple. Talk to them about the topic “Lock”. They will guide the boat through and meet you at the train. Go back to the lock mechanism and enter 41* to raise the water level again. Go over the first bridge and go to the front of the train. You will see the boat there. Talk to the couple. They will throw a chain for Kate to attach to the train. Use the hook from inventory on the chain and Kate will automatically attach it to the train. See it being tower to the big wall. Follow the train. Professor Pons will call to tell you the lecture is starting. Go to the university. You will need the mammoth doll back.
University – Enter the university. Click on the large mammoth skeleton right in the center. You will be able to see the staircase. Climb to the top of the stairs to the lecture hall.
Lecture Hall -- As you walk forward Professor Pons will call out to you. Kate will learn about the Youkal tribe who have been around since the ice age and migrated along with the mammoths to Syberia. There is a legend that mammoths are still in Syberia and have been cared for by the Youkals this whole time. When the lecture is over, exit the lecture hall and go to the laboratory.
Laboratory – Speak to the professor. Talk about the topic “mission”. Take the mammoth doll and the lecture information. Read about the ark legend of the mammoths. Exit and go to the train.
Train – Walk through the train to get to the other side of the train. Turn the wheel on the winding machine and pull the lever. Kate’s phone rings. It’s Dan, the annoying boyfriend. Get on the train and put the mammoth doll back in its place. Speak to Oscar about as many topics as you can starting at the top. Everything is ready and the train begins its journey. But, it doesn’t get far. It stops at the wall. Exit the train at Kate’s left. There is a ticket office next to the train.
Ticket Office -- Click on the speak icon. Oscar will appear in the office. It seems you must have an exit visa. You can try discussing the topics, but you will not get very far. Walk around to the back of the office. You won’t be able to get in the door at the back, but you can walk up to the tower door and enter.
Tower – Climb the steps. Kate’s friend calls. Go to Kate’s right and cross over the train. Enter the door. Talk to Captain Malatesta who is the border control chief. Talk about all available topics. Find out the Hans created the locking mechanism on the gate. The Captain will not let you through because he sees the enemy through his telescope. Finish the conversation. Examine the telescope. Click on the right red button twice. You will see that the enemy is just a dead tree. Speak to the captain again about the topic “mission”. Examine the Captain’s desk. Use the Yangala-cola powder on the left wine glass. Then use the wine on the left glass and both will be filled. Exit the desk and Kate will offer the wine to the Captain. The captain will look in the telescope again and see that the enemy is a tree. He gives Kate the visa. Go back to the ticket office.
Ticket Office – Use the exit visa on the ticket office. Oscar gives Kate a ticket. Get on the train. Speak to Oscar. He will ask for Kate’s ticket. Give Oscar the ticket from inventory. The train will set off to the next location.
Komkolzgrad
Train Station – Exit the train and walk towards the front of the train. Speak to Oscar. He, yet again, will not get off the train due to the outdoor conditions. Continue forward to see a door with a red light over it. It’s locked and Kate must find a way around it. Walk towards the opposite end of the train. See a lever in the ground near some crates. Pull the lever and an elevator will rise to the surface. Enter the elevator.
Mine – Walk forward and examine the generator on Kate’s right hand side. It’s missing the spark plug. You won’t get any further until you find one. Enter the elevator again and pull on the lever. Exit the elevator and walk towards the front of the train. Keep going until you reach the large automaton.
Automaton – Climb the ladder. Examine the control panel to the right. It’s missing a lever. Examine the shelf above the bed. Take the voice cylinder, control panel lever and the drawing. Examine the control panel again. Use the lever on the middle of the panel. Click on the lever to move it up one time. Wait until the automaton moves forward. Then click on the lever to move it up again. The automaton will now be straddling the train. Press the red button on the control panel and the train will be wound. Click the lever to the down position twice to move the automaton back to its original position. Exit the automaton. Go to the train.
Train – See a man running out of the train and into the door with the red light over it. Run to the train. Oscar is no longer standing in the doorway. Enter the train and go to the bedroom in the back of the train. Kate will find Oscar tied up. Click on Oscar’s mouth to remove the gag. Someone attacked Oscar and stole his hands. Speak about all topics to Oscar. Take the metal sheers left on the floor by the attacker. Go into the next room and use the cylinder on the music box. See another letter from Anna to Hans. Exit the train and go to the large automaton again.
Automaton – Climb the ladder. Examine the control panel and move the lever to the up position once. Exit the automaton. There is a ledge directly across from Kate. Click on the ledge to have Kate jump on to it. Examine the hole in the wall. It’s a bit too small for Kate to climb through. Perhaps we can make it bigger. Use the metal shears on the hole. Enter the storage room.
Storage Room – Move forward to the other side of the storage room. Examine the shelves on the left. Take the spark plug. Examine both windows to see the factory. Exit the storage room the same way you came in. Jump across to the automaton and climb the ladder.
Automaton – Examine the control panel. Click the lever to the down position to move the automaton back to its original position. Exit the automaton.
Mine – Enter the elevator to descend into the mine again. Examine the generator again. Use the spark plug on the generator. Click on the lever right below the spark plug and the generator will turn on. You now have lights. Continue straight into the mine, past the television screen until you reach another elevator. Enter the elevator.
Factory – After exiting the elevator, turn to Kate’s left and walk until you see steps leading up to a huge pipe organ. Climb the steps and examine the automaton. Take the screwdriver. Exit and go back to the elevator. See a steel door. Click on the panel to the left of the door to open it. Walk through the door and see that this is the red light door entrance. Go back inside and turn to Kate’s right. Walk around the corner. Examine the steel plate attached to the ladder. Use the screwdriver on each of the screws to remove the plate. Climb the ladder. Enter the door on the left.
Serguei’s Office -- See a man sitting in front of a large panel with monitors on it. Speak to the Serguei Borodine to find out why he stole the hands. He took them to complete his theater so he can lure back a certain Helena Romanski who is a renowned singer he is obsessed with. Speak to him about all topics. He will give Kate back the hands only if she can locate Helena and bring her back. Exit the office and climb back down. To the right is another small office with a door. This must be the Helena memorial room.
Helena’s Room – Walk all the way to the back and examine the open drawer of the table. Take the scrapbook and read it. Read about how she sang with her great friend Frank Malkovitch. That’s the same man Kate’s mother is seeing. Exit out of the scrapbook and take the letters from the drawer and read them. In inventory, right click on Kate’s cell phone. Use the bottom arrow to scroll down to “Mom”. Press the send button to call Kate’s mother. Frank remembers Helena being very ill and going to a place called Aralbad. Exit Helena’s room and climb the ladder to Serguei’s office again.
Serguei’s Office – Speak to Serguei. Speak to him about the topic “Aralbad”. Then, ask about the “mission”. He will tell Kate about the soldier guarding the space compound. Perhaps you could get a vehicle there. Kate has to use the monorail outside Serguei’s office. Exit Serguei’s office and enter the monorail.
Space Compound – Enter the compound. Climb the staircase. See a large spaceship like structure. Walk to the right of the spaceship. See a small set of stairs and an open round door.
Boris’s Quarters -- Enter and see man drinking vodka. This is Colonel Boris Charov. He’s completely drunk and doesn’t seem to be able to help much. Speak to him about all topics. Behind him is a full bottle of Vodka on the floor. Take the bottle. Boris will stumble off to find more and fall down outside. Enter Boris’s quarters again. Examine the cabinet to the right of where the Colonel was sitting. Take the key. Take the letter and read it. It seems Hans was definitely here at one point. Exit.
Space Compound -- Examine a control panel right in front of where the colonel is lying. Use the key you found to turn it on. Click on the horizontal sliding lever to move it left. The colonel will be moved to the left also. Click the left most vertical lever up once to move the colonel forward. Climb down the steps and go forward to where the colonel is lying. Turn the wheel on the left. Climb back up the steps and examine the panel again. Click on the right vertical lever to dump water on the colonel. He is now awake. Go back down the steps and speak to the colonel. Speak to the colonel about all topics. Learn about Souyouz, the golden eagle on site, Hans’ flying invention and an air ship that traveled to Aralbad. Walk past the colonel to the right. There is a large launch pad right in front of you. Walk to the right. Climb the steps.
Air Ship -- You are now in front of an air ship. It’s locked. Go back and speak to the Colonel about the topic “airship”. He will give you the key. Go back to the airship. Use the key on the door. See an automaton at the helm. Try to pull the lever to the right of the automaton. It doesn’t seem to do anything. Maybe the colonel can give you more insight. Go back and find the colonel. Go around the launch pad to the other side. Speak to the colonel. Go up the steps to the control station.
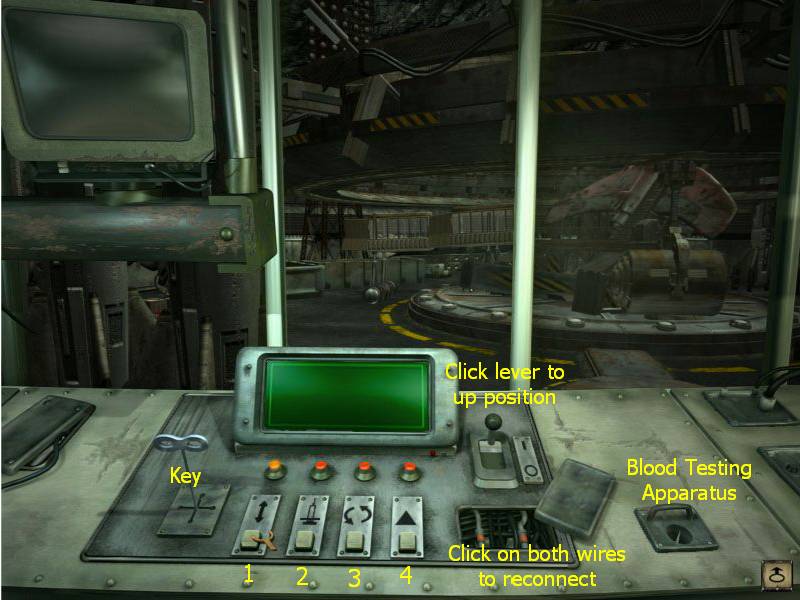
Control Station – Examine the panel on the right side of the room. There is a key lying to the left of the panel. Take it and use it on the panel. There is a lever on the right side of the panel. Right below it is another panel. Click on it to remove the cover. Click on each wire to re-connect it. Click the lever into the up position to turn on the machine. To the right of the wire panel is another panel. Click on it to take it. It is a blood testing apparatus. There are 4 buttons. Click the button with one arrow. Then, click on the button with the picture of a needle on it. It tells you it’s unauthorized. Click the first button again to lower the capsule outside. Exit out of the panel and the control station. Go down the steps and speak to the colonel. Use the blood testing apparatus on the Colonel. Once you have the sample, return to the control station. Examine the control panel again. Place the blood testing apparatus back into its original position. Press the button with the arrow first. Then press the button with the needle. The blood is rejected due to alcohol content. Click on the testing apparatus and Kate will use her own blood. Press the 3rd button with the 2 arrows on it. The colonel will radio to Kate to press the launch button. Press the 4th button. Right before launch, he tells Kate that she needs to wind something.

Space Compound -- Walk around the launch pad in the direction of the Colonel’s quarters. Pick up the crank handle from the ground. Go to the airship. It still doesn’t work. Maybe there are too many birds. Remember what the colonel said about the eagle? Go back to the first staircase where you came in. To the left of the spaceship is another set of stairs. Climb the steps and see the eagle behind Kate. To the right of the eagle’s cage is an air horn. Use the crank on the air horn. This is the signal to the eagle to rid the station of the other birds. Go back to the airship.
Airship – Enter the airship. All the birds are gone now. Pull the lever to the right of the automaton. Kate is off to Aralbad.
ARALBAD
Hotel Kronsky Lobby – Exit the air ship and enter the front door of the hotel. Speak to the man at the front desk. Speak to him about all topics. He’s not very helpful. He won’t let Kate see Helena or answer any questions about any of the guests. Go to the other side of the lobby. There is a narrow door along the wall behind the couch. Open the door and take the detergent. Kate needs to create a distraction. Go outside to the courtyard.
Courtyard – Use the detergent on the fountain. Go back inside and tell the receptionist about the fountain.
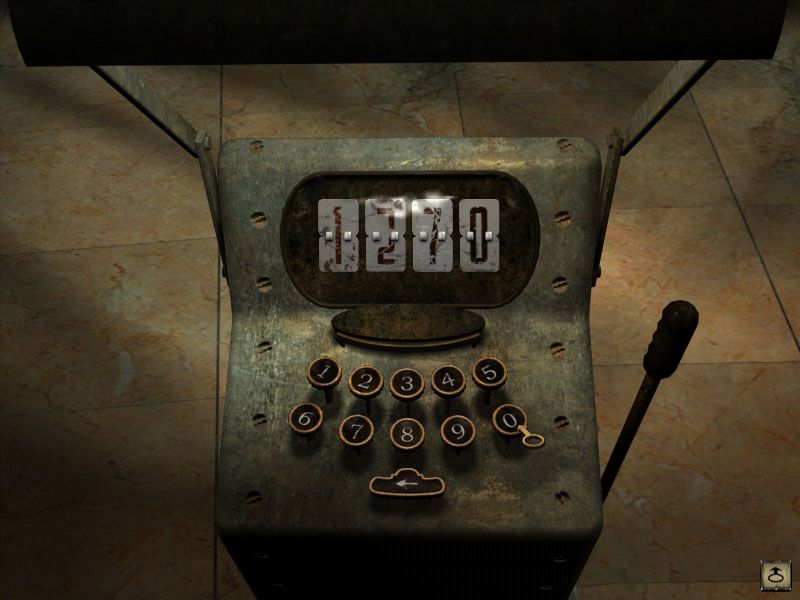
Lobby – Try to speak to the receptionist. He will not answer you. Ring he bell on the desk. He still will not help you. Go to the window and click on the drapes to open them. Go back and speak to the receptionist again. He sees the sudsy fountain and leaves to go clean it up. Now is your chance. Go behind the reception desk and examine the guest book. Note that Helena Romanski is listed as a resident with an access code of 1270. She arrived on 5/6/1981. Take the hotel brochure. There is a number written inside. Click on the red button to open the gate. Enter the gate. Note, if you click the button again, the door will lock again but you can just press again to open.
Pool Area – Go to the right and go to the other end of the room. Enter the hallway at the back. Take one of the glasses on the cart. Exit the hallway. Go to Kate’s right and enter the dining room.
Dining Room – See an automaton in the middle of the room. His name is James. He is the automaton nurse. Speak to him about all topics. Madame Romanski is outside on the pier. Exit and go to the pier door which is near where you came in. There is a control box that looks like a cash register. You will have to punch in four numbers and then pull the handle. From the guestbook, we saw that Helena’s access code is 1270. Enter 1270 and pull the handle.

The door doesn’t open. That’s odd. Exit the dining room and go straight across. This door was locked before and is now open.
Locker Room – Pick up the access card from the floor. Read the temporary code of 0968. Go back to the dining room.
Dining Room – Enter 0968 into the machine and pull the handle. The door to the pier now opens.

Hallway to Pier – Take the mask off the wall before exiting onto the pier. Kate will automatically put it on. Open the door.
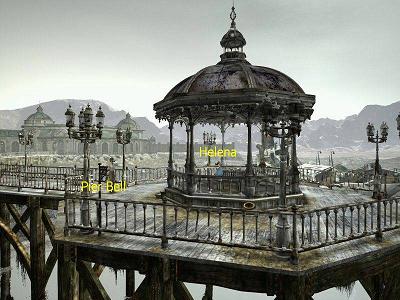
Pier -- Walk all the way down to the end of the pier. See Helena sitting at the end of the pier. Speak to Helena. She has a headache. She wants Kate to get her valet. Try to exit the location and the receptionist will show up and try to remove Kate. Helena speaks up and allows Kate to stay. To the left of where Helena is sitting is a bell. Click on the bell and pull the chain to ring it. James will not be able to hear it. Examine the bell again. Click on the actual bell to take it.
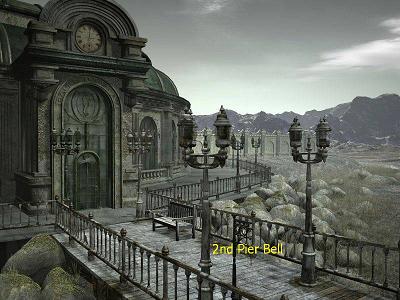
Walk to the hotel. When you enter the screen where you can see the front door clearly, there is a bell stand to the left of Kate. Examine the stand. Use the bell on the stand. Pull the chain to ring the bell.
Hallway to Pier – Click on the wall hook to remove the mask. Walk to the dining room.
Dining Room – Speak to James. Kate will tell him he can borrow her mask to go get Helena. Kate’s mother calls. At the end of the conversation, Helena is wheeled in. Speak to her about all topics. It turns out she can’t sing anymore. But she could if Kate can make a cocktail she once got in Paris at the Hotel Meurizt. Remember the hotel brochure you picked up at the front desk. Examine it in inventory. See the number 46433643 next to The Meurizt. Click on the cell phone in inventory and dial 46433643. Click on send. Kate asks for Mr. George. Unfortunately he doesn’t work there anymore. The current barman tries to help. He mentions a drink call the Blue Helena. He gives Kate the recipe.
Blue Helena Recipe
On measure of vodka
One measure of Blue Curacao,
One measure of Honey
A Dash of Lime and Ice Cubes
Shake
Note: The recipe you’re given states the use of lime. Do not bother looking for lime. You will use lemon instead.
Bar -- Open the panel on the bottom right side of the bar. Take the lemon and the honey. Take a look at the honey in inventory. It’s crystallized and may not work properly. Go out to the pool area. On the side of the pool are some men playing chess. To the right of them is a hot tub of sort. Try putting the honey in the water. It doesn’t seem to work. Maybe it’s not hot enough. Look behind the hot tub for a valve. Turn the valve and the water will heat up. Use the honey on the water. Go back to the bar.
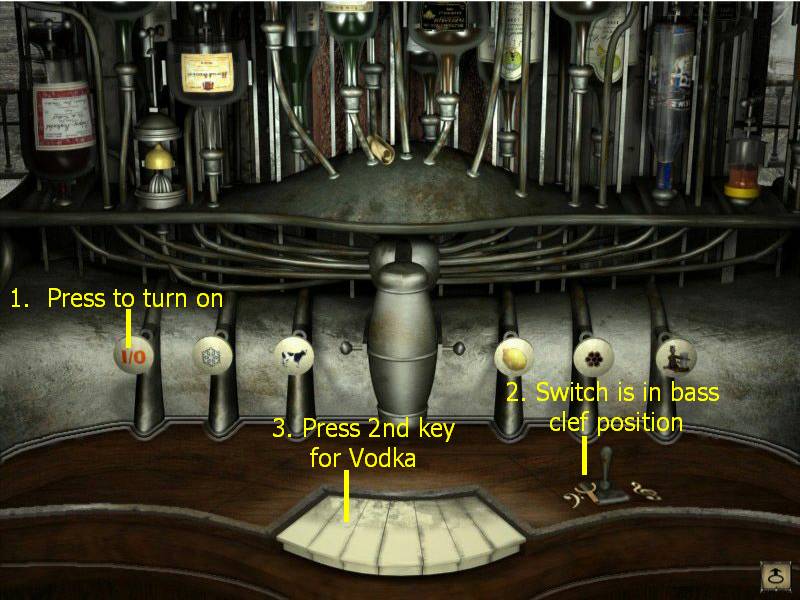
There are 7 notes on the keyboard of the bar. There are 3 open slots on the bar where you can put the 3 items you found. Starting at the left, place the lemon, vodka and honey into their slots.
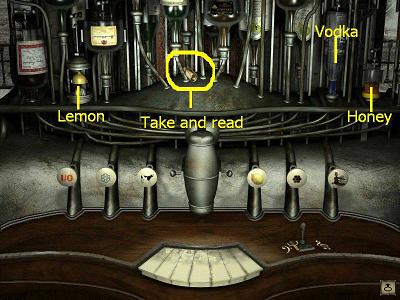
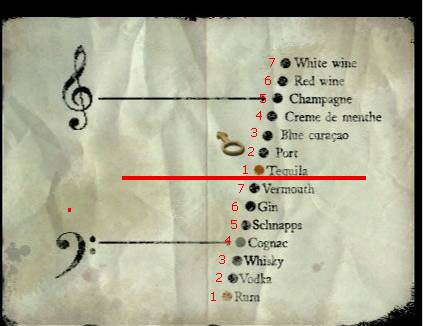
Take the rolled up piece of paper. It’s a musical score of liquor.
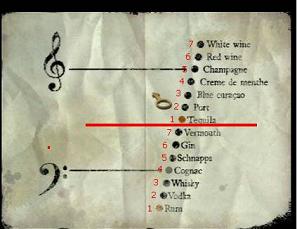
Starting at rum (1) and going up to Vermouth (7) are all liquors under the bass clef. Starting at Tequila (1) going up to White wine (7) are under the treble clef. This is important to know for the settings on the bar. If you look at your recipe, it includes Vodka and Blue Curacao. Vodka is listed 2nd under the bass clef and Blue Curacao is listed 3rd under the treble clef.
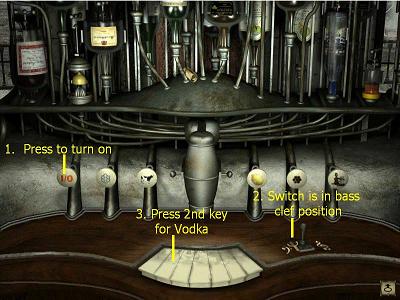
Click on the I/O button
Place the switch to the bass clef
Click on the 2nd key
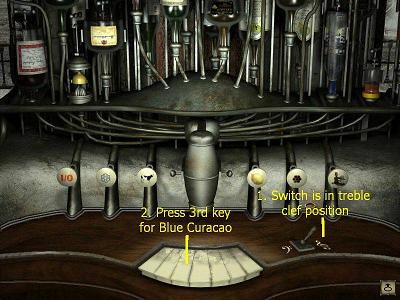
Place the switch to the right side – treble clef
Click on the 3rd key
Click on the button with a picture of a honeycomb
Click on the button with a picture of a lemon
Click on the button with a picture of a snowflake
Click on the button with a picture of an automaton
Helena drinks it and her voice is returned but she is doubtful of it. Speak to Helena again until James mentions she used to be able to break crystal with her voice. Place the crystal glass from inventory on the end of the bar. Speak to Helena again and she will sing until the glass breaks. She now believes in her voice and will travel with you. Return to the airship.
Air Ship – Enter the airship. Olivia calls. Apparently she called to tell Kate she cheated with Kate’s fiancé. How nice to know. After the conversation ends, Helena arrives to board the airship to go back to see Serguei. Watch Helena’s comeback performance. At the end of the performance, a cage drops from the ceiling around her.
Warehouse – Go up to the cage and speak to Helena. Examine the lock on the cage. Use the metal sheers to cut the lock off. Examine the piano automaton inside the cage. Use the screwdriver on the hands to remove them. Exit the cage and go down the steps. Move forward and Helena is waiting by the big door. Speak to Helena and Kate automatically opens the door. Helena steps in and another gate crashes down. Kate is trapped inside. Speak to Helena to give her Oscar’s hands. Now, Kate has to find a way out. Get into the elevator at the right which leads to the mine.
Mine -- Run forward to the elevator at the other end. Hear a blast go off behind you. Get to the elevator shaft and pull the lever. The elevator arrives but there is a bomb in it. Kate runs as the bomb goes off. Go back towards the elevator that just blew up. On the way, see a large pipe opening on the side. Use the pipe to crawl through to the outside. Run and get on the train.
Train – Go all the way to the front of the train to speak to Oscar. He is ready. Get on the train and get ready for departure. The phone rings. It’s Dan, the fiancé. End the conversation and exit the train. The train still has not departed. Speak to Oscar at the front of the train. There are large rods protruding from the huge automaton and the path is completely blocked. Go back to the mine entrance.
Mine Entrance -- One of the boxes near the entrance is now open. Examine the box and take the dynamite. Go back to the automaton blocking the train. Use the bomb on the leg of the automaton. Watch the cut scene of the automaton blowing up and the train taking off.
ARALBAD
Train – Exit the train. Walk to the front of the train and speak to Oscar. The train needs to be wound again. See the winding mechanism behind Oscar. Click on the wheel and then pull the lever to wind the train. Speak to Oscar again. He tells you to get seated on the train. Before you can move, the receptionist comes out to tell Kate a package is waiting for her at the reception desk. Go through the courtyard into the hotel.
Hotel Lobby – Examine the box at the far end of the reception desk. It is a small mammoth automaton. The phone rings. It’s Kate boss to yell at her again. End the conversation and the front desk phone rings. Helena wants to see Kate in the hotel bar.
Dining Room – Speak to Helena. She tells Kate the plane with the hotel supplies has arrived. Kate should go check it out. Walk outside to the pier.
Hotel Pier – There is an old man sitting on a bench. Speak to him. The boss calls again. Hans will speak to Kate again.
Watch the final cut scene.
|